How to Replace a Ceiling Air Vent
Replacing a ceiling air vent is a straightforward home improvement task that can enhance a room's aesthetics, improve air distribution, or simply replace a damaged or outdated vent. This article provides a comprehensive guide to safely and effectively replacing ceiling air vents. The process generally involves removing the existing vent, preparing the opening, and installing the new vent securely. Proper installation ensures optimal airflow and prevents drafts or air leaks.
Before commencing the replacement, it is crucial to gather the necessary tools and materials. This preparation phase will streamline the process and ensure a smooth and efficient installation. Furthermore, understanding the different types of ceiling air vents available will help in selecting the appropriate replacement that meets specific needs and preferences.
Safety should always be paramount when working with home fixtures, particularly those located on the ceiling. Taking necessary precautions, such as turning off the HVAC system and wearing appropriate safety gear, will mitigate potential risks associated with the task. Following these guidelines will result in a successful and aesthetically pleasing outcome.
Key Point 1: Preparation and Assessment
The initial step in replacing a ceiling air vent involves thorough preparation. This includes gathering the necessary tools and assessing the existing vent and the surrounding area. A well-prepared workspace contributes significantly to a successful and safe replacement process.
First, gather the following tools: a screwdriver (both Phillips head and flathead may be needed), a measuring tape, a pencil, safety glasses, gloves, and potentially a step ladder or sturdy chair to reach the vent. A utility knife may also be helpful for scoring any paint that is adhered to the existing vent. Having these tools readily available will minimize interruptions during the replacement process.
Next, turn off the HVAC system. This is a crucial safety precaution that prevents dust, debris, and potentially harmful substances from being blown into the room during the removal process. Additionally, shutting off the system ensures that no sudden bursts of air interfere with the installation of the new vent.
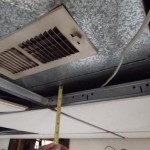
Now, carefully examine the existing vent. Note the type of vent (e.g., diffuser, register, grille) and its dimensions. Measure the opening in the ceiling where the vent is installed. These measurements are essential for selecting a replacement vent that fits properly. It is preferable to take multiple measurements to ensure accuracy.
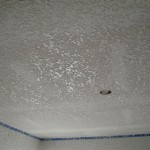
Inspect the surrounding ceiling area for any damage, such as cracks, water stains, or loose drywall. Address any underlying issues before installing the new vent. Ignoring these problems can lead to further deterioration and compromise the effectiveness of the new vent installation. If water stains are present, investigate and repair the source of the leak before proceeding.
Finally, determine how the existing vent is attached. Most vents are held in place by screws, clips, or friction. Identifying the attachment method will determine the appropriate removal technique. If the vent is painted over, carefully score the paint around the edges with a utility knife to prevent damaging the ceiling when removing the vent.
Key Point 2: Removing the Existing Vent
The removal process requires careful attention to avoid damaging the ceiling or the vent itself, especially if the intention is to reuse it elsewhere. The method used will depend on how the vent is attached, as identified during the assessment phase.
If the vent is secured with screws, use the appropriate screwdriver to remove them. Store the screws in a safe place, as they might be needed for installing the new vent or re-installing the old one. Once the screws are removed, gently wiggle the vent to loosen it from the ceiling. If it feels stuck, double-check for any remaining screws or paint adhering to the edges.
For vents held in place by clips, carefully insert a flathead screwdriver between the vent and the ceiling to release the clips. Apply gentle pressure and work around the perimeter of the vent until all the clips are disengaged. Avoid applying excessive force, as this can damage the clips or the ceiling. Some clips are spring-loaded and may require a specific technique to release.
If the vent is held in place by friction, gently pull it straight down from the ceiling. It may require some effort to overcome the friction. If the vent is particularly stubborn, try using a rubber mallet to gently tap around the edges to loosen it. Be careful not to damage the vent or the ceiling.
Once the vent is removed, clean the opening in the ceiling. Remove any dust, debris, or old insulation that may be present. This ensures a clean surface for the new vent to attach to and prevents contaminants from entering the HVAC system. A vacuum cleaner with a brush attachment is ideal for this task.
Inspect the ductwork connected to the opening. Ensure that it is in good condition and properly sealed. If there are any gaps or tears in the ductwork, repair them with duct tape or foil tape. This prevents air leaks and improves the efficiency of the HVAC system.
Key Point 3: Installing the New Vent
The installation of the new vent requires careful alignment and secure attachment to ensure proper airflow and a professional finish. Selecting the correct vent size and type is crucial for optimal performance.
Before installing the new vent, compare it to the old vent to ensure that it is the correct size and type. It is important to verify that the new vent covers the entire opening in the ceiling and that it is compatible with the ductwork. If the new vent is too small, it will not seal properly and air will leak around the edges. If it is too large, it may not fit properly.
Position the new vent over the opening in the ceiling. Align it carefully to ensure that it is centered and that the airflow direction is correct. Some vents have adjustable louvers that can be used to direct the airflow in a specific direction. Adjust the louvers to suit the room's needs.
If the new vent is attached with screws, align the screw holes with the existing holes in the ceiling. If new screw holes are needed, use a pencil to mark their location. Pre-drill pilot holes to make screwing in the screws easier and to prevent cracking the ceiling material. Use the appropriate screwdriver to securely fasten the vent to the ceiling. Avoid over-tightening the screws, as this can damage the vent or the ceiling.
For vents held in place by clips, align the clips with the corresponding holes in the ceiling. Press the vent firmly into place until the clips engage. Ensure that all the clips are securely fastened to prevent the vent from falling down. Some clips may require a specific technique to engage, such as pushing or twisting.
If the new vent is held in place by friction, simply push it firmly into the opening in the ceiling. Ensure that it is securely seated and that there are no gaps around the edges. If the vent is loose, you may need to add some shims or foam tape to the edges to create a tighter fit.
Once the new vent is installed, inspect it carefully to ensure that it is properly aligned and securely attached. Turn on the HVAC system and check the airflow. Ensure that the air is flowing evenly and that there are no leaks around the edges of the vent. Make any necessary adjustments to the louvers to optimize the airflow.
Clean up the work area and dispose of any debris. Store the old vent in a safe place if it is to be reused or recycled. Properly dispose of any packaging or materials used during the installation process.
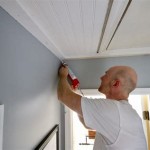
Consider caulking around the edges of the vent with paintable caulk to create a seamless and airtight seal. This will prevent drafts and improve the energy efficiency of the room. Apply a thin bead of caulk around the perimeter of the vent and smooth it with a wet finger or a caulking tool.
Regularly clean the ceiling air vents to maintain optimal airflow and prevent the buildup of dust and allergens. Use a vacuum cleaner with a brush attachment to remove dust and debris from the vent surfaces. Wipe down the vents with a damp cloth to remove any stubborn dirt or grime.

How To Replace Your Ac Vent Covers Clf Services

How To Remove Ducted Air Conditioning Vents Quickair

A Step By Guide To Replacing Your Ceiling Vent Air Filter

Ceiling Vent Replacement For Air Conditioning Hq Joondalup Perth Wa

Man Opening Ceiling Air Vent To Replace Dirty Hvac Filter Home Duct System Maintenance For Clean Stock Photo Adobe

Fix Or Replace Broken Ceiling Vent Stuck Open Closed

How To Fix Loose Ducted Air Vent Gaps

Updating Air Vents With Stellar Covers Oak Grain Home

Changing All My A C Heating Ceiling Vents For Better Airflow Between Naps On The Porch

3 Ways To Fix Water Stains On Your Ceiling Air Conditioning Vents Baylor Heating Inc
Related Posts