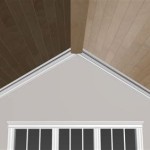
Installing beams on your ceiling can add a unique, architectural touch to your home. If you’re looking for a way to add a distinctive touch to your interior, installing beams is a great option. It is a relatively straightforward process that involves measuring, cutting, and nailing the beams into place. With a few simple tools and a little bit of patience, you can easily install beams on your ceiling.
Tools Needed For Installation
Before you begin, you’ll need to gather the necessary tools for the job. You’ll need a tape measure, level, saw, hammer, nail set, and masonry drill. You’ll also need an assortment of nails and screws, depending on the type of beams you’re using. Finally, you’ll need a ladder or other tool to help you reach the ceiling installation site.
Preparing The Area
Once you have all of your tools, you’ll need to prepare the area where you will be installing the beams. Start by measuring the area and marking out the spots where the beams should be placed. Make sure the measurements are accurate, as any miscalculations may lead to an uneven or crooked installation. You’ll also want to make sure the area is free of dust and debris, as dirt and dust can interfere with the installation process.
Cutting The Beams
Once you have marked out the area and made sure it is free of dust and debris, you can start cutting the beams. Depending on the type of beam you are using, you may need to make a few cuts to achieve the desired length. Make sure to use the right saw for the job, and measure twice before you make each cut. Once you have cut the beams to size, you can move onto the next step.
Nailing The Beams In Place
Now that the beams have been cut to size, you can begin nailing them in place. Start by making sure the beams are even and level before you begin nailing. If you’re using a masonry drill, make sure to drill pilot holes for the nails to ensure a secure fit. Once the beams are in place, you can hammer in the nails. When you’re finished, you should have a secure and level installation.
Finishing The Installation
The final step in installing beams on the ceiling is to finish the installation. Depending on the type of beam you are using, you may need to apply a coat of paint or sealant. This will help protect the beam from the elements and keep it looking its best. Once the sealant or paint has dried, you can admire your handy work and enjoy the unique touch of architectural detail that beams can bring to your home.


:max_bytes(150000):strip_icc()/P1040091-5723b22b5f9b589e346d5be2.JPG)


:no_upscale()/cdn.vox-cdn.com/uploads/chorus_asset/file/19962284/ceiling_beam_withlabels.jpg)

Related Posts