How to Install Beadboard Ceiling in a Basement
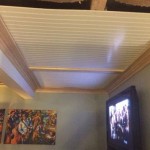
Installing a beadboard ceiling in a basement can dramatically improve the space's aesthetic appeal, offering a bright, clean, and classic look. Beadboard is relatively easy to work with, making it a viable DIY project for homeowners with basic carpentry skills. This article provides a comprehensive guide to installing beadboard on a basement ceiling, covering preparation, installation steps, and important considerations.
Before beginning any project, it is crucial to assess the existing basement ceiling structure. Typically, basements have either exposed joists or a pre-existing drywall or plaster ceiling. The installation method will vary depending on the existing conditions. For exposed joists, furring strips must be installed to create a level and stable surface for attaching the beadboard. If an existing ceiling is already in place, its integrity should be examined. Sagging or damaged drywall must be repaired or removed before proceeding.
Planning and Material Acquisition
Accurate planning is essential for a successful beadboard ceiling installation. This phase involves measuring the ceiling area, calculating material needs, and selecting appropriate tools and fasteners. Careful planning minimizes waste and ensures a professional-looking finished product.
First, measure the length and width of the basement ceiling. Multiply these measurements to determine the total square footage. This will help estimate the amount of beadboard needed. It is advisable to add an extra 10-15% to the calculated square footage to account for cuts, waste, and potential errors. Beadboard is typically sold in panels or individual boards, so choose the format that best suits the project and aesthetic preferences.
Next, consider the material of the beadboard. Options include MDF (Medium-Density Fiberboard), PVC, and wood. MDF is a cost-effective choice that paints well, but it is susceptible to moisture damage, making it less suitable for basements with humidity issues. PVC beadboard is waterproof and mold-resistant, making it an excellent option for damp basements. Wood beadboard offers a natural look and feel but requires proper sealing and maintenance to prevent moisture damage. Select a material that aligns with the basement's environmental conditions and the desired aesthetic.
Following material selection, gather the necessary tools and fasteners. The following tools are generally required: a measuring tape, a level, a stud finder (if applicable), a pencil, a circular saw or jigsaw, a miter saw (for precise cuts), a drill, a screw gun or hammer, safety glasses, a dust mask, and construction adhesive. Fasteners should be selected based on the chosen material and the existing ceiling structure. For attaching beadboard to furring strips or an existing ceiling, screws are generally preferred over nails as they provide a more secure hold. Consider using pan-head screws or trim screws that can be easily concealed with wood filler.
Also, acquire furring strips if the basement has exposed joists. Typically, 1x3 or 1x4 lumber is used for furring strips. The length of the furring strips will depend on the spacing between the joists and the overall dimensions of the ceiling. Ensure the furring strips are straight and free from knots or warping.
Preparing the Ceiling for Installation
Proper ceiling preparation is critical for achieving a flat, stable, and aesthetically pleasing beadboard ceiling. This involves addressing any existing issues, installing furring strips (if needed), and ensuring the surface is clean and properly aligned.
If the basement has an existing drywall or plaster ceiling, inspect it for signs of damage, such as cracks, sagging, or water stains. Repair any minor cracks with joint compound and sand them smooth. For sagging or severely damaged areas, consider removing the affected section and replacing it with new drywall. Ensure the repaired or replaced areas are properly sealed and primed before proceeding.
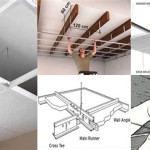
For basements with exposed joists, the installation of furring strips is necessary to create a solid surface for attaching the beadboard. Use a stud finder to locate the ceiling joists. Install the furring strips perpendicular to the joists, typically spaced 12 to 16 inches apart. Use screws to attach the furring strips to the joists, ensuring they are securely fastened. Use a level to check that the furring strips are aligned and provide a flat plane for the beadboard. Shims can be used to correct any minor variations in the joist height.
Once the ceiling is prepared, clean the surface thoroughly to remove dust, debris, and any loose particles. This will improve adhesion of the construction adhesive and ensure a smooth, even finish. Use a broom or vacuum to remove larger debris, followed by a damp cloth to wipe down the surface. Allow the ceiling to dry completely before proceeding with the beadboard installation.
Consider painting the ceiling joists or existing ceiling a dark color before installing the beadboard. This can help to minimize the visibility of any gaps or imperfections in the beadboard installation. A dark color will recede into the background, making the beadboard the focal point of the ceiling.
Beadboard Installation Process
The beadboard installation process involves cutting the beadboard to size, applying adhesive and fasteners, and ensuring proper alignment and spacing. This phase requires patience, precision, and attention to detail to achieve a professional-looking result.
Begin by measuring and cutting the first piece of beadboard to fit snugly against the wall. Use a miter saw for precise cuts, ensuring the edges are clean and straight. Apply construction adhesive to the back of the beadboard, focusing on the edges and center. Position the beadboard against the ceiling, aligning it with the wall and any adjacent pieces. Press firmly to ensure good adhesion.
Secure the beadboard with screws, spacing them approximately 12 inches apart. Drive the screws through the beadboard and into the furring strips or existing ceiling structure. Use a screw gun or drill to avoid over-tightening the screws, which can damage the beadboard. If using nails, pre-drill pilot holes to prevent splitting the beadboard.
Continue installing subsequent pieces of beadboard, ensuring they are properly aligned and spaced. Use a level to check for any gaps or unevenness. If necessary, use shims to correct any minor discrepancies. Pay close attention to the alignment of the beadboard grooves, ensuring a seamless and uniform appearance.
When installing beadboard around obstructions, such as pipes, electrical boxes, or light fixtures, use a jigsaw to cut the necessary openings. Measure and mark the dimensions of the obstruction on the beadboard, then carefully cut along the marked lines. Ensure the openings are slightly larger than the obstruction to allow for easy installation and removal.
At the edges of the ceiling, it is likely that the beadboard will need to be custom-cut to fit the available space. Measure the distance between the last full piece of beadboard and the wall, then cut the remaining piece to size. Use a miter saw to create angled cuts if necessary to match the slope of the ceiling or walls.
After installing all the beadboard, inspect the ceiling for any gaps, imperfections, or loose fasteners. Fill any gaps with wood filler or caulk, and sand them smooth. Tighten any loose screws or replace them if necessary. Clean the ceiling thoroughly to remove dust and debris.
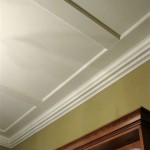
Once the beadboard is installed and finished, consider adding trim or molding around the perimeter of the ceiling to create a polished and professional look. Crown molding, cove molding, or simple trim boards can be used to conceal any gaps between the beadboard and the walls.
Before painting or staining, prime the beadboard with a high-quality primer. This will help to seal the surface and provide a smooth, even base for the paint or stain. Apply the primer according to the manufacturer's instructions, and allow it to dry completely before proceeding.
Choose a paint or stain that complements the basement's décor and the style of the beadboard. Apply the paint or stain in thin, even coats, using a brush or roller. Allow each coat to dry completely before applying the next. Consider applying a clear coat of sealant to protect the beadboard from moisture and wear.
Installing a beadboard ceiling in a basement is a rewarding project that can greatly enhance the space's appearance and value. By following these detailed instructions and taking the necessary precautions, homeowners can achieve professional-looking results and enjoy a beautiful and functional basement ceiling for years to come.

How To Install A Beadboard Ceiling Pine And Prospect Home

Diy Beadboard Ceiling To Replace A Basement Drop Remodelaholic

Diy Beadboard Ceiling Tutorial Easy And Inexpensive Custom Treatment

How To Install A Beadboard Ceiling Pine And Prospect Home

Diy Beadboard Ceiling To Replace A Basement Drop Remodelaholic

Diy Beadboard Ceiling To Replace A Basement Drop Remodelaholic

Beadboard Ceiling Panels Ceilings Armstrong Residential

Why Beadboard On The Ceiling Is Nothing At All Like Dancing Space Between Finishing Basement Remodeling

Installing Bead Board Ceiling Sand And Sisal

Beadboard Ceiling Easy Basement Options
Related Posts