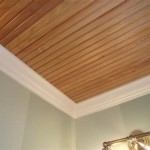
How to Hang Beadboard Ceiling
Beadboard ceilings offer a classic and timeless aesthetic, adding texture and visual interest to any room. While beadboard is frequently used for walls and wainscoting, its application to ceilings provides a distinctive architectural element. The installation process, while manageable for experienced DIYers, requires careful planning, precise measurements, and a thorough understanding of carpentry basics. This article provides a comprehensive guide on how to hang a beadboard ceiling, covering preparation, installation, and finishing techniques.
Before embarking on this project, it's crucial to assess the existing ceiling structure. The condition of the ceiling joists is paramount, as they will bear the weight of the beadboard. Any signs of water damage, sagging, or weakness must be addressed before proceeding. If significant structural issues are present, consulting a qualified structural engineer is advisable. Additionally, understanding local building codes regarding ceiling finishes and fire safety is essential to ensure compliance.
Gathering the necessary tools and materials is another critical preparatory step. The required tools typically include a measuring tape, level, stud finder, pencil, safety glasses, dust mask, circular saw or miter saw, jigsaw (for cutting around obstructions), pneumatic nail gun (or hammer and nails), construction adhesive, and painter's caulk. Material requirements include beadboard panels, furring strips (if necessary), nails, construction adhesive, caulk, primer, and paint. The quantity of beadboard and other materials will depend on the ceiling's square footage.
Key Point 1: Properly Prepare the Existing Ceiling
The success of a beadboard ceiling installation hinges on adequate preparation of the existing surface. If the existing ceiling is drywall or plaster in good condition, it can serve as a suitable base for the beadboard. However, loose or damaged areas must be repaired. Any loose paint or wallpaper should be scraped off, and holes or cracks should be filled with patching compound. Sand the patched areas smooth once the compound is dry.
If the existing ceiling is uneven or significantly damaged, installing furring strips is recommended. Furring strips are thin pieces of wood (typically 1x3 or 1x4 lumber) that are attached to the ceiling joists to create a level and uniform surface for the beadboard. Use a stud finder to locate the ceiling joists, marking their locations clearly. The furring strips should be installed perpendicular to the joists, typically spaced 16 inches or 24 inches apart, depending on the thickness and rigidity of the beadboard panels. Secure the furring strips to the joists using screws or nails, ensuring they are level. If using screws, pre-drilling pilot holes can prevent the wood from splitting.
Whether installing beadboard directly onto the existing ceiling or onto furring strips, applying a coat of primer is recommended. Primer helps to seal the surface, improve adhesion of the construction adhesive, and prevent the beadboard from absorbing moisture from the adhesive. Allow the primer to dry completely before proceeding to the next step. Cleaning the ceiling prior to priming is also recommended to remove dust and debris.
Key Point 2: Install the Beadboard Panels Accurately
Before installing the beadboard, acclimatize the panels to the room's temperature and humidity for several days. This prevents warping or expansion after installation. Plan the layout of the beadboard carefully, considering the size and shape of the room. It is often best to start with a full panel against the longest, most visible wall. This ensures that any partial panels will be less conspicuous.
Measure and cut the first beadboard panel to fit snugly against the wall and any adjacent trim. Use a circular saw or miter saw for straight cuts and a jigsaw for cutting around obstructions such as light fixtures or pipes. Always wear safety glasses and a dust mask when cutting beadboard. Apply a generous amount of construction adhesive to the back of the panel, focusing on the areas that will make contact with the ceiling or furring strips. Position the panel against the ceiling, pressing firmly to ensure good contact. Use a pneumatic nail gun to drive nails through the panel and into the ceiling joists or furring strips. If using a hammer and nails, be careful not to damage the beadboard surface. Space the nails approximately 6 to 8 inches apart. A nail set can be used to recess the nail heads slightly.
Continue installing the remaining beadboard panels in a similar manner, ensuring that the tongue-and-groove edges interlock tightly. Use a rubber mallet to gently tap the panels together for a snug fit. Stagger the seams between rows of beadboard to create a more visually appealing and structurally sound ceiling. As the installation progresses, check frequently for levelness and alignment. Any minor adjustments can be made by shimming the panels or furring strips.
When installing the final row of beadboard, it may be necessary to rip the panels to fit. Measure the remaining space accurately and cut the panels to the required width. Remember to account for any expansion gaps needed along the non-adjacent wall. Apply construction adhesive and nail the final row of panels in place.
Key Point 3: Finishing and Detailing the Beadboard Ceiling
Once the beadboard panels are installed, the final step involves finishing and detailing the ceiling to achieve a professional and polished look. Fill any nail holes or gaps with painter's caulk. Smooth the caulk with a wet finger or putty knife. After the caulk is dry, sand it lightly to blend it seamlessly with the beadboard surface.
Caulk along the perimeter of the ceiling where the beadboard meets the walls. This creates a clean and seamless transition between the ceiling and the walls. Choose a caulk that is paintable and matches the color of the beadboard. Apply the caulk evenly and smooth it with a wet finger or caulk smoothing tool.
Prime the entire beadboard ceiling with a high-quality primer. Primer helps to seal the surface, improve the adhesion of the paint, and ensure a uniform finish. Allow the primer to dry completely before applying the paint. Choose a paint color that complements the room's décor. Typically, a semi-gloss or satin finish is recommended for ceilings, as these finishes are more durable and easier to clean. Apply two coats of paint, allowing each coat to dry completely before applying the next. Use a paint roller for the main surface of the ceiling and a brush for the edges and corners.
Consider adding crown molding or other decorative trim to enhance the appearance of the beadboard ceiling. Crown molding can add a touch of elegance and sophistication, while other trim pieces can be used to conceal any imperfections or gaps. Measure and cut the trim pieces to fit snugly against the ceiling and walls. Attach the trim using nails and construction adhesive. Caulk any gaps between the trim and the ceiling or walls. Paint the trim to match the beadboard or to provide a contrasting accent color. Inspect the finished ceiling for any imperfections, such as uneven seams, nail holes, or paint drips. Correct any imperfections to achieve a flawless and professional-looking beadboard ceiling.
Ensuring proper ventilation in the room where the beadboard ceiling is installed is important, especially in bathrooms and kitchens where humidity levels are typically higher. Consider installing a ventilation fan to remove excess moisture and prevent mold growth. Also, periodic cleaning of the beadboard ceiling is necessary to maintain its appearance. Use a mild soap and water solution to clean the surface, avoiding harsh chemicals or abrasive cleaners that could damage the paint or beadboard.

How To Install A Beadboard Ceiling Pine And Prospect Home

Diy Beadboard Ceiling Tutorial Easy And Inexpensive Custom Treatment

Diy Beadboard Ceiling Tutorial Easy And Inexpensive Custom Treatment

How To Install A Beadboard Ceiling Pine And Prospect Home

How To Install Beadboard Panels On A Ceiling And Why We Ll Never Do It Again The Lake Land

How To Install A Beadboard Paneled Ceiling The Kim Six Fix

How To Install A Beadboard Ceiling Pine And Prospect Home

How To Install A Wood Plank Ceiling Young House Love

Installing Bead Board Ceiling Sand And Sisal

Diy Beadboard Ceiling Tutorial Easy And Inexpensive Custom Treatment
Related Posts