How to Install a Light Box in a Drop Ceiling
Installing a light box in a drop ceiling, also known as a suspended ceiling or a T-bar ceiling, is a common and relatively straightforward project for homeowners and professionals alike. Light boxes offer a convenient way to mount recessed lighting fixtures, speakers, or other ceiling-mounted devices without compromising the structural integrity of the drop ceiling grid. The following guide provides a comprehensive overview of the process, including necessary tools, materials, and step-by-step instructions.
Before commencing any electrical work, it is crucial to prioritize safety. Disconnect the power supply to the circuit you will be working on at the main service panel. Verify the power is off using a non-contact voltage tester. Always adhere to local electrical codes and regulations, which may vary based on your location. If you are unsure about any aspect of the electrical work, it is recommended to consult with a qualified electrician.
Drop ceilings are designed to be lightweight and easily adaptable. The grid system supporting the ceiling tiles or panels is not typically designed to bear significant weight. Therefore, installing a light fixture directly into a ceiling tile without adequate support can lead to the tile sagging or even collapsing. Light boxes bridge this gap, distributing the weight of the fixture across the grid system, ensuring a secure and stable installation.
Key Point 1: Gathering Tools and Materials
Before beginning the installation process, gather all the necessary tools and materials. This will streamline the workflow and minimize interruptions. The following is a comprehensive list:
- Light Box: Choose a light box specifically designed for drop ceilings. These boxes typically feature adjustable support arms that rest on the T-bar grid. Ensure the box is rated for the weight of the fixture you intend to install. Different sizes are available, so select one that comfortably accommodates your fixture.
- Light Fixture: Select the desired light fixture based on your lighting needs and aesthetic preferences. Ensure the fixture is compatible with the light box and electrical wiring.
- Electrical Wire (Romex): Purchase the appropriate gauge and type of electrical wire (typically NM-B or Romex) for the circuit. Consult local electrical codes for specific requirements. Enough wire is needed to run from the junction box to the location of the light box, with some slack for connections.
- Wire Connectors (Wire Nuts): These are used to safely connect the electrical wires within the light box. Select the appropriate size and type of connectors for the gauge of wire being used.
- Non-Contact Voltage Tester: This tool is essential for verifying that the power is disconnected before working on the electrical wiring.
- Wire Strippers/Cutters: These tools are used to strip the insulation from the electrical wires and cut the wires to the appropriate length.
- Screwdriver (Phillips and Flathead): A screwdriver is needed to secure the light fixture to the light box and tighten any necessary screws.
- Pliers: Pliers may be needed to manipulate the wires and tighten connections.
- Tape Measure: Used to accurately measure distances and ensure proper placement of the light box.
- Pencil or Marker: Used to mark the location of the light box on the ceiling tile.
- Safety Glasses: Protect your eyes from debris during the installation process.
- Gloves: Provide a better grip and protect your hands.
- Ladder or Step Stool: Needed to safely reach the drop ceiling.
- Drill (Optional): A drill may be required if the light box requires pre-drilled holes.
- Utility Knife or Sharp Knife: To cut the ceiling tile (if necessary).
Key Point 2: Installation Procedure
With the tools and materials prepared, the installation can proceed. The following steps outline the process of installing a light box in a drop ceiling:
- Locate the Desired Position: Determine the desired location for the light fixture in the drop ceiling. Consider the overall lighting design and ensure the location is suitable for the fixture's intended purpose. Use a tape measure to accurately determine the position and mark it on the ceiling tile with a pencil or marker.
- Prepare the Ceiling Tile: If the light fixture requires a hole in the ceiling tile, carefully cut the hole to the appropriate size using a utility knife or sharp knife. Ensure the hole is centered on the marked location and is large enough to accommodate the light fixture's housing. It might be better to cut it slightly smaller and enlarge it as needed to prevent making the hole too big.
- Access the Area Above the Ceiling: Carefully lift the ceiling tile and set it aside. This will provide access to the area above the drop ceiling grid.
- Prepare the Electrical Wiring: Locate the existing electrical wiring in the ceiling cavity. Ensure the power is disconnected at the main service panel. Use a non-contact voltage tester to verify that the wires are not live. If there isn't an existing wire, you may need to run one from a junction box.
- Position the Light Box: Carefully position the light box in the desired location on the ceiling grid. Ensure the support arms of the light box are resting securely on the T-bars of the grid. Adjust the arms as needed to ensure the light box is level and stable.
- Secure the Light Box (if necessary): Some light boxes may require additional securing to the ceiling grid. This can be done using screws or clips provided with the light box. Follow the manufacturer's instructions for securing the light box.
- Connect the Electrical Wiring: Using wire strippers, strip the insulation from the ends of the electrical wires. Connect the wires from the light fixture to the wires from the electrical circuit using wire connectors (wire nuts). Ensure the connections are secure and properly insulated. Typically, black wire connects to black wire (hot), white wire connects to white wire (neutral), and the ground wire (usually green or bare copper) connects to the ground screw or wire in the light box.
- Attach the Light Fixture: Carefully attach the light fixture to the light box. Use the screws or mounting hardware provided with the light fixture. Ensure the fixture is securely attached and properly aligned.
- Replace the Ceiling Tile: Carefully replace the ceiling tile into the drop ceiling grid. Ensure the tile is properly aligned and seated securely in the grid.
- Test the Light Fixture: After completing the installation, restore power to the circuit at the main service panel. Test the light fixture to ensure it is functioning properly.
Key Point 3: Troubleshooting Common Issues
While installing a light box in a drop ceiling is generally straightforward, certain issues may arise. Being prepared for these potential problems can help expedite the installation and ensure a successful outcome. Here are some common issues and their potential solutions:
- Light Box Not Sitting Securely: If the light box is not sitting securely on the T-bar grid, double-check the adjustment of the support arms. Ensure the arms are properly positioned and tightened. If necessary, add shims or additional support to ensure the light box is level and stable.
- Electrical Connections Not Working: If the light fixture is not working after the installation, double-check all electrical connections. Ensure the wires are properly stripped, connected, and insulated. Use a voltage tester to verify that power is reaching the light fixture. If the issue persists, consult with a qualified electrician.
- Hole in Ceiling Tile Too Large: If the hole cut in the ceiling tile is too large, it can create an unsightly gap around the light fixture. To remedy this, consider using a trim ring or decorative plate to cover the gap. Alternatively, you may need to replace the ceiling tile with a new one.
- Insufficient Wire Length: Ensure adequate wire length to comfortably make all necessary connections. If the existing wire is too short, it may be necessary to extend it using wire connectors within an approved junction box. Always adhere to electrical codes and regulations when extending electrical wiring.
- Light Fixture Too Heavy: If the light fixture is too heavy for the light box, it can cause the ceiling tile to sag or the grid system to become unstable. Choose a light box with a weight rating that exceeds the weight of the fixture. If necessary, consider using multiple light boxes to distribute the weight more evenly.
By carefully following these instructions and addressing potential issues proactively, installing a light box in a drop ceiling can be a successful and rewarding project. Remember to always prioritize safety, adhere to local electrical codes, and consult with a qualified electrician if you have any doubts or concerns.
Regularly inspect the light fixture and surrounding ceiling area for any signs of sagging, damage, or loose connections. Address any issues promptly to prevent further problems. A properly installed light box ensures a secure and aesthetically pleasing lighting solution for your drop ceiling.

Diy A Dropped Ceiling Light Box

Diy A Dropped Ceiling Light Box

Arlington T Box For Suspended Ceiling Grids

Installing Flush Mount Llight Fixture Into Drop Ceiling Refinish Paint House Remodeling Decorating Construction Energy Use Kitchen Bathroom Bedroom Building Rooms City Data Forum

Arlington T Box For Suspended Ceiling Grids

Arlington T Box For Suspended Ceiling Grids

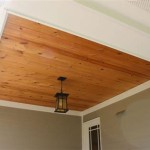
Installing Woodhaven Planks And Hiding Drop Ceiling Grid Sawdust Girl

Installing Woodhaven Planks And Hiding Drop Ceiling Grid Sawdust Girl

Ultimate Guide How To Install Ceiling Tiles Successfully

How To Hang A Ceiling Fan On Suspended Hunker
Related Posts