Mounting a Ceiling Fan on a Vaulted Ceiling: A Comprehensive Guide
Vaulted ceilings, also known as cathedral ceilings, present a unique aesthetic appeal, adding spaciousness and architectural interest to a room. However, installing a ceiling fan on a vaulted ceiling requires careful planning and execution compared to a standard flat ceiling installation. The angled surface necessitates specialized hardware and techniques to ensure the fan is securely mounted and operates safely. This article provides a comprehensive guide to mounting a ceiling fan on a vaulted ceiling, covering essential considerations, necessary tools, and step-by-step instructions.
Before commencing any installation, it is crucial to prioritize safety. De-energize the electrical circuit at the breaker panel that supplies power to the existing light fixture or intended fan location. This prevents electrical shock during the wiring process. Additionally, ensure that the ladder used is stable and appropriate for the height of the vaulted ceiling. A spotter can also be beneficial to maintain stability and provide assistance.
Key Point 1: Assessing the Ceiling Structure and Electrical Wiring
The first step involves thoroughly assessing the existing ceiling structure to determine its suitability for supporting a ceiling fan. Locate the ceiling joist or support beam where the fan will be mounted. Use a stud finder to accurately identify the joist's position. The fan's mounting bracket must be securely attached to this structural member to prevent the fan from wobbling or, in extreme cases, detaching from the ceiling. If the existing electrical box is not rated for supporting a ceiling fan, it must be replaced with a fan-rated box. These boxes are designed to withstand the dynamic forces generated by a rotating ceiling fan.
Examine the electrical wiring at the mounting location. Ensure that the wiring is in good condition and of the appropriate gauge for the fan's electrical requirements. Typically, a 14-gauge or 12-gauge wire is recommended, depending on the fan's amperage rating and local electrical codes. If the existing wiring is inadequate or damaged, it should be replaced by a qualified electrician. Verify that the wiring is properly grounded to prevent electrical hazards.
Furthermore, determine the slope of the vaulted ceiling. This angle is critical for selecting the appropriate downrod length. The downrod is the metal pipe that connects the fan motor to the mounting bracket. For vaulted ceilings, a longer downrod is typically required to ensure adequate clearance between the fan blades and the ceiling. This clearance is essential for optimal airflow and prevents the fan from scraping against the ceiling.
Accurately measuring the ceiling slope is critical and can be done using a protractor or an angle finder. Alternatively, measure the vertical rise and horizontal run of the slope over a specific distance (e.g., 12 inches) and use trigonometric functions (tangent function) to calculate the angle. The ceiling fan manufacturer's instructions will specify the maximum allowable ceiling slope for their particular model. Exceeding this limit may compromise the fan's stability and performance.
Key Point 2: Selecting the Appropriate Mounting Hardware and Downrod
Choosing the correct mounting hardware is paramount for a safe and successful vaulted ceiling fan installation. Several types of mounting options are available, each designed for varying ceiling slopes and structural conditions. A universal mounting bracket, designed for angled ceilings, is usually the best choice. This type includes a swivel mechanism that allows the fan to hang plumb regardless of the ceiling's slope. The bracket should be made of heavy-duty steel to withstand the fan's weight and vibrations.
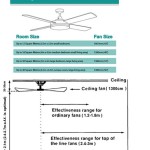
The downrod length is a critical consideration. A general rule of thumb is that the bottom of the fan blades should be at least 7 feet above the floor to ensure adequate headroom and prevent accidental contact. For higher vaulted ceilings, a longer downrod is necessary to achieve this clearance. Conversely, excessively long downrods can cause the fan to wobble or sway, so it's important to strike a balance between height and stability. Most manufacturers provide guidelines for selecting the appropriate downrod length based on ceiling height and slope.
When selecting the downrod, make sure it is compatible with the ceiling fan model. Downrods come in various diameters and thread sizes, so it's important to choose one that matches the fan's specifications. Using an incompatible downrod can damage the fan or compromise its structural integrity. Many ceiling fan kits include a downrod, but if a longer one is needed, it can be purchased separately.
Consider using a downrod with pre-drilled holes for the wiring. This simplifies the wiring process and ensures that the wires are properly routed through the downrod. If the downrod does not have pre-drilled holes, carefully drill them yourself, ensuring that the edges are smooth to prevent damage to the wires. Always use appropriate safety precautions when drilling metal.
Key Point 3: Step-by-Step Installation Process
With the appropriate hardware and tools on hand, the installation process can begin. Start by de-energizing the circuit breaker that controls the electrical supply to the mounting location. Remove the existing light fixture, if any, and disconnect the wiring. Carefully inspect the wiring connections and ensure that they are properly insulated. If the existing electrical box is not fan-rated, replace it with a fan-rated box that is securely attached to the ceiling joist.
Attach the mounting bracket to the ceiling joist using the screws or bolts provided with the bracket. Ensure that the bracket is securely fastened and can support the weight of the ceiling fan. Use lag bolts or other heavy-duty fasteners if necessary, especially if the joist is not particularly strong. Ensure that the mounting bracket is properly aligned to allow the downrod to hang plumb.
Next, assemble the ceiling fan motor and blades according to the manufacturer's instructions. Connect the electrical wiring from the fan motor to the wiring in the electrical box. Use wire connectors to securely join the wires, ensuring that the connections are tight and properly insulated. Follow the manufacturer's wiring diagram to ensure that the wires are connected correctly. Typically, the black wire connects to the black wire, the white wire connects to the white wire, and the green or bare copper wire connects to the grounding wire.
Carefully lift the fan motor and attach it to the mounting bracket. Ensure that the downrod is properly inserted into the mounting bracket and secured with the appropriate pins or screws. Double-check that all connections are secure and that the fan is hanging plumb. Rotate the fan blades manually to ensure that they clear the ceiling and any other obstructions. Tighten all screws and bolts to prevent the fan from wobbling or swaying.
Finally, install the light kit, if applicable, following the manufacturer's instructions. Connect the wiring for the light kit to the fan motor wiring, ensuring that the connections are secure and properly insulated. Install the light bulbs and the light kit cover. Restore power to the circuit breaker and test the fan and light kit to ensure that they are functioning properly. Check the fan at all speed settings. If the fan wobbles, use the balancing kit provided by the manufacturer to correct the imbalance.
Throughout the installation process, refer to the manufacturer's instructions for specific details and guidance. Different ceiling fan models may have slightly different installation procedures. It is crucial to follow the instructions carefully to ensure a safe and successful installation. If the homeowner is uncomfortable with any aspect of the installation, it is advisable to hire a qualified electrician or ceiling fan installer to perform the work.
Regular maintenance is essential to keep the ceiling fan operating safely and efficiently. Periodically check the screws and bolts to ensure that they are tight. Clean the fan blades regularly to remove dust and debris. If the fan develops a wobble, use the balancing kit to correct the imbalance. Inspect the wiring connections periodically to ensure that they are still secure and properly insulated.
In addition to the core aspects outlined above, supplementary considerations can enhance the overall installation and functionality of the ceiling fan. For instance, incorporating a remote control or wall-mounted control unit offers added convenience in managing fan speed and light settings. These controls can be particularly beneficial in rooms with high vaulted ceilings, eliminating the need for manual chain pulling. Furthermore, choosing a ceiling fan with energy-efficient features, such as a DC motor, can contribute to reduced energy consumption and lower electricity bills. DC motors are generally quieter and more efficient than traditional AC motors.
Another aspect to consider is the aesthetic compatibility of the ceiling fan with the room's decor. Ceiling fans are available in a wide variety of styles, finishes, and blade designs. Selecting a fan that complements the overall aesthetic of the room can enhance its visual appeal. Consider factors such as the room's color scheme, furniture style, and lighting fixtures when choosing a ceiling fan. A well-chosen ceiling fan can serve as both a functional and decorative element in the room.
Finally, always adhere to local building codes and regulations when installing a ceiling fan. Some jurisdictions may have specific requirements for ceiling fan installations, such as requiring permits or inspections. Contact the local building department to determine the applicable codes and regulations in the area. Complying with these requirements ensures that the installation is safe and legal.
Installing a ceiling fan on a vaulted ceiling requires careful planning, the right tools, and a thorough understanding of the installation process. By following these detailed instructions and prioritizing safety, homeowners can successfully install a ceiling fan that enhances the comfort and aesthetic appeal of their home.

Ensuring Proper Ceiling Fan Installation With Vaulted Ceilings

How To Install A Ceiling Fan On Sloped Lemon Thistle

How To Install A Ceiling Fan On Sloped Lemon Thistle

How To Choose A Ceiling Fan For Vaulted Ceilings Lightology

Vaulted Ceiling Beams Installing Recessed Lighting Fan

Vaulted Sloped Ceiling Adapter For Modern Fan Company Fans Stardust

How To Choose A Ceiling Fan For Vaulted Ceilings Lightology

Smart Choice For A Ceiling Fan

Pin By Renee B On New House Ceiling Fan Vaulted Lighting Home

Ceiling Fan Boise Id Installation
Related Posts

