Installing a Ceiling Fan on a Vaulted Ceiling
Installing a ceiling fan can significantly improve air circulation and energy efficiency within a room. When the room features a vaulted ceiling, the installation process requires careful consideration and specific adaptations to ensure a safe and functional fan installation. This article provides a detailed guide to successfully installing a ceiling fan on a vaulted ceiling.
Preparation and Safety Precautions
Prior to commencing any electrical work, safety must be prioritized. The initial step involves turning off the power supply to the circuit that serves the intended ceiling fan location. This is typically accomplished at the electrical panel by switching off the appropriate circuit breaker. It is crucial to verify that the power is indeed off by using a non-contact voltage tester on the existing wiring at the ceiling fan location. Never assume the power is off based solely on switching the breaker; always confirm with a tester.
Next, gather all necessary tools and materials. This includes, but is not limited to, a ceiling fan designed for sloped or vaulted ceilings, a downrod of appropriate length, a mounting bracket suitable for sloped ceilings, wire connectors, electrical tape, a screwdriver set (including both Phillips head and flathead screwdrivers), a wire stripper, a drill (possibly with various drill bits for different ceiling materials), a measuring tape, a stud finder, safety glasses, and work gloves. A ladder appropriate for reaching the vaulted ceiling height is indispensable. Ensure the ladder is stable and positioned on a solid, level surface.
Examine the existing electrical box in the ceiling. It must be rated for ceiling fan support. Standard electrical boxes are not designed to bear the weight and dynamic forces of a rotating ceiling fan and can pose a significant safety hazard if used inappropriately. Replace the existing box with a fan-rated box if it is not already one. These boxes are typically marked as “fan rated” or “ceiling fan rated” and are designed to support the weight and movement of the fan. If unsure, consult a qualified electrician.
Carefully review the ceiling fan's instruction manual. Different models have varying installation procedures and safety recommendations. Familiarizing oneself with the specific instructions for the chosen fan is critical for a successful and safe installation. Pay particular attention to the recommended downrod length based on the ceiling height and slope angle. The instruction manual will also provide guidance on wiring connections and blade installation.
Determine the appropriate downrod length. The downrod is the metal rod that connects the fan motor to the mounting bracket. For vaulted ceilings, a longer downrod is typically required to ensure the fan blades are at an optimal height for effective air circulation. A general guideline is to have the fan blades hang approximately 7 to 9 feet above the floor. Measuring the distance from the ceiling to the desired blade height will allow for accurate downrod selection. Various downrod lengths are available, and choosing the correct length is crucial for both aesthetics and functionality.
Mounting the Fan Bracket and Wiring Connections
Once the power is off and the appropriate tools and materials are assembled, the next step is to install the mounting bracket. For vaulted ceilings, a specialized mounting bracket that accommodates the slope angle is essential. These brackets often feature a swivel or ball-and-socket design that allows the fan to hang straight down even when mounted on an angled surface.
Locate the ceiling joists using a stud finder. The mounting bracket must be securely attached to a structural joist to ensure the fan is adequately supported. Using the mounting bracket as a template, mark the locations for the mounting screws on the joist. Drill pilot holes if necessary, especially if the joist is made of hardwood. Securely attach the mounting bracket to the joist using screws of appropriate length and strength. Ensure the bracket is firmly in place and cannot be easily moved or dislodged.
Prepare the wiring. Carefully strip the insulation from the ends of the wires (typically black, white, and green or bare copper) from both the ceiling and the fan's wiring harness. Consult the fan's instruction manual for specific wiring instructions, as color codes and wiring configurations can vary between models. Typically, the black wire from the ceiling connects to the black or colored (often blue) wire from the fan (for power). The white wire from the ceiling connects to the white wire from the fan (neutral). The green or bare copper wire from the ceiling connects to the green or bare copper wire from the fan (ground). The ground wire is crucial for safety, as it provides a path for electrical current in the event of a fault.
Connect the wires using wire connectors. Twist the bare ends of the wires together tightly and then screw on a wire connector of appropriate size. Ensure the connection is secure and will not come loose over time. Wrap electrical tape around the wire connectors for added insulation and safety. Tuck the connected wires carefully into the electrical box, ensuring they are not pinched or damaged. Proper wire management is essential to prevent shorts or other electrical problems.
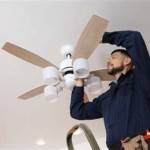
Attach the fan motor to the mounting bracket. Carefully lift the fan motor and align it with the mounting bracket. Follow the fan's instruction manual for specific instructions on attaching the motor to the bracket. This often involves inserting the downrod through the bracket and securing it with pins or screws. Ensure all connections are tight and secure. Safety cables, if included, should be attached according to the manufacturer's instructions. These cables provide an additional layer of safety in case the primary mounting system fails.
Blade Installation and Final Checks
Once the fan motor is securely mounted and the wiring is connected, the next step is to install the fan blades. Most ceiling fans come with separate blades that need to be attached to blade holders or directly to the motor housing. Follow the fan's instruction manual for specific instructions on blade installation, as the process can vary between models.
Attach the blades to the blade holders, if applicable. Align the screw holes in the blades with the screw holes in the blade holders and secure them with screws. Ensure the screws are tightened securely, but avoid over-tightening, which can damage the blades. Repeat this process for all blades.
Attach the blade holders to the fan motor. Align the screw holes in the blade holders with the screw holes on the motor housing and secure them with screws. Ensure the screws are tightened securely. Use the same torque for each screw to ensure the blades are balanced and will not cause the fan to wobble. Proper blade balance is crucial for smooth and quiet fan operation.
Install the light kit, if applicable. Many ceiling fans come with integrated light kits. Follow the fan's instruction manual for specific instructions on light kit installation. This typically involves connecting additional wires and attaching the light fixture to the fan motor. Ensure all connections are secure and the light bulbs are properly installed.
Before restoring power, perform a thorough visual inspection. Check all wiring connections to ensure they are secure and properly insulated. Verify that all screws are tightened and that the fan blades are securely attached. Ensure that the downrod is properly secured to the mounting bracket and the fan motor. Remove any tools or debris from the work area. Confirm that the ladder is safely stored away.
Restore power to the circuit breaker. Turn on the ceiling fan and observe its operation. Check for any unusual noises, wobbling, or other signs of malfunction. If the fan wobbles, try adjusting the blade weights or tightening the blade screws. If the light kit does not work, check the wiring connections and the light bulbs. If any problems persist, consult a qualified electrician.
Clean up the work area. Dispose of any packaging materials, wire scraps, and other debris. Wipe down the fan blades and motor housing to remove any dust or fingerprints. Proper cleanup is essential for a safe and aesthetically pleasing installation.

How To Install A Ceiling Fan On Sloped Lemon Thistle

How To Choose A Ceiling Fan For Vaulted Ceilings Lightology

Ensuring Proper Ceiling Fan Installation With Vaulted Ceilings

How To Install A Ceiling Fan On Sloped Lemon Thistle

How To Choose A Ceiling Fan For Vaulted Ceilings Lightology

How To Choose A Ceiling Fan For Vaulted Ceilings Lightology

Hunter Vaulted Ceiling Fan Mount 22170 The Home Depot

Fans On An Angle Installing Ceiling Angled Or Raked

Smart Choice For A Ceiling Fan

How To Find Ceiling Fans Slope Adapters And Downrods For Angled Ceilings Delmarfans Com
Related Posts