How To Spray Paint An Old Ceiling Fan
Revitalizing an old ceiling fan with a fresh coat of spray paint can dramatically enhance a room's aesthetic. This process, while straightforward, requires careful preparation and execution to achieve a professional-looking finish. This article provides a comprehensive guide to spray painting a ceiling fan, ensuring a smooth and durable result.
Preparing the Work Area
Proper preparation is crucial for a successful paint job. A clean, well-ventilated area minimizes dust particles and ensures proper paint drying. Protecting surrounding surfaces from overspray is also essential.
- Choose a well-ventilated area, preferably outdoors or in a garage with open doors.
- Cover the floor with drop cloths or newspapers to protect it from paint.
- If working indoors, mask off surrounding walls and furniture with painter's tape and plastic sheeting.
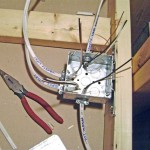
Removing the Ceiling Fan
Disassembling the ceiling fan allows for thorough cleaning and even paint application. Taking the time to remove the fan components will significantly improve the final outcome.
- Turn off the power supply to the fan at the circuit breaker.
- Carefully remove the fan blades, light kit (if applicable), and motor housing from the ceiling mount.
- Label wires and connections for easy reassembly.
- Place all screws and small parts in a container to prevent loss.
Cleaning the Fan Components
A clean surface is essential for proper paint adhesion. Removing dust, grease, and grime ensures the paint bonds effectively and creates a smooth, professional finish.
- Wash all fan components with a solution of warm water and mild detergent.
- Use a degreaser to remove any stubborn grease or grime buildup.
- Rinse thoroughly with clean water and allow to dry completely.
Preparing the Fan for Painting
Proper surface preparation is key to a durable and visually appealing paint job. This includes masking areas that shouldn't be painted and lightly sanding for optimal paint adhesion.
- Lightly sand all surfaces to be painted with fine-grit sandpaper (220-grit). This creates a slightly rough surface for the paint to adhere to.
- Wipe down the sanded surfaces with a tack cloth to remove any sanding dust.
- Mask off any areas that should not be painted, such as screw holes or pull chain mechanisms, using painter's tape.
- If working with metal components, apply a metal primer specifically designed for adhesion to smooth surfaces. Allow the primer to dry completely according to the manufacturer's instructions.
Applying the Spray Paint
Applying thin, even coats is crucial for a smooth, professional finish. Rushing the process can lead to drips and an uneven appearance. Patience is key to achieving optimal results.
- Shake the spray paint can vigorously for at least two minutes to ensure the paint is properly mixed.
- Hold the can 10-12 inches away from the surface and apply thin, even coats, overlapping each pass slightly.
- Avoid heavy coats, which can lead to drips and runs.
- Allow each coat to dry completely before applying the next.
- Apply multiple thin coats for better coverage and durability, typically 2-3 coats are sufficient.
Drying and Reassembling the Fan
Allowing ample drying time is essential for a durable, chip-resistant finish. Rushing reassembly can damage the newly applied paint and compromise the final result.
- Allow the paint to dry completely according to the manufacturer's instructions, typically 24-48 hours.
- Once dry, carefully remove any painter's tape.
- Reassemble the fan components, ensuring all wires and connections are properly secured.
- Reinstall the fan on the ceiling mount and restore power.
Choosing the Right Spray Paint
Selecting the correct spray paint is crucial for achieving a durable and aesthetically pleasing finish. Consider the material of the fan and the desired finish when choosing your paint.
- Use a spray paint specifically designed for the material of the fan (e.g., metal, plastic, wood).
- Choose a paint finish that complements the room's decor (e.g., matte, satin, gloss).
- Consider using a rust-inhibiting primer if painting metal components in a humid environment.
Safety Precautions
Safety should always be a priority when working with spray paint. Taking necessary precautions ensures personal well-being and prevents accidents.
- Wear a respirator or mask designed for paint fumes to avoid inhaling harmful vapors.
- Wear safety glasses to protect your eyes from overspray.
- Work in a well-ventilated area to prevent the buildup of fumes.
- Keep spray paint away from open flames or heat sources.

Update A Ceiling Fan Using Spray Paint

Upcycling A Ceiling Fan With Spray Paint Happy Frugal Mama

Another Ceiling Fan Makeover And How Not To Paint A Nani S Notebook

Painting A Ceiling Fan My Repurposed Life

How To Update A Ceiling Fan Without Removing It Savvy Apron

Ceiling Fan Makeover An Easy Diy Tutorial

Ceiling Fan Makeover Sprayed With Oil Rubbed Broe Paint Over The Base Old Barn Contact Paper Painting Fans Diy

Another Ceiling Fan Makeover And How Not To Paint A Nani S Notebook

Quick Easy Fan Update Without Uninstalling It

Painted Fan Blades A Little Revamp In My Sewing Room
Related Posts