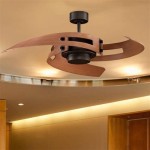
How To Paint A Ceiling Fan Without Taking It Down
Painting a ceiling fan without removing it can save significant time and effort. This approach allows for a refresh of the fan's appearance while minimizing disruption to the room. However, careful preparation and execution are crucial for achieving professional-looking results and preventing paint drips and splatters.
The first step involves gathering the necessary materials. These typically include drop cloths, painter's tape, a sturdy ladder, a paint tray, a paint roller with an extension pole, a small angled brush for detail work, and the desired paint. Choosing a paint specifically formulated for metal or plastic, depending on the fan's material, is recommended. For smoother results and easier cleanup, consider using a paint with a satin or semi-gloss finish.
Preparing the workspace is essential for containing the paint and protecting the surrounding area. Furniture and flooring should be covered with drop cloths. Painter's tape can be used to mask off any light fixtures or areas adjacent to the fan that should remain paint-free. Ensuring adequate ventilation in the room is also important for dispersing paint fumes.
Before painting can begin, the fan must be thoroughly cleaned. Dust and grime can interfere with paint adhesion, leading to an uneven finish. A damp cloth can be used to wipe down the fan blades, motor housing, and any other surfaces to be painted. Allowing the fan to dry completely before painting is crucial.
Once the fan is clean and dry, the painting process can commence. For the fan blades, it's often recommended to use a paint roller with an extension pole. This allows for efficient coverage and minimizes strain. Begin by applying thin, even coats of paint to each blade, working from the base to the tip. Multiple thin coats are generally preferable to one thick coat, as they help prevent drips and promote a smooth finish. Allow adequate drying time between each coat, according to the paint manufacturer's instructions.
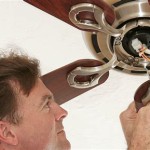
Painting the fan's motor housing requires a slightly different approach. A small angled brush is typically the best tool for this task, allowing for precise application and minimizing the risk of paint getting into the motor itself. As with the blades, apply thin, even coats, ensuring thorough coverage. Exercise extreme caution when painting around electrical components and wiring. Avoid applying excessive paint near these areas to prevent potential electrical hazards.
Maintaining a consistent paint thickness across all surfaces of the fan is important for achieving a uniform appearance. Careful attention should be paid to areas where different parts of the fan meet, such as the blade attachments and the motor housing connections. Blending the paint seamlessly in these areas can contribute to a more professional-looking result.
Throughout the painting process, regularly check for drips and runs. These can be addressed immediately with a clean brush or a damp cloth. Acting quickly can prevent these imperfections from drying and becoming permanent blemishes.
While painting, it's advisable to rotate the fan blades periodically. This allows access to all sides of each blade and ensures complete coverage. However, before rotating the blades, allow the paint to dry sufficiently to prevent smudging or transferring paint to other surfaces.
After the final coat of paint has been applied, allow the fan to dry thoroughly before restoring power. The drying time can vary depending on the type of paint used and the ambient temperature and humidity. Referring to the paint manufacturer's instructions for recommended drying times is essential.
Careful cleanup after painting is important. Remove the painter's tape carefully to avoid peeling off any fresh paint. Dispose of used drop cloths and other painting materials properly. Clean brushes and rollers according to the manufacturer's instructions to ensure they can be reused for future projects.
By following these steps, one can effectively paint a ceiling fan without the need for dismantling it, saving time and effort while achieving a refreshed and updated look.

How To Update A Ceiling Fan Without Removing It Savvy Apron

Update A Ceiling Fan Using Spray Paint

How To Update A Ceiling Fan Without Removing It Savvy Apron

Chalk Painted Ceiling Fan Makeover Easy Home Decor Project

Another Ceiling Fan Makeover And How Not To Paint A Nani S Notebook

How To Update A Ceiling Fan Without Removing It Savvy Apron

How To Paint A Ceiling Fan Without Taking It Down In 2024 Toolspart
.JPG?strip=all "Restoration House Spray Painting A Light Fixture Without Taking It Down")
Restoration House Spray Painting A Light Fixture Without Taking It Down

Update A Ceiling Fan Using Spray Paint

How To Paint Light Fixtures Update Without Taking Them Down Artsy Rule
Related Posts