How to Make a Ceiling in SketchUp
Creating a ceiling in SketchUp is a fundamental skill for any user, whether you are a beginner or a seasoned professional. This process involves using various tools and techniques to effectively construct and define the ceiling surface within your model. This guide will break down the process step-by-step to help you create accurate and visually appealing ceilings in SketchUp.
1. Defining the Ceiling Plane
The first step is to determine the location and shape of the ceiling within your model. You can achieve this by utilizing different drawing tools, such as:
- Line Tool: For simple rectangular or square ceilings, use the Line tool to draw the outline of the ceiling.
- Rectangle Tool: This tool is a more efficient way to create rectangular ceilings.
- Polygon Tool: If your ceiling has an irregular shape, use the Polygon tool to draw the outline.
- Freehand Tool: For curved or complex ceiling shapes, the Freehand tool can be used to draw the outline, but it may require some refinement.
After creating the outline, use the Push/Pull tool to extrude the shape upwards, forming the ceiling plane. The height of the extrusion will determine the distance between the floor and the ceiling.
2. Adding Details and Features
Once the basic ceiling plane is created, you can start adding details and features to enhance its realism and functionality. Here are some of the most common features:
- Lights: You can use the 3D Warehouse to find and import various lighting fixtures. Place these fixtures on the ceiling to add illumination to your model.
- Ceiling Fans: These can be found in the 3D Warehouse or created from scratch using basic shapes and tools.
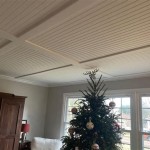
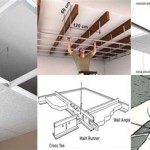
- Crown Molding: This decorative element is often used at the junction of the ceiling and walls. It can be created by drawing a profile and using the Follow Me tool to wrap it around the edges of the ceiling.
- Decorative Beams: These can be added to create visual interest and structure within the ceiling plane. Use the Line tool to draw the shape of the beam and then extrude it using the Push/Pull tool.
- Skylights: Use the Rectangle tool to draw a rectangular shape where you want the skylight to be placed. Then, use the Push/Pull tool to cut a hole in the ceiling and create the skylight.
3. Applying Materials and Textures
To give your ceiling a visually appealing and realistic appearance, apply materials and textures using the Paint Bucket tool. You can choose pre-defined materials from SketchUp's library, upload custom images or use online resources such as textures.com to find suitable textures for your project. Experiment with different material types such as wood, plaster, drywall, or tile to achieve your desired look.
A variety of textures, such as wood grain, painted surfaces, or intricate patterns, can be applied to the ceiling to create visual interest and enhance the details. Consider how the material choice and texture will interact with the overall design of the room and the surrounding elements.

Sketchup Beginners False Ceiling Tutorial I How To Make In Jsdesign Ii

How To Make False Ceiling In Sketchup V Ray

Making A Wavy Wood Ceiling In Sketchup

How To Make Ceiling In Sketchup False Design Easy Fast Create

How To Make Rectangular False Ceiling In Sketchup Vray

Draw A Coffered Ceiling In Sketchup

Draw A Coffered Ceiling In Sketchup

How To Make Ceiling In Sketchup False Design Easy Fast Create

How To Make Ceiling In Sketchup False Design Easy Fast Create

Making Of Wave Fabric Ceiling With Sketchup
Related Posts