How To Install PVC Beadboard Ceiling Panels
PVC beadboard ceiling panels offer a durable, attractive, and moisture-resistant alternative to traditional wood beadboard. Ideal for bathrooms, kitchens, basements, or any space prone to humidity, PVC beadboard panels are lightweight, easy to clean, and resistant to mold and mildew. This article provides a step-by-step guide on how to install PVC beadboard ceiling panels, covering essential preparations, installation techniques, and helpful tips for a professional-looking finish.
Before embarking on the installation process, careful planning and preparation are crucial. This initial stage sets the foundation for a successful and aesthetically pleasing outcome. Accurate measurements, proper material selection, and a clear understanding of the installation space are vital to minimizing errors and ensuring a smooth workflow.
First, accurately measure the ceiling area where the beadboard panels will be installed. This involves determining the length and width of the ceiling to calculate the total square footage. Add an extra 10-15% to the calculated square footage to account for cuts, waste, and potential errors during installation. This buffer ensures that sufficient material is available throughout the project, preventing delays and frustration.
Next, assess the existing ceiling structure. Identify any potential obstructions, such as light fixtures, vents, or pipes. Plan how to work around these obstacles, considering whether adjustments or modifications are necessary. Determine how the panels will be oriented on the ceiling and align the first row with the most visible edge of the room. For example, if the room is rectangular, starting with the longest, straightest wall will often yield the best visual result.
Gather all necessary tools and materials before beginning the installation. Having everything within reach streamlines the process and minimizes interruptions. Essential tools and materials include:
*PVC beadboard ceiling panels
*Construction adhesive specifically designed for PVC
*Fine-tooth saw or utility knife (for cutting panels)
*Measuring tape
*Pencil
*Level
*Caulk gun
*Safety glasses
*Dust mask
*Ladder or scaffolding
*Optional: Nail gun/staple gun with stainless steel fasteners (for additional securing)
*Optional: J-trim or other edge molding for finishing edges.
Inspect each PVC beadboard panel for any defects, damage, or inconsistencies. Reject any panels that do not meet acceptable quality standards. Sort the panels by size and pattern to ensure consistency throughout the installation. Clean the panels with a damp cloth to remove any dust or debris that may have accumulated during storage or transportation. Cleanliness is essential for proper adhesion of the construction adhesive.
Preparing The Ceiling Surface
Proper preparation of the existing ceiling surface is paramount for successful installation and long-term adhesion. The ceiling must be clean, dry, and structurally sound. Any loose paint, wallpaper, or debris must be removed to ensure a solid bonding surface. Ensuring the surface is level is also important, but furring strips (described later) can compensate for minor inconsistencies. If the existing ceiling is significantly uneven, addressing this issue before installing the beadboard is critical.
Begin by thoroughly cleaning the ceiling surface. Use a scraper to remove any loose paint, wallpaper, or other materials. Vacuum the ceiling to remove any remaining dust or debris. If the ceiling is dirty or greasy, wash it with a mild detergent solution and allow it to dry completely. Moisture can compromise the adhesive bond and lead to future problems. Allow ample drying time, particularly in humid environments.
Inspect the ceiling for any signs of water damage, mold, or mildew. Address any underlying moisture problems before proceeding with the installation. Repair any leaks or plumbing issues to prevent future damage to the beadboard panels. Apply a mold and mildew treatment solution to the ceiling to eliminate any existing growth and prevent future outbreaks. This step is crucial for ensuring a healthy and durable installation, particularly in moisture-prone areas.
If the existing ceiling is uneven or damaged, consider installing furring strips before installing the beadboard panels. Furring strips are thin strips of wood or metal that are attached to the ceiling to create a level and consistent surface. Attach the furring strips to the ceiling joists using screws. Ensure that the furring strips are level and evenly spaced, typically 16 or 24 inches apart. The spacing of the furring strips will depend on the thickness and rigidity of the PVC beadboard panels. If using furring strips, also consider adding insulation between the strips for better energy efficiency.
For ceilings with existing popcorn texture, scraping it off to create a smooth surface is ideal for optimal adhesion. However, this can be a messy and time-consuming process. Alternatively, the popcorn ceiling can be covered with furring strips to provide a level surface for panel installation. It is important to note that popcorn ceilings may contain asbestos. If you suspect your popcorn ceiling contains asbestos, it is highly recommended to consult with a qualified asbestos abatement professional before attempting to remove or disturb it.
Installing The PVC Beadboard Panels
The actual installation of the PVC beadboard panels requires careful attention to detail and precise execution. Following the planned layout and utilizing appropriate techniques ensures a seamless and professional-looking finish. Working methodically and taking frequent measurements are crucial for achieving optimal results.
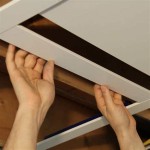
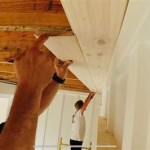
Begin by cutting the first row of panels to the required length. Use a fine-tooth saw or a utility knife to make clean, precise cuts. Ensure that the cuts are straight and square to ensure a tight fit against the walls or trim. Test-fit the first row of panels to ensure that they align properly with the ceiling and walls. Any gaps or misalignments must be addressed before proceeding. Prior to applying adhesive, dry-fit the first few rows to ensure proper alignment and fit.
Apply construction adhesive to the back of the panel in a zigzag pattern. Be generous with the adhesive, but avoid applying too much, which can cause it to squeeze out between the panels. Position the panel against the ceiling, aligning it with the guide lines or furring strips. Press the panel firmly against the ceiling for several seconds to ensure a secure bond. If using furring strips, the panels can also be secured with staples or small nails. If opting for nails or staples, use stainless steel fasteners to prevent rust over time.
Continue installing the remaining panels, row by row. Ensure that each panel is properly aligned and secured to the ceiling. Use a level to ensure that the panels are installed straight and even. Stagger the seams between the panels to create a more visually appealing and structurally sound installation. This helps distribute stress and minimizes the visibility of seams.
When installing panels around light fixtures, vents, or other obstructions, carefully measure and cut the panels to fit around these objects. Use a jigsaw or a utility knife to make precise cuts. Consider using a template to create accurate cutouts. Leave a small gap around the objects to allow for expansion and contraction of the panels. This prevents buckling or cracking due to temperature or humidity changes. Caulk around the edges of the cutouts to create a watertight seal.
If applying adhesive, support the panels with temporary supports (e.g., props, T-braces) until the adhesive sets completely. The adhesive manufacturer's instructions will specify the required curing time. Remove temporary supports gently once the adhesive has fully cured. If using staples or nails in conjunction with adhesive, temporary supports are still recommended, though for a shorter duration.
Finishing Touches and Considerations
Completing the installation involves adding finishing touches to conceal gaps, trim edges, and ensure a polished appearance. These final steps contribute significantly to the overall aesthetic and longevity of the installation. Careful attention to detail at this stage can elevate the project from functional to visually impressive.
Once all the panels are installed, inspect the ceiling for any gaps or imperfections. Fill any gaps with caulk that is paintable and suitable for PVC. Smooth the caulk with a wet finger or a caulk smoothing tool to create a seamless finish. Allow the caulk to dry completely before painting or applying any other finishes. Choose a caulk color that matches the beadboard panels for a cohesive appearance.
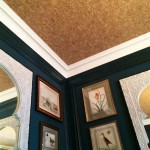
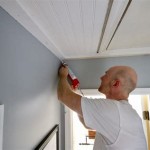
Install trim or molding around the perimeter of the ceiling to conceal any exposed edges. Choose a trim style that complements the design of the room. Miter the corners of the trim to create a clean, professional look. Attach the trim to the ceiling using finishing nails or construction adhesive. Consider using a combination of both for added security. Apply caulk along the edges of the trim to seal any gaps and create a watertight barrier.
Clean the installed PVC beadboard panels with a mild detergent solution and a soft cloth. Avoid using harsh chemicals or abrasive cleaners, which can damage the surface of the panels. Regularly clean the panels to remove dirt, dust, and mildew. Proper maintenance will prolong the life of the panels and keep them looking their best. In areas prone to moisture, regular inspection for leaks and prompt repairs are crucial for preventing water damage.
For areas with specific moisture levels or ventilation challenges, consider consulting with building professionals or contractors to address any concerns before installation. This could involve improving ventilation, installing vapor barriers, or selecting specific types of PVC beadboard panels designed for high-humidity environments. Addressing these challenges proactively will contribute to the longevity and performance of the PVC beadboard ceiling.
Finally, remember to dispose of all construction debris properly. Recycle any recyclable materials and dispose of any hazardous materials according to local regulations. A clean and organized workspace ensures a safe and efficient project completion. Thoroughly cleaning the area post-installation not only enhances the final appearance but also promotes a safe and comfortable environment.

How To Install A Beadboard Paneled Ceiling The Kim Six Fix

Beadboard Ceiling Panels Ceilings Armstrong Residential

Diy Beadboard Ceiling Tutorial Easy And Inexpensive Custom Treatment

How To Install Beadboard Panels On A Ceiling And Why We Ll Never Do It Again The Lake Land

How To Install A Beadboard Porch Ceiling This Old House

Diy Beadboard Ceiling Tutorial Easy And Inexpensive Custom Treatment

Vinyl Beadboard Ceiling Common Problems And A Better Alternative Allura Usa

Beadboard Ceiling Panels Ceilings Armstrong Residential

Pvc Beadboard Panels Jlc

How To Install A Wood Plank Ceiling Young House Love
Related Posts