How To Install a Drop Ceiling in Your Basement
Installing a drop ceiling, also known as a suspended ceiling, in a basement can be a worthwhile project, enhancing aesthetics, concealing unsightly ductwork and wiring, and improving acoustics. This guide provides a comprehensive overview of the process, from planning and gathering materials to the final installation.
A drop ceiling consists of a grid of metal tracks suspended from the existing ceiling joists. These tracks support lightweight ceiling tiles that are easily installed and removed. This accessibility is a major advantage, allowing for easy access to plumbing, electrical wiring, and HVAC systems above the finished ceiling.
Before embarking on the project, careful planning and preparation are essential. This includes accurately measuring the basement, selecting appropriate materials, and understanding the necessary tools and safety precautions.
Planning and Preparation: The Foundation for a Successful Installation
The initial stage involves a thorough assessment of the basement space. Begin by accurately measuring the length and width of the room. This information is crucial for calculating the required quantity of materials, including the main runners, cross tees, wall angles, and ceiling tiles.
Next, determine the desired ceiling height. This will influence the amount of suspension wire needed. Consider factors such as headroom requirements, the height of existing ductwork or piping, and the desired clearance for recessed lighting fixtures, if planned. Ideally, the new ceiling should provide ample headroom while still concealing any mechanical systems. A minimum of 7 feet is generally recommended for areas with frequent foot traffic.
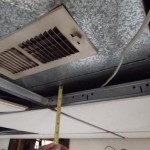
Examine the existing basement ceiling structure. Identify any obstructions, such as pipes, ducts, or electrical boxes. Plan how to work around these obstacles during the installation. It might be necessary to relocate some fixtures or create custom cut tiles to accommodate them. Documenting the location of utilities with photographs or sketches before covering them is highly recommended for future maintenance.
Select the appropriate ceiling tiles. Consider factors such as appearance, acoustics, and fire resistance. Tiles are available in a wide range of materials, textures, and colors to suit different aesthetic preferences and functional requirements. Acoustic tiles can significantly reduce noise levels in the basement, which is especially beneficial for home theaters or recreation rooms. Fire-resistant tiles provide an added layer of safety.
Gather the necessary materials and tools. This includes:
- Ceiling tiles
- Main runners
- Cross tees (typically 4-foot and 2-foot lengths)
- Wall angle molding
- Suspension wire (also known as hanger wire)
- Eye screws or concrete anchors (depending on the ceiling type)
- Screws or nails for attaching wall angle
- Level (at least 4 feet long)
- Measuring tape
- Chalk line
- Tin snips or metal cutters
- Drill
- Safety glasses
- Gloves
- Stud finder (if needed)
- Ladder
Ensure that the workspace is clean and well-lit. Remove any obstacles that could impede movement or create a safety hazard. Proper lighting is crucial for accurate measurements and safe tool operation.
Before starting, familiarize yourself with local building codes and regulations regarding ceiling height, fire safety, and electrical work. Obtain any necessary permits before commencing the installation.
Installing the Perimeter: Wall Angle and Suspension Points
The first step in the physical installation is to install the wall angle molding around the perimeter of the room. This molding provides support for the edges of the ceiling tiles and creates a clean, finished look.
Using a level and a measuring tape, mark the desired ceiling height on the walls. Accurately transferring this level line is critical for ensuring a level ceiling. A laser level can simplify this process.
Attach the wall angle molding to the walls along the marked line. Use screws or nails, depending on the wall material. Ensure that the molding is securely fastened to the walls, as it will bear the weight of the ceiling tiles along the perimeter. For concrete or masonry walls, use concrete anchors and screws. For drywall, locate the studs behind the drywall for secure attachment.
Next, install the suspension points. These are the points from which the main runners will be suspended. The spacing of the suspension points depends on the weight of the ceiling tiles and the span of the main runners. Consult the manufacturer's recommendations for specific spacing guidelines. A common spacing is 4 feet apart along each main runner.
Attach eye screws or concrete anchors to the existing ceiling joists or concrete ceiling at the marked suspension points. Ensure that these anchors are securely fastened, as they will bear the weight of the entire ceiling grid. For wood joists, use eye screws that are long enough to penetrate deeply into the wood. For concrete ceilings, use appropriate concrete anchors that are rated for the expected load.
Cut the suspension wire to the appropriate length. The length of the wire will depend on the distance between the suspension points and the desired ceiling height. It is generally advisable to cut the wire slightly longer than necessary, as it can be easily adjusted later. Leave at least 12 inches of extra wire for adjustments.
Attach the suspension wire to the eye screws or concrete anchors, creating a secure loop. Ensure that the wire is properly secured to prevent slippage. Use pliers to tightly twist the wire ends together.
Assembling the Grid: Main Runners and Cross Tees
With the perimeter and suspension points in place, the next step is to assemble the grid. This involves installing the main runners and cross tees that will support the ceiling tiles.
Hang the main runners from the suspension wires. Thread the suspension wire through the holes in the main runners and adjust the height until the runners are level. Use a level to ensure that the main runners are perfectly horizontal. Fine-tune the wire lengths to achieve a level surface.
Once the main runners are level, secure the suspension wires. Bend the wire ends over to prevent them from slipping and to ensure a secure connection. Properly securing the suspension wires is crucial for the stability of the entire ceiling grid.
Install the cross tees between the main runners. These tees are typically 4 feet or 2 feet long, depending on the size of the ceiling tiles. The cross tees snap into the slots in the main runners, creating a grid pattern. Ensure that the cross tees are properly seated in the slots and that they are level.
Continue installing the cross tees until the entire grid is complete. Maintain consistent spacing between the tees to ensure that the ceiling tiles fit properly. Regularly check the level of the grid to ensure that it is uniform across the entire surface.
Cut the last row of cross tees to fit against the wall angle molding. Use tin snips or metal cutters to make precise cuts. Ensure that the cut edges are clean and free of burrs to prevent injury.
Double-check the entire grid for level and stability. Make any necessary adjustments to the suspension wires or cross tee connections. A stable and level grid is essential for a professional-looking and long-lasting drop ceiling.
Installing the Ceiling Tiles: Completing the Project
The final step is to install the ceiling tiles. This is a relatively straightforward process, but it requires care and attention to detail to ensure a clean and professional finish.
Begin by installing the tiles along one edge of the room. Gently lift each tile and angle it up into the grid opening. Lower the tile until it rests on the wall angle and the cross tees.
Continue installing the tiles, working your way across the room. Ensure that each tile is properly seated in the grid and that it is flush with the surrounding tiles. Avoid forcing the tiles into place, as this can damage them or the grid.
For border tiles that need to be cut, measure the required size carefully. Use a utility knife or a ceiling tile cutter to make clean, precise cuts. Score the tile several times before attempting to break it cleanly.
Install the cut border tiles along the edges of the room. Ensure that the cut edges are facing the wall and that the tiles fit snugly against the wall angle molding. A small gap between the tile and the wall can be covered with caulk if desired.
If installing recessed lighting, cut the necessary holes in the ceiling tiles before installation. Use a hole saw of the appropriate size to create clean, round holes. Follow the manufacturer's instructions for installing the recessed lighting fixtures.
Carefully inspect the finished ceiling for any imperfections. Make any necessary adjustments to the tiles or the grid to achieve a uniform and professional appearance. Replace any damaged or stained tiles.
Clean up the workspace and dispose of any scrap materials properly. A clean workspace is essential for safety and prevents accidents.
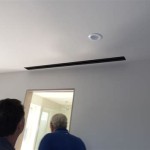
With the ceiling tiles installed, the drop ceiling project is complete. The new ceiling will enhance the aesthetics of the basement, conceal unsightly ductwork and wiring, and improve acoustics. The accessibility of the drop ceiling allows for easy access to plumbing, electrical wiring, and HVAC systems above the finished ceiling for future maintenance and repairs.

How To Install A Drop Ceiling Ceilings Armstrong Residential

Installing A Drop Ceiling Bob Vila

How To Easily Install A Drop Ceiling Ron Hazelton

Basement Finishing Kirkwood Mo Transformation Drop Ceiling Installation In

How To Install A Drop Ceiling

A Drop Ceiling That Looks Better Than Drywall How To Install In Basement Diy

How To Install A Drop Ceiling Yourself

How To Install A New Ceiling In Your Garage Or Basement Myfixituplife

Drop Ceiling Tile Installation Acoustic Suspended

How To Install A Suspended Ceiling Building Advanced Drops
Related Posts