How to Install Beadboard Ceiling Over Popcorn
Transforming a dated ceiling with popcorn texture into a sleek and elegant beadboard finish can dramatically enhance a room's aesthetic appeal. While the process may appear daunting, it is achievable with careful planning and execution. This article outlines the steps involved in installing a beadboard ceiling over existing popcorn texture, providing practical guidance for a successful project.
1. Preparation is Key: Removing the Popcorn Ceiling
Before embarking on the beadboard installation, it is imperative to remove the popcorn texture. This step ensures a smooth and even surface for the beadboard panels. The process involves using a chemical remover or a scraping tool, both requiring appropriate safety precautions.
For chemical removal, apply a specialized popcorn ceiling remover according to the manufacturer's instructions. Allow the product to penetrate the texture, soften it, and then scrape it off using a putty knife. Ensure adequate ventilation during this process, and wear protective gear such as gloves, a mask, and eye protection.
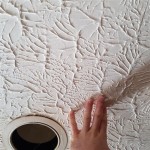
Alternatively, use a scraper to manually remove the popcorn texture. This method involves applying firm pressure while scraping the texture off in thin layers. It is a more physically demanding option but can be effective for smaller areas. Regardless of the method chosen, thoroughly clean the ceiling surface after removing the popcorn texture.
2. Framing and Installation of Beadboard Panels
With the popcorn ceiling removed, install the beadboard panels onto a framing system. This step provides structural support and creates a smooth and consistent surface. Begin by measuring the ceiling area and calculating the required number of beadboard panels.
The framing system can be constructed using 2x4 lumber or metal furring strips. Install the framing members directly to the existing joists or attach them to the ceiling using appropriate fasteners. Ensure the framing is level and plumb for a professional finish.
Once the framing is in place, start installing the beadboard panels. These panels are typically available in 4x8 sheets and can be easily cut to size for a precise fit. Secure the panels to the framing using finishing nails or screws, taking care not to overtighten them.
3. Finishing Touches: Caulking and Painting
After installing the beadboard panels, complete the project with finishing touches. Fill any gaps or imperfections between the panels using a paintable caulk. Apply a thin bead of caulk along the seams, smooth it out with a damp finger, and allow it to dry completely.
Finally, paint the beadboard ceiling to achieve the desired look. Choose a paint appropriate for the beadboard material and apply it in even coats, allowing each coat to dry completely before applying the next. Consider using a primer if necessary to ensure proper paint adhesion.
Installing a beadboard ceiling over popcorn texture can be a rewarding project, transforming a room's character with a sophisticated touch. By carefully following these steps and utilizing the right tools and materials, you can create a stunning and long-lasting ceiling that enhances the overall aesthetic of your space.

The Best Way To Cover Popcorn Ceilings With Beadboard Shoe Makes New

How To Cover Popcorn Ceilings With Beadboard

How To Cover Popcorn Ceilings With Beadboard

How Much Does It Cost To Install A Beadboard Ceiling 2024 Data Angi

How To Cover Popcorn Ceiling With Beadboard Planks Diy Tutorial

How To Cover Popcorn Ceilings With Beadboard

How To Cover Popcorn Ceiling With Beadboard Planks Diy Covering

Diy Beadboard Ceiling Tutorial Easy And Inexpensive Custom Treatment

Diy Bead Board Ceiling To Hide An Ugly Popcorn Lehman Lane Beadboard

From Popcorn To Beadboard Ceiling In Just Hours Decorative Tiles Inc
Related Posts