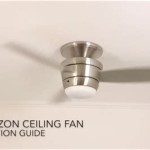
How To Install A Universal Ceiling Fan Remote Control
Installing a universal ceiling fan remote control offers a convenient way to control fan speed and lighting without the need for wall switches or pull chains. This guide provides a step-by-step approach to installing a universal remote, empowering users to upgrade their ceiling fan control system.
Safety Precautions
Before beginning any electrical work, prioritizing safety is paramount. Taking the necessary precautions ensures a safe and successful installation process.
- Turn off the power supply to the ceiling fan at the circuit breaker.
- Confirm the power is off using a voltage tester.
- Read all manufacturer instructions for both the ceiling fan and the universal remote control kit.
Gathering Necessary Tools and Materials
Having all the required tools and materials readily available streamlines the installation process and minimizes disruptions.
- Universal ceiling fan remote control kit
- Screwdriver (Phillips and flathead)
- Wire strippers/cutters
- Electrical tape (optional)
- Ladder
- Voltage tester
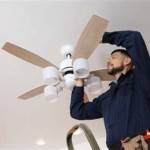
Removing the Existing Canopy Cover
The canopy cover houses the ceiling fan's electrical connections and needs to be removed to access the wiring.
- Carefully remove the screws holding the canopy cover to the mounting bracket.
- Lower the canopy cover, exposing the wiring.
Identifying the Fan and Light Wires
Correctly identifying the wires from the ceiling fan and the house wiring is crucial for proper remote control functionality.
- Locate the wires coming from the fan motor (typically labeled "FAN").
- Identify the wires coming from the light kit (typically labeled "LIGHT").
- Note the colors of the house supply wires (typically black for hot, white for neutral, and green or bare copper for ground).
Connecting the Receiver Unit
The receiver unit is the core component of the remote control system and needs to be wired correctly to the fan and house wiring.
- Connect the receiver unit's fan wires to the corresponding fan wires from the motor using wire connectors.
- Connect the receiver unit's light wires to the corresponding light wires from the light kit using wire connectors.
- Connect the receiver unit's power wires (typically black and white) to the house supply wires using wire connectors.
- Securely cap any unused wires with wire connectors.
Mounting the Receiver Unit Inside the Canopy
Properly securing the receiver unit within the canopy prevents it from interfering with the fan operation and ensures a clean installation.
- Carefully tuck the receiver unit and the connected wires inside the canopy.
- Ensure the wires are not pinched or strained.
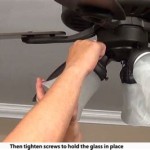
Reinstalling the Canopy Cover
Once the receiver unit is secured, the canopy cover can be reinstalled, completing the visual aspect of the installation.
- Align the canopy cover with the mounting bracket.
- Secure the canopy cover with the screws.
Installing the Remote Control Battery
The remote control requires battery power to operate. Installing the battery activates the remote and enables pairing with the receiver.
- Open the battery compartment on the remote control.
- Insert the battery according to the polarity markings.
- Close the battery compartment.
Testing the Remote Control
After completing the installation, testing the remote control functionality verifies proper operation and confirms the success of the process.
- Restore power to the ceiling fan at the circuit breaker.
- Test the fan speed and light controls using the remote.
- Verify all functions operate as expected.
Setting the Dip Switches (If Applicable)
Some universal remote control kits use dip switches for frequency matching between the remote and the receiver. This section addresses how to adjust these switches.
- Locate the dip switches on both the remote control and the receiver unit.
- Ensure the dip switches on both devices are set to the same configuration.
- Refer to the manufacturer's instructions for specific dip switch settings.
Wall Cradle Installation (Optional)
Many remote controls come with a wall cradle for convenient storage. This section explains how to install the cradle.
- Choose a convenient location near the fan.
- Use the provided screws to secure the cradle to the wall.
Troubleshooting Tips
If the remote control does not function correctly after installation, following these troubleshooting steps may help resolve the issue.
- Check the battery in the remote control.
- Verify the dip switches on the remote and receiver match (if applicable).
- Ensure the power supply to the fan is restored.
- Consult the manufacturer's troubleshooting guide for specific error codes or issues.

How To Install A Ceiling Fan With Remote Control

How To Wire A Ceiling Fan With Remote Receiver

Diy How To Install A Ceiling Fan Remote

How To Install A Ceiling Fan Remote Control

Diy How To Install A Ceiling Fan Remote

How To Install The Universal Wink Ceiling Fan Remote Control

Universal Remote Ceiling Fan Light Installation Diagram Doityourself Com Community Forums

Install Remote Control For Ceiling Fan With Light

Ceiling Fan Remote Control Information Do You Need A

Universal Ceiling Fan Remote Control Kit 3 In 1 Light Timing Sd For Hunter Harbor Breeze Westinghouse Honeywell Other Lamp Batteries Are Not Included Temu
Related Posts