How to Fix Water Stains on Popcorn Ceiling
Popcorn ceilings, also known as textured ceilings, were a popular choice in residential construction for several decades. They offered sound dampening qualities and efficiently concealed imperfections in the ceiling surface. However, a significant drawback of these ceilings is their susceptibility to water damage. Water stains on a popcorn ceiling are not only unsightly but can also indicate underlying issues, such as roof leaks, plumbing problems, or condensation build-up. Addressing these stains promptly is crucial to prevent further damage and maintain the integrity of the ceiling. This article provides a comprehensive guide on how to effectively fix water stains on a popcorn ceiling.
Before commencing any repair work, it is imperative to identify and rectify the source of the water leak. Failure to do so will render any repair attempts futile, as the stain will inevitably reappear. Inspect the roof for damaged or missing shingles, compromised flashing around chimneys or vents, or clogged gutters that could be causing water to back up and seep into the ceiling. Inside the attic, carefully examine the areas above the water-stained ceiling for any signs of water ingress or damp insulation. If the leak originates from plumbing, engage a qualified plumber to diagnose and repair the issue. In cases of condensation, improving ventilation in the affected area may be necessary.
Once the water source is resolved, the next step involves preparing the work area. This includes adequately protecting the surrounding surfaces from potential debris and dust generated during the stain removal and repair process. Cover the floor directly beneath the affected area with drop cloths or plastic sheeting. Remove any furniture or objects that could hinder access to the ceiling. It is also advisable to wear protective gear, such as safety glasses and a dust mask, to safeguard against airborne particles. Good ventilation is essential during the repair process, so consider opening windows or using a fan to circulate air.
Key Considerations Before Starting
Prior to attempting any repair, it's vital to consider several key factors that can influence the outcome and safety of the project. These considerations will ensure that the repair is conducted effectively and without causing further damage or health hazards.
Asbestos Testing: A critical first step, especially in homes built before the 1980s, is to have the popcorn ceiling tested for asbestos. Asbestos was commonly used in building materials, including popcorn ceilings, for its fire-resistant and insulating properties. Disturbing asbestos-containing materials during repair can release harmful fibers into the air, posing serious health risks. A certified asbestos inspector can collect a sample of the ceiling material and analyze it in a laboratory. If asbestos is present, it is strongly recommended to hire a professional asbestos abatement company to safely remove or encapsulate the ceiling.
Severity of the Stain: The extent of the water stain will determine the appropriate repair method. Minor, superficial stains may only require cleaning or a light coat of paint, while more extensive stains may necessitate removing and replacing the damaged section of the ceiling. Evaluate the size, color, and depth of the stain to assess the level of repair needed. Darker and larger stains usually indicate more severe water damage and may require more intensive treatment.
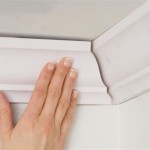
Matching the Texture: Achieving a seamless repair requires careful attention to matching the existing popcorn texture. Popcorn ceilings come in various textures, ranging from fine to coarse. Before starting the repair, take a close look at the surrounding texture and try to find a matching product. Pre-mixed popcorn ceiling texture repair compounds are available at most home improvement stores. Alternatively, a texture sprayer can be used to apply a more uniform and consistent texture. Testing the texture match on a small, inconspicuous area before applying it to the entire damaged section is always recommended.
Methods for Fixing Water Stains
Several methods can be employed to fix water stains on popcorn ceilings, depending on the severity of the stain and the overall condition of the ceiling. These methods range from simple cleaning techniques to more involved repair procedures.
Cleaning Minor Stains: For light, superficial stains, cleaning may be sufficient. This method involves gently wiping the stained area with a mild cleaning solution. Mix a small amount of dish soap with warm water. Dampen a sponge or soft cloth with the solution, ensuring it is not overly saturated. Carefully blot the stain, working from the outside towards the center. Avoid rubbing vigorously, as this can damage the texture of the ceiling. Rinse the sponge or cloth frequently with clean water and continue blotting until the stain is removed. Allow the area to dry thoroughly before assessing the results. If the stain persists, proceed to the next method.
Painting Over the Stain: If cleaning is ineffective, painting may be necessary to conceal the stain. Before painting, ensure the ceiling is completely dry. Apply a stain-blocking primer to the stained area. Stain-blocking primers are specifically formulated to prevent stains from bleeding through the paint. Allow the primer to dry according to the manufacturer's instructions. Once the primer is dry, apply a coat of ceiling paint that matches the existing color. Use a paint roller with a nap designed for textured surfaces to ensure even coverage. Allow the paint to dry completely and apply a second coat if needed. It is essential to feather the edges of the painted area to blend seamlessly with the surrounding ceiling.
Removing and Replacing Damaged Section: For severe water stains or areas where the popcorn texture is heavily damaged, removing and replacing the affected section may be the most effective solution. This method requires more skill and effort but can produce excellent results. First, carefully score the perimeter of the damaged area with a utility knife. This will help prevent the surrounding texture from peeling away during removal. Use a putty knife or scraper to gently scrape away the damaged popcorn texture. Be careful not to damage the underlying drywall. Once the damaged texture is removed, apply a thin layer of drywall joint compound to the area. Allow the compound to dry completely and then sand it smooth. Apply a coat of primer to the repaired area. Finally, apply a popcorn ceiling texture repair compound to match the existing texture. Practice applying the texture on a piece of cardboard first to achieve the desired effect. Allow the texture to dry completely and then paint it to match the surrounding ceiling.
Step-by-Step Guide to Repairing a Water Stained Popcorn Ceiling
This detailed guide provides a step-by-step approach to repairing water stains on popcorn ceilings, encompassing both minor stain removal and more extensive replacement techniques.
Step 1: Preparation
Begin by gathering all necessary materials, including drop cloths, safety glasses, a dust mask, a sponge, mild dish soap, warm water, stain-blocking primer, ceiling paint, a paint roller with a textured nap, a utility knife, a putty knife, drywall joint compound, sandpaper, and popcorn ceiling texture repair compound. Protect the surrounding area with drop cloths and wear safety glasses and a dust mask. Ensure adequate ventilation by opening windows or using a fan.
Step 2: Stain Assessment
Carefully assess the severity of the water stain. If the stain is minor and superficial, proceed to the cleaning method. If the stain is more extensive or the popcorn texture is damaged, consider removing and replacing the affected section.
Step 3: Cleaning (for Minor Stains)
Mix a small amount of dish soap with warm water. Dampen a sponge or soft cloth with the solution and gently blot the stain, working from the outside towards the center. Rinse the sponge or cloth frequently with clean water and continue blotting until the stain is removed. Allow the area to dry completely.
Step 4: Priming and Painting (if Cleaning Fails)
Once the cleaned area is completely dry, apply a stain-blocking primer to the stained area. Allow the primer to dry according to the manufacturer's instructions. Apply a coat of ceiling paint that matches the existing color. Use a paint roller with a nap designed for textured surfaces to ensure even coverage. Allow the paint to dry completely and apply a second coat if needed. Feather the edges of the painted area to blend seamlessly with the surrounding ceiling.
Step 5: Removing Damaged Section (for Extensive Stains/Damage)
Carefully score the perimeter of the damaged area with a utility knife. Use a putty knife or scraper to gently scrape away the damaged popcorn texture. Be careful not to damage the underlying drywall.
Step 6: Applying Joint Compound
Once the damaged texture is removed, apply a thin layer of drywall joint compound to the area. Allow the compound to dry completely and then sand it smooth.
Step 7: Priming the Repaired Area
Apply a coat of primer to the repaired area. Allow the primer to dry completely.
Step 8: Applying Texture
Apply a popcorn ceiling texture repair compound to match the existing texture. Practice applying the texture on a piece of cardboard first to achieve the desired effect. Allow the texture to dry completely.
Step 9: Painting the Repaired Area
Paint the textured area to match the surrounding ceiling. Use a paint roller with a nap designed for textured surfaces to ensure even coverage. Allow the paint to dry completely and apply a second coat if needed. Feather the edges of the painted area to blend seamlessly with the surrounding ceiling.
Preventative Measures
Preventing water stains on popcorn ceilings is always preferable to repairing them. Implement preventative measures to minimize the risk of water damage and maintain the integrity of the ceiling.
Regular Roof Inspections: Conduct regular inspections of the roof, especially after severe weather events. Look for damaged or missing shingles, compromised flashing, or clogged gutters. Address any issues promptly to prevent water from seeping into the ceiling.
Maintain Plumbing Systems: Regularly inspect plumbing fixtures and pipes for leaks. Repair any leaks immediately to prevent water damage to the ceiling. Ensure proper ventilation in bathrooms and kitchens to minimize condensation.
Control Humidity Levels: High humidity levels can lead to condensation, which can cause water stains on the ceiling. Use dehumidifiers in areas prone to high humidity, such as basements and bathrooms. Ensure proper ventilation to reduce moisture build-up.

Popcorn Ceiling How To Remove An Ugly Stain Drywall Repairman Water Damage Repair

What Should I Do About Water Stains On A Popcorn Williams Painting

How To Fix Water Damage On Popcorn Ceilings

How To Fix Water Stains On Ceiling Leaks Super Easy Steps Abbotts At Home

How To Fix Water Damage On Popcorn Ceilings

How To Repair A Water Damaged Popcorn Ceiling

How To Remove Water Stains From Popcorn Ceiling At Home Without Paint Homax Texture Spray

How To Repair A Water Damaged Popcorn Ceiling

We Have An Old Water Stain On Our Ceiling How Do I Cover It Hometalk

How To Paint Water Stains On Ceiling
Related Posts