How To Draw a Ceiling in SketchUp
Drawing a ceiling in SketchUp is a fundamental skill for creating three-dimensional models. It's an essential element for defining spaces and creating realistic representations of interiors and exteriors. This process involves creating a plane that sits above the walls, defining the top boundary of the room or structure. This guide will outline the steps involved in creating a ceiling in SketchUp, from basic shapes to more complex designs.
1. Create the Walls of Your Structure
Before drawing the ceiling, you need to establish the framework of your structure. In SketchUp, this typically involves creating the walls of the room or building. You can achieve this by using the Line tool to draw the outline of the walls, followed by the Push/Pull tool to extrude the lines into three-dimensional walls.
Ensure that the walls are positioned correctly and have the desired height. The ceiling will be drawn on top of these walls, so accurate wall dimensions are crucial for a realistic representation.
2. Draw the Ceiling Plane
Once the walls are in place, you can begin creating the ceiling plane. This is the surface that will define the top of the room. Here's how to do it:
- Select the Rectangle tool: This tool is found in the toolbar or by pressing the "R" key on your keyboard.
- Click and drag: Click anywhere on the top edge of your walls, and then drag the cursor to create a rectangle that extends beyond the walls. This rectangle will be the outline of your ceiling.
- Adjust the Size: Use the "Move" tool (or press the "M" key) to adjust the size and position of the rectangle to ensure it perfectly covers the top of your walls.
It's important to note that the ceiling plane doesn't have to be a simple rectangle. You can utilize the Line tool to create more complex shapes, such as angled ceilings or curved surfaces.
3. Extrude the Ceiling
After creating the ceiling plane, you need to give it thickness, transforming it into a solid surface. For this, you will use the Push/Pull tool:
- Select the Push/Pull tool: This tool is located in the toolbar or can be accessed by pressing the "P" key.
- Click and drag upward: Position your cursor over the ceiling plane, and click and drag upward. This will extrude the plane into a solid ceiling.
- Adjust the thickness: As you drag, you can see the thickness of the ceiling changing. Release the mouse button when the ceiling has reached the desired thickness.
You can now see your ceiling as a distinct object within your model. It's possible to further refine the ceiling by applying materials, adding details, or creating openings.
4. Optional: Adding Details and Refinements
After creating the basic ceiling, you can enhance its appearance and realism by:
- Adding materials: Apply a material to your ceiling to give it a specific texture and color. You can choose from pre-defined materials or create your own.
- Incorporating trims: Use the Line tool to draw trim around the edges of the ceiling, mimicking the look of molding or crown molding.
- Creating openings: If your design requires skylights or vents, you can create these openings by using the "Move" tool to cut sections out of the ceiling.
- Creating complex shapes: For more intricate ceiling designs, you can use the "Follow Me" tool to create complex shapes and patterns.
This level of detail allows you to create highly realistic and customized ceiling designs within your SketchUp model.

Sketchup Beginners False Ceiling Tutorial I How To Make In Jsdesign Ii

How To Create A Reflected Ceiling Plan In Sketch Up And Then Insert It Layout Pro Sketchup Community

Sketchup Adding Floors And Ceilings

How To Make Ceiling In Sketchup False Design Easy Fast Create

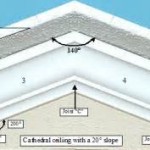
How To Build This Room Slanted Ceilings Sketchup Community

Draw A Coffered Ceiling In Sketchup

Adding A Sloped Ceiling In Sketchup Cut Away Method

Draw A Coffered Ceiling In Sketchup

Draw A Coffered Ceiling In Sketchup

Draw A Coffered Ceiling In Sketchup
Related Posts