How to Create a Ceiling in SketchUp
Creating a ceiling in SketchUp is a relatively simple process that can be completed in a few steps. By following these instructions, you can easily add a realistic-looking ceiling to your SketchUp model.
Materials You'll Need
- SketchUp software
- A 2D or 3D model of your room or space
Step-by-Step Instructions
Step 1: Import Your ModelBegin by importing your 2D or 3D model into SketchUp. Ensure that the model is properly oriented and scaled.
Step 2: Create the Ceiling PlaneSelect the "Rectangle" tool in the SketchUp toolbar. Click on one corner of the room or space on the floor plan and drag the mouse cursor to create a rectangle that extends to the opposite corner. This rectangle will represent the bottom edge of your ceiling.
Step 3: Extrude the CeilingOnce you have created the rectangle, select it and right-click. Choose "Extrude" from the context menu. Enter the desired height of the ceiling in the "Distance" field. The ceiling will be extruded upward from the rectangle.
Step 4: Create the Perimeter Moldings (Optional)If desired, you can add perimeter moldings to the ceiling. This will give it a more finished look. Select the "Line" tool and draw lines around the perimeter of the ceiling, at the edges of the rectangle. Then, extrude these lines upward by a small distance (e.g., 1-2 inches).
Step 5: Add Textures and MaterialsTo make your ceiling look more realistic, you can apply textures and materials to it. Select the ceiling plane and open the "Materials" panel in SketchUp. Choose a ceiling material from the library or import your own custom texture.
Step 6: Adjust LightingProper lighting is essential for making your ceiling look realistic. Adjust the lighting in your SketchUp model to create a natural and balanced illumination. You may need to add additional light sources or adjust the intensity of existing ones.
Step 7: Save Your ModelOnce you are satisfied with your ceiling, save your SketchUp model. You can export it in various formats for further use or presentation.
Additional Tips
* Use realistic textures and materials to enhance the appearance of your ceiling. * Pay attention to the scale of your ceiling and make sure it is proportional to the rest of the model. * Take your time and experiment with different ceiling designs to find the one that best suits your space. * Consider adding recessed lights or other lighting fixtures to the ceiling for additional realism.
Sketchup Beginners False Ceiling Tutorial I How To Make In Jsdesign Ii

How To Make False Ceiling In Sketchup V Ray

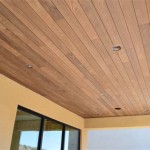
Making A Wavy Wood Ceiling In Sketchup

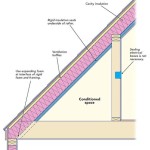
Adding A Sloped Ceiling In Sketchup Cut Away Method

How To Make Ceiling In Sketchup False Design Easy Fast Create

How To Create A Reflected Ceiling Plan In Sketch Up And Then Insert It Layout Pro Sketchup Community

How To Make False Ceiling In Sketchup V Ray

Draw A Coffered Ceiling In Sketchup

How To Build This Room Slanted Ceilings Sketchup Community

How To Make Ceiling In Sketchup False Design Easy Fast Create
Related Posts