How to Transform Your Popcorn Ceiling with Shiplap: A Comprehensive Guide
Popcorn ceilings, once a popular design choice, have fallen out of favor in recent years. If you're looking to update the look of your home and ditch the textured ceiling, shiplap is an excellent alternative.
Shiplap is a type of wooden paneling that has gained popularity in both interior and exterior design. It's known for its rustic charm and versatility, and it can be used to create a variety of different looks.
In this guide, we'll walk you through the essential steps on how to cover a popcorn ceiling with shiplap. We'll cover everything from preparing the surface to installing the shiplap and finishing touches.
Step 1: Prepare the Popcorn Ceiling
Before you can install shiplap, you need to prepare the popcorn ceiling. This involves removing the popcorn texture and ensuring the surface is smooth and level.
To remove the popcorn texture, you can use a scraping tool or a chemical popcorn remover. Once the popcorn texture is removed, you may need to patch any cracks or holes in the ceiling with drywall compound or plaster.
Once the ceiling is patched, you need to sand it smooth. This will help to create a good surface for the shiplap to adhere to.
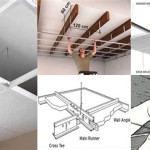
Step 2: Install Furring Strips
Furring strips are thin strips of wood that are used to create a flat surface for the shiplap to be installed on. They also help to hide any imperfections in the ceiling.
To install furring strips, you will need to first measure the length of the ceiling and cut the furring strips to that length. Then, you will need to space the furring strips evenly across the ceiling and attach them to the joists with nails or screws.
Step 3: Install the Shiplap
Now that the furring strips are installed, you can start installing the shiplap. Shiplap is typically installed in a horizontal pattern, but you can also install it vertically if you prefer.
To install the shiplap, you will need to cut each piece to the length of the ceiling. Then, you will need to nail or screw the shiplap into the furring strips.
Step 4: Fill the Gaps
Once the shiplap is installed, you will need to fill in any gaps between the boards. You can do this using caulk or wood filler.
Once the gaps are filled, you can sand the ceiling smooth.
Step 5: Paint or Stain the Shiplap
The final step is to paint or stain the shiplap. You can choose any color or finish that you like.
If you are painting the shiplap, you will need to apply a primer first. This will help the paint to adhere to the wood.
Once the primer is dry, you can apply two coats of paint.
Conclusion
Covering a popcorn ceiling with shiplap is a relatively easy and affordable DIY project that can transform the look of your home. By following the steps outlined in this guide, you can achieve a professional-looking finish.

How To Cover A Popcorn Ceiling With Shiplap Sprucing Up Mamahood

Easily Cover Popcorn Ceilings With Shiplap

How To Plank A Popcorn Ceiling

Easily Cover Popcorn Ceilings With Shiplap

Decorative Ideas To Cover Popcorn Ceilings Artsy Rule

Easily Cover Popcorn Ceilings With Shiplap

How To Install Shiplap Ceiling Over Popcorn Making Maanita

Easily Cover Popcorn Ceilings With Shiplap

The Easiest Way To Cover A Popcorn Ceiling Simplicity In South

How To Cover Popcorn Ceiling 8 Creative Ways Making Maanita
Related Posts