How to Build Vaulted Ceiling Trusses
Vaulted ceilings, often associated with grand architecture, add a touch of elegance and spaciousness to any room. Building vaulted ceiling trusses is a complex but rewarding project that requires careful planning and execution. This article will guide you through the process of building vaulted ceiling trusses, providing an overview of the necessary steps and considerations.
1. Planning and Design
Before you begin construction, meticulous planning is crucial. This includes determining the overall dimensions of the vaulted ceiling, the desired roof pitch, and the span of the trusses. You should also choose the type of wood to use. Engineered lumber, such as I-joists or laminated veneer lumber (LVL), offers superior strength and stability, while traditional dimensional lumber can be used for smaller spans.
Design software, such as SketchUp or AutoCAD, can be helpful in visualizing the truss design and ensuring that the required structural components are incorporated. You should consult with a qualified engineer for complex or large-scale projects, especially in areas with demanding weather conditions. The engineer can perform structural calculations and provide detailed drawings to comply with local building codes.
2. Cutting and Assembling the Truss
Once the design is finalized, you can proceed with cutting the lumber. This involves accurately measuring and cutting the lumber to the required lengths according to the truss design drawings. A circular saw or miter saw is useful for making these cuts. Ensure that the cuts are accurate and precise to maintain structural integrity.
Assembly of the truss components is a crucial step. The process involves carefully aligning and joining the lumber pieces according to the design. Use appropriate connectors, such as gusset plates, metal plates, or specially designed truss plates, to fasten the pieces securely.
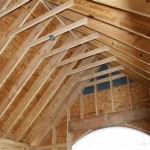
3. Truss Installation
After assembling the trusses, you need to install them on the wall structure. This typically involves lifting and securing them in place using heavy-duty jacks or a crane. It is essential to ensure that the trusses are properly aligned and plumb.
Once the trusses are in place, they need to be securely fastened to the wall structure. This can be achieved using strong bolts, nails, or screws. Additionally, you may need to install additional bracing or support beams to ensure the stability of the vaulted ceiling.
4. Roofing and Finishing
The final stage involves installing the roofing material and finishing the vaulted ceiling. The chosen roofing material will depend on the desired aesthetic and the local climate.
With the roofing in place, you can start the finishing process. This may involve installing insulation, drywall, or other ceiling materials. The specific finishing touches will depend on the overall design and the desired look of the vaulted ceiling.

Framing A Cathedral Ceiling Fine Homebuilding

Best Way To Build A Cathedral Roof For Garage Greenbuildingadvisor

Vaulted Ceiling Precautions Don T Get In Trouble On Your Project Armchair Builder Blog Build Renovate Repair Own Home Save Money As An Owner

Framing A Cathedral Ceiling Rafter Overview My Diy

How To Build Vaulted Roof For Crawlspace Home Addition Design Framing And Assembly Ideas

Insulating And Air Sealing A Vaulted Ceiling Greenbuildingadvisor

Vaulted Ceiling Opening Up Your Home For A Bigger Feel Armchair Builder Blog Build Renovate Repair Own Save Money As An Owner

Vaulting A Presently Trussed Ceiling In Ranch House Fine Homebuilding

Explore Roof Truss Designs For Your Project A J Reliable Inc

Types Of Prefab Roof Trusses
Related Posts