How To Build A Coffered Ceiling Step-by-Step
Coffered ceilings, distinguished by their recessed panels formed by intersecting beams, add a touch of architectural elegance and sophistication to any room. This intricate detail, once a hallmark of grand estates, can now be incorporated into residential designs to elevate aesthetics and increase property value. The construction of a coffered ceiling involves careful planning, precise measurements, and meticulous execution. This article provides a thorough guide on how to build a coffered ceiling, walking through each step required to achieve a visually stunning result.
Before commencing the project, a comprehensive understanding of the existing ceiling structure is necessary. This includes identifying the type of ceiling (e.g., drywall, plaster), the location of joists and studs, and any existing electrical wiring or plumbing. This assessment forms the foundation for a successful and safe installation. Furthermore, it is crucial to review local building codes and regulations to ensure compliance throughout the project.
Safety is paramount when undertaking any construction project. Appropriate personal protective equipment (PPE) should be worn at all times. This typically includes safety glasses, a dust mask or respirator, hearing protection, and work gloves. Ensure the workspace is well-ventilated and free of obstructions. Ladders used must be stable and correctly positioned to prevent falls. When working with power tools, always adhere to the manufacturer's instructions and safety guidelines.
Planning and Design
The initial phase involves meticulous planning and design. The size and shape of the room will dictate the coffered ceiling's design. Typically, a symmetrical grid pattern is preferred for visual balance. Begin by measuring the room's length and width, and then determine the desired size and spacing of the coffers. It's recommended to create a detailed sketch or digital rendering of the ceiling design to visualize the final outcome. This visual representation will assist in the accurate calculation of material quantities and ensure a harmonious aesthetic.
Consider the depth of the coffers. A deeper coffer creates a more dramatic visual effect, while a shallower coffer provides a subtle enhancement. The chosen depth should complement the room's overall height and scale. A low ceiling may benefit from shallower coffers to avoid overwhelming the space. Conversely, a high ceiling can accommodate deeper coffers for increased visual impact.
Material selection is a crucial aspect of the design process. Common materials for coffered ceilings include wood (e.g., pine, poplar, oak), MDF (medium-density fiberboard), and PVC. Wood offers a natural warmth and can be stained or painted to match the existing décor. MDF provides a smooth, uniform surface that is ideal for painting. PVC is a moisture-resistant option that is suitable for bathrooms or kitchens. Consider the budget, aesthetic preferences, and the room's environment when selecting materials. The weight of the selected material is also a critical factor, as heavier materials require additional support.
Framing the Ceiling Grid
The first step in the physical construction is to establish the reference lines on the existing ceiling. Use a laser level or chalk line to mark the locations of the main beams. Ensure these lines are perfectly straight and parallel. The accuracy of these initial lines will directly impact the final outcome of the coffered ceiling. Use a stud finder to locate ceiling joists; these will serve as anchor points for the framing members.
Construct the grid using lumber, typically 2x4s or 2x6s, depending on the desired depth of the coffers. Secure the main beams to the ceiling joists using screws or nails. Ensure the beams are level and plumb. Add cross beams, also referred to as "ribs", to create the individual coffer boxes. These cross beams should be spaced according to the design plan. Accurate cutting and precise installation of these beams contribute to a professional appearance.
For added strength and stability, consider using construction adhesive in addition to screws or nails. This will create a stronger bond between the framing members and the existing ceiling. Ensure the adhesive is compatible with the materials being used. Clamps can assist in holding the framing members in place while the adhesive cures. Periodically check the levelness and alignment of the framing as it is being installed.
If the existing ceiling is uneven, shims can be used to level the framing. Position the shims between the framing members and the ceiling joists to compensate for any variations in height. Secure the shims with screws or nails to prevent them from shifting. This will ensure the finished coffered ceiling has a consistent and level appearance.
Installing the Coffer Boxes
Once the framing is complete, the coffer boxes can be installed. These boxes are typically constructed from MDF or wood, and their dimensions should precisely match the openings created by the framing grid. The coffer boxes can be pre-assembled or assembled in place, depending on their size and complexity.
Cut the material for the coffer boxes to the required dimensions using a miter saw for accurate angled cuts. Assemble the boxes using wood glue and nails or screws. Ensure the boxes are square and the corners are tight. Clamps can be used to hold the boxes together while the glue dries.
Install the coffer boxes into the framing grid, ensuring they fit snugly and are level. Secure them to the framing members using screws or nails. Countersink the screws or nails and fill the holes with wood filler. Sand the filler smooth and prime the coffer boxes. This will create a seamless transition between the coffer boxes and the framing grid.
Consider adding decorative trim or molding to the inside edges of the coffer boxes to enhance their visual appeal. This trim can be made from wood, MDF, or PVC, and it can be painted or stained to match the coffered ceiling. Install the trim using adhesive and nails or screws. Miter the corners of the trim for a professional finish.
Finishing Touches
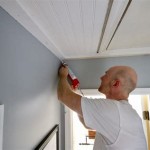
After the coffer boxes are installed, the finishing touches can be applied. This includes caulking, painting, and adding any desired decorative elements. Caulk all the seams and joints between the coffer boxes and the framing grid. This will create a smooth, seamless appearance and prevent drafts. Use a paintable caulk that is compatible with the chosen paint.
Prime the entire coffered ceiling, including the framing grid and the coffer boxes. This will provide a uniform surface for the paint to adhere to. Use a high-quality primer that is suitable for the chosen paint. Allow the primer to dry completely before applying the paint.
Paint the coffered ceiling with the desired color. Use a high-quality paint that is durable and easy to clean. Apply multiple coats of paint, allowing each coat to dry completely before applying the next. A brush can be used for detailed areas, and a roller can be used for larger surfaces. Maintain a wet edge to avoid lap marks.
Consider adding lighting to the coffered ceiling to further enhance its visual appeal. Recessed lighting can be installed within the coffer boxes to create a soft, ambient glow. Track lighting can be installed along the framing grid to highlight specific areas of the room. Chandeliers or pendant lights can be suspended from the center of the coffer boxes to create a focal point.
Finally, inspect the completed coffered ceiling for any imperfections. Touch up any areas that need attention, such as nail holes, scratches, or uneven paint. Clean the coffered ceiling with a damp cloth to remove any dust or debris. The completed coffered ceiling should be a visually stunning and structurally sound addition to the room.

Coffered Ceiling Diy Step By Install Guide Arched Manor

How To Build A Coffered Ceiling Top Shelf Diy

How To Install Coffered Ceilings Think Wood

Diy Coffered Ceiling Project Renoguide N Renovation Ideas And Inspiration

Coffered Ceiling Diy Tutorial Palmetto Highway

How To Build A Diy Coffered Ceiling Step By Our Aesthetic Abode

How To Build A Coffered Ceiling Top Shelf Diy

Easy Diy Coffered Ceiling Idea Simple Low Profile Design Steps And Abbotts At Home

How To Create A Coffered Ceiling

How To Build A Diy Coffered Ceiling Step By Our Aesthetic Abode
Related Posts