DIY Beadboard Ceiling Over Popcorn: A Step-by-Step Guide
Transforming your space with a classic beadboard ceiling can elevate the aesthetic and create a timeless, elegant feel. While many homeowners choose to replace their existing ceiling entirely, a more budget-friendly and DIY-friendly option is to install beadboard panels over an existing popcorn ceiling. This guide will walk you through the process of covering your popcorn ceiling with beadboard, providing a step-by-step approach for a successful and stylish makeover.
Preparing the Ceiling for Beadboard Installation
Before embarking on the installation process, it's crucial to prepare the ceiling properly. This involves addressing existing issues and creating a smooth surface for the beadboard panels. The first step is to remove the popcorn ceiling. While this might seem daunting, it's a manageable task with the right tools and approach.
You can use a scraper or a paint scraper to remove the popcorn texture. However, it's essential to protect yourself from the dust and debris generated during this process. Wear a dust mask and safety glasses, and cover the surrounding areas with drop cloths or plastic sheeting. Be patient and methodical when removing the popcorn ceiling, ensuring you remove all of it for a smooth, even surface.
Once the popcorn is removed, your ceiling will likely have some imperfections. To create a smooth, even surface for the beadboard, consider skim coating the entire ceiling. This involves applying a thin layer of joint compound over the existing ceiling, filling any cracks or imperfections. Ensure that the ceiling is completely dry before proceeding to the next step.
Installing Furring Strips for a Secure Beadboard Attachment
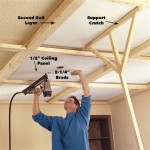
Installing furring strips over the existing ceiling provides a solid foundation for the beadboard panels and helps to create a perfectly level surface. Furring strips are narrow pieces of wood that are attached to the ceiling at regular intervals. They are typically made of pine or spruce and come in different lengths and widths.
Choose furring strips that are wide enough to accommodate the thickness of the beadboard panels. You can use a stud finder to determine the location of joists in your ceiling. Attach the furring strips perpendicular to the direction of the joists, ensuring they are level using a level tool. Secure the furring strips to the ceiling with screws or nails, making sure to drive them in at a slight angle for stability.
Spacing the furring strips correctly is essential for a secure and aesthetically pleasing beadboard installation. The spacing should be slightly less than the width of the beadboard panels to ensure proper support. It's also important to ensure there is consistency in the spacing throughout the ceiling for a seamless and professional look.
Installing Beadboard Panels Over the Prepared Ceiling
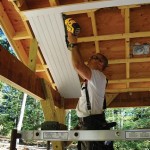
With the furring strips securely attached, you're ready to install the beadboard panels. Beadboard panels come in various sizes, so choose a size that best suits your ceiling dimensions. It's recommended to start at one corner of the ceiling and work your way across, fitting the panels together tightly.
Use a pencil to mark the cut lines on the panels before using a saw or utility knife to cut them to size. Make sure the cuts are precise, as any gaps or misalignment will be noticeable. Apply construction adhesive to the back of the panels and press them firmly against the furring strips, ensuring they are level and flush with the surrounding panels. Secure the panels to the furring strips using finishing nails or staples, driving them in at an angle for added stability.
As you install the panels, use a level to ensure they are properly aligned and flush with each other. If you encounter any gaps, you can fill them with wood filler. Apply a thin layer of filler, let it dry completely, and sand it smooth for a seamless finish.
Finishing Touches for a Polished Look
Once all the beadboard panels are installed, it's time to add the finishing touches for a polished and elegant look. The final step involves painting the beadboard ceiling to match the desired aesthetic of your space.
Sand the beadboard panels gently to create a smooth surface for the paint to adhere to. Then, apply a primer to ensure even paint coverage and prevent the beadboard from absorbing too much paint. Allow the primer to dry completely before applying the selected paint color in thin, even coats. You can use a brush, roller, or paint sprayer for this step.
After the paint is completely dry, inspect the beadboard ceiling for any imperfections or touch-up areas. Apply additional paint or wood filler as needed to achieve a flawless finish. Once the paint is dry, your DIY beadboard ceiling will be complete, adding a classic charm and elegance to your space.

The Best Way To Cover Popcorn Ceilings With Beadboard Shoe Makes New

How To Cover Popcorn Ceilings With Beadboard

Diy Beadboard Ceiling Tutorial Easy And Inexpensive Custom Treatment

How To Cover Popcorn Ceiling With Beadboard Planks Diy Tutorial

Diy Beadboard Ceiling Tutorial Easy And Inexpensive Custom Treatment

How To Cover Popcorn Ceilings With Beadboard

Diy Bead Board Ceiling To Hide An Ugly Popcorn Lehman Lane Beadboard

How To Cover Popcorn Ceilings With Beadboard

How To Cover Popcorn Ceiling With Beadboard Planks Diy Covering

How Much Does It Cost To Install A Beadboard Ceiling 2024 Data Angi
Related Posts