Covering Popcorn Ceilings With Beadboard Panels
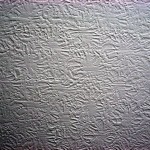
Popcorn ceilings, once a popular design choice, have fallen out of favor in recent years. Their rough texture can collect dust and allergens, and they can be difficult to clean and repair. If you're looking for a way to update your popcorn ceiling, covering it with beadboard panels is a great option.
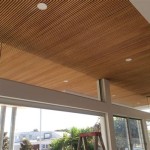
Beadboard panels are a type of wall paneling that is made from thin, narrow strips of wood. They have a raised, beaded pattern that gives them a classic, elegant look. Beadboard panels are available in a variety of widths and finishes, so you can find the perfect look for your home.
Installing beadboard panels over a popcorn ceiling is a relatively easy project that can be completed in a weekend. The following steps will guide you through the process:
Materials You'll Need:
- Beadboard panels
- 1x4 furring strips
- Construction adhesive
- Brad nails and a brad nailer
- Caulk
- Paint or stain (optional)
Step 1: Prepare the Ceiling
The first step is to prepare the ceiling for the beadboard panels. This involves removing any popcorn texture that may be present. You can do this by using a drywall scraper or a power sander. Once the popcorn texture has been removed, you need to clean the ceiling thoroughly to remove any dust or debris.
Step 2: Install the Furring Strips
Once the ceiling is prepared, you need to install furring strips to create a level surface for the beadboard panels. Furring strips are thin strips of wood that are typically 1x4 inches in size. To install the furring strips, simply apply construction adhesive to the back of the strips and then press them into place on the ceiling. Make sure that the strips are level and spaced evenly apart.
Step 3: Install the Beadboard Panels
Once the furring strips are installed, you can begin installing the beadboard panels. To do this, apply a bead of construction adhesive to the back of a panel and then press it into place against the furring strips. Use a brad nailer to secure the panel in place. Continue installing the panels in this manner until the entire ceiling is covered.
Step 4: Caulk and Paint
Once the beadboard panels are installed, you need to caulk the seams between the panels and the ceiling. This will help to seal out any air leaks and prevent moisture from getting into the panels. Once the caulk has dried, you can paint or stain the beadboard panels to match your desired décor.
Covering a popcorn ceiling with beadboard panels is a great way to update the look of your home. By following these steps, you can easily complete this project yourself in a weekend.

The Best Way To Cover Popcorn Ceilings With Beadboard Shoe Makes New

How To Cover Popcorn Ceilings With Beadboard

How To Cover Popcorn Ceilings With Beadboard

How To Cover Popcorn Ceiling With Beadboard Planks Diy Tutorial

How Much Does It Cost To Install A Beadboard Ceiling 2024 Data Angi

Diy Beadboard Ceiling Tutorial Easy And Inexpensive Custom Treatment

How To Cover Popcorn Ceilings With Beadboard

How To Cover Popcorn Ceiling 8 Creative Ways Making Maanita

How To Cover Popcorn Ceiling With Beadboard Planks Diy Hometalk

Cover Popcorn Ceilings Armstrong Residential
Related Posts