Common Ceiling Fan Problems In English Rooms: America's Test Kitchen Insights
Ceiling fans are a staple in many American homes, especially in the English-inspired rooms often favored for their comfort and classic aesthetic. They provide efficient air circulation, contributing to both comfort and energy savings throughout the year. However, like any mechanical device, ceiling fans are prone to various issues that can compromise their performance and longevity. This article explores common ceiling fan problems observed and addressed, drawing upon the rigorous testing and practical insights reminiscent of America's Test Kitchen approach to problem-solving – focusing on understanding the root cause and providing effective solutions, rather than merely offering band-aid fixes.
Understanding the mechanics of a ceiling fan is fundamental to diagnosing problems. A typical ceiling fan consists of a motor, blades, a mounting bracket, and a switch or remote control for operation. The motor converts electrical energy into mechanical energy, rotating the blades to create airflow. The mounting bracket secures the fan to the ceiling, and the switch or remote allows for controlling the fan's speed and direction. Failures in any of these components can lead to a variety of issues.
Wobbly Fan
A wobbly or unbalanced ceiling fan is a common complaint. This issue not only creates an annoying visual distraction but can also put undue stress on the mounting bracket and motor, potentially leading to more significant problems down the line. The primary cause of a wobbly fan is often an imbalance in the blades. This imbalance can arise from several factors, including variations in blade weight, slight differences in blade pitch, or even the accumulation of dust and grime unevenly distributed on the blades.
Addressing a wobbly fan typically involves a systematic approach. First, ensure that all blade holder screws are securely tightened. Loose screws can exacerbate any existing imbalance. Next, visually inspect the blades for any signs of damage, such as cracks or warping. A damaged blade may need to be replaced. If the blades appear to be in good condition, the next step is to balance them. Balancing kits are readily available at most hardware stores and typically include small weights that can be attached to the blades. The kit usually comes with instructions on how to identify the blade causing the wobble and where to attach the weights for optimal balance.
The process of balancing involves a trial-and-error approach. Start by attaching a weight to one of the blades, testing the fan, and observing the wobble. Adjust the weight's position or add more weight as needed until the wobble is minimized. It's important to make small adjustments and re-test the fan after each adjustment to avoid over-correcting the imbalance. In some cases, the wobble may be caused by a bent blade iron (the metal piece connecting the blade to the motor). These can be carefully bent back into shape, but extreme caution is needed to avoid breaking them. If the wobble persists despite balancing efforts, the problem may lie in the mounting bracket or the motor itself, requiring more advanced troubleshooting.
Fan Not Spinning or Spins Slowly
A ceiling fan that fails to spin or spins significantly slower than usual indicates a potential problem with the motor, the capacitor, or the wiring. The capacitor is a crucial component that provides the initial surge of power needed to start the motor. If the capacitor is faulty, the motor may struggle to start or may only operate at a reduced speed.
Before delving into more complex troubleshooting steps, it's essential to verify that the fan is receiving power. Check the circuit breaker to ensure that it hasn't tripped. Also, inspect the wiring connections in the fan's switch housing to ensure that all wires are securely connected and that there are no signs of damage or corrosion. A loose or corroded connection can disrupt the flow of electricity to the motor.
If the wiring appears to be in good condition and the fan is receiving power, the next step is to examine the capacitor. The capacitor is typically located in the fan's switch housing and is a small, cylindrical component. Visually inspect the capacitor for any signs of bulging, leaking, or discoloration, which are indicators of a faulty capacitor. Replacing a capacitor is a relatively straightforward task that can often be performed by a homeowner with basic electrical knowledge. However, it's crucial to disconnect the power to the fan before working on any electrical components and to ensure that the replacement capacitor has the same voltage and capacitance ratings as the original.
If the capacitor is not the culprit, the problem may lie within the motor itself. Motor failure can be caused by overheating, worn bearings, or a short circuit. Diagnosing motor problems typically requires specialized tools and expertise. If you suspect that the motor is faulty, it's best to consult with a qualified electrician or replace the entire fan unit.
Noisy Fan Operation
A noisy ceiling fan can be disruptive and annoying, especially in quiet rooms like bedrooms or studies. The source of the noise can vary, ranging from loose hardware to worn bearings to interference with the light kit. Identifying the source of the noise is the first step in resolving the issue.
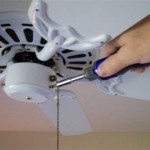
Begin by tightening all screws and bolts on the fan, including those on the blades, the motor housing, and the mounting bracket. Loose hardware can vibrate and create rattling or buzzing noises. Next, check the light kit (if applicable). Ensure that the light bulbs are securely tightened and that the glass shades are properly attached. Loose bulbs or shades can also vibrate and contribute to the noise.
If tightening the hardware doesn't eliminate the noise, the problem may stem from the motor bearings. Over time, the bearings can become worn and dry, leading to squealing or grinding noises. Lubricating the bearings can often alleviate this problem. However, not all ceiling fans have accessible bearings. If the bearings are sealed, lubrication may not be possible, and replacing the motor may be the only solution. For fans with accessible bearings, use a lightweight oil, such as sewing machine oil, to lubricate the bearings. Apply a small amount of oil to each bearing and run the fan to allow the oil to distribute throughout the bearing surface.
Another potential source of noise is interference between the fan blades and the light kit. If the blades are too close to the light kit, they may rub against it, creating a clicking or scraping noise. Adjusting the position of the light kit or using shorter blades can resolve this issue. Also, check that the blades clear the ceiling by a sufficient amount. If the blades are too close to the ceiling, they may create a whooshing noise as they rotate.
In some cases, the noise may be caused by the fan's speed control. Older speed controls, especially those that use a rheostat to adjust the fan speed, can generate a humming or buzzing noise, particularly at lower speeds. Replacing the speed control with a newer, solid-state control can often eliminate this noise.
Dim or Flickering Lights
Ceiling fans with integrated light kits can sometimes experience issues with dim or flickering lights. This problem can be caused by a variety of factors, including loose connections, faulty bulbs, incompatible dimmers, or problems with the light kit's wiring.
Begin by checking the light bulbs. Ensure that they are properly seated in their sockets and that they are not burned out. Replace any burned-out bulbs with new ones of the correct wattage. If the lights are still dim or flickering, inspect the wiring connections in the light kit's housing. Loose or corroded connections can disrupt the flow of electricity to the bulbs. Tighten any loose connections and clean any corroded connections with a wire brush.
If the fan has a dimmer switch, ensure that it is compatible with the type of bulbs being used. Some dimmer switches are not compatible with LED or CFL bulbs, and using an incompatible dimmer can cause the lights to flicker or fail prematurely. Replace the dimmer switch with one that is compatible with the bulbs being used. Also, ensure that the dimmer switch is rated for the wattage of the light kit. Using a dimmer switch that is not rated for the wattage of the light kit can overload the switch and cause it to fail.
Another potential cause of dim or flickering lights is a problem with the light kit's wiring. If the wiring is damaged or shorted, it can disrupt the flow of electricity to the bulbs. Inspect the wiring for any signs of damage, such as frayed wires or burnt insulation. If you find any damaged wiring, it's best to consult with a qualified electrician to have it repaired.
Remote Control Problems
Many modern ceiling fans are equipped with remote controls that allow for convenient operation of the fan and light kit. However, remote controls can sometimes malfunction due to dead batteries, signal interference, or programming issues.
The first step in troubleshooting remote control problems is to replace the batteries. Use fresh batteries of the correct type and ensure that they are properly installed. If the remote still doesn't work after replacing the batteries, check for signal interference. Other electronic devices in the room, such as cordless phones or Wi-Fi routers, can sometimes interfere with the remote's signal. Try moving the fan closer to the remote or turning off any nearby electronic devices to see if that resolves the issue.
If signal interference is not the problem, the remote may need to be reprogrammed. Most ceiling fan remote controls require a special code to be programmed to the fan's receiver. The programming instructions are typically found in the fan's owner's manual. Follow the instructions carefully to reprogram the remote. In some cases, the receiver in the fan itself may be faulty. If reprogramming the remote doesn't work, it may be necessary to replace the receiver.
Troubleshooting common ceiling fan problems requires a systematic approach, starting with the simplest and most obvious solutions and progressing to more complex troubleshooting steps. Safety should always be a top priority when working on electrical appliances. Always disconnect the power to the fan before performing any repairs or maintenance to prevent electric shock. If you are not comfortable working with electrical wiring, it's best to consult with a qualified electrician. By understanding the common causes of ceiling fan problems and how to address them, you can keep your ceiling fans running smoothly and efficiently for years to come, maintaining the comfort and aesthetic of your English-inspired rooms.

Why Designers Think These Ceiling Fans Aren T Cool Anymore And How To Choose A Better Option

Hunter Avia Ii Led 52 Indoor Ceiling Fan With Light And Remote Costco

Atomi Smart Monarc 52 Wi Fi Indoor Ceiling Fan With Color Changing Integrated Led Light And Remote Costco

Hunter Aa 52 Led Ceiling Fan Costco

Ceiling Fan Spinning Slow Repair Easy Diy Fix

How To Troubleshoot Your Ceiling Fan The Home Depot

How To Troubleshoot Your Ceiling Fan The Home Depot

How To Replace A Ceiling Fan Ask This Old House

Hunter Exeter Led 54 Ceiling Fan Costco

Unique Ceiling Fan Super Quiet And Bright Led Light W 3 Color Temperatures Remote Control
Related Posts