Can You Put Shiplap Over Popcorn Ceiling?
Shiplap, with its clean lines and rustic charm, has become a popular choice for wall and ceiling coverings. But what if your existing ceiling boasts a less-desirable feature: popcorn texture? Can you directly install shiplap over a popcorn ceiling, or does this present a challenge? The answer, unfortunately, is not a simple yes or no. It depends on several factors, including the condition of the popcorn ceiling and the desired aesthetic outcome.
Understanding the Challenges
Installing shiplap over a popcorn ceiling poses several challenges:
1. Adhesion Issues:
Popcorn ceilings are typically coated with a textured paint, which offers a less than ideal surface for shiplap installation. The rough texture can hinder the adhesion of the shiplap to the ceiling. This can lead to the shiplap detaching over time, especially in areas with high humidity or temperature fluctuations.
2. Uneven Surface:
The uneven surface created by the popcorn texture can make achieving a smooth and flush shiplap installation difficult. The unevenness can lead to gaps between the shiplap boards and create an unappealing visual effect.
3. Asbestos Concerns:
Popcorn ceilings installed before 1978 may contain asbestos, a hazardous material. Attempting to remove or cover asbestos-containing popcorn ceilings yourself can be dangerous and illegal. If you suspect your popcorn ceiling contains asbestos, professional testing and removal are essential.
Solutions for Installing Shiplap Over Popcorn Ceilings
While directly installing shiplap over a popcorn ceiling is not ideal, several solutions can help overcome these challenges:
1. Removing the Popcorn Ceiling:
The most effective solution for achieving a smooth and secure shiplap installation is to remove the popcorn ceiling entirely. This requires careful preparation, as it may involve asbestos removal, depending on the age of your home. After removing the popcorn, skim-coating and sanding the ceiling creates a smooth and even surface for shiplap installation.
2. Covering the Popcorn Ceiling with a Smooth Layer:
If removing the popcorn ceiling is not feasible, you can cover it with a smooth layer of drywall compound or joint compound. This process involves applying a thin, even layer of compound over the popcorn texture, allowing it to dry thoroughly, and then sanding it smooth. This creates a more suitable surface for shiplap installation, but it requires meticulous preparation and careful application.
3. Utilizing Shiplap with a Textured Surface:
If you prefer to maintain the character of the popcorn ceiling, consider using shiplap boards with a textured surface, such as shiplap with a rough-sawn finish. This approach can help camouflage the popcorn texture and create a visually cohesive effect, although it may not fully conceal the unevenness.
Considerations for Shiplap Installation
Regardless of the approach you choose, several considerations are essential for a successful shiplap installation:
1. Professional Expertise:
If you aren't experienced with drywall and shiplap installation, it's best to hire a professional contractor to ensure proper preparation and installation. They can advise on the most suitable approach for your specific situation and handle the potentially hazardous aspects of asbestos removal if necessary.
2. Proper Preparation:
Whether you choose to remove the popcorn ceiling or apply a smooth layer, thorough preparation is crucial. This includes cleaning the ceiling surface, patching any holes or cracks, and ensuring the surface is dry and dust-free before installing the shiplap.
3. Choosing the Right Shiplap:
Consider the style and design of your shiplap boards. Choose a thickness and width that complements your ceiling and provides a visually pleasing aesthetic. Also, ensure the boards are made from high-quality materials that are resistant to moisture and warping.
4. Maintaining a Safe Environment:
If you are removing the popcorn ceiling yourself, prioritize safety. Wear appropriate protective gear, including a respirator mask and gloves, and work in a well-ventilated area. Dispose of the removed popcorn ceiling material properly, following local regulations.
Installing shiplap over a popcorn ceiling can be achieved with careful planning and consideration. Understanding the challenges, exploring different solutions, and prioritizing safety while maintaining a professional approach will contribute to a successful and aesthetically pleasing outcome.

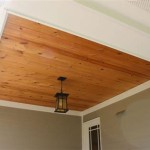
Easily Cover Popcorn Ceilings With Shiplap

How To Cover A Popcorn Ceiling With Shiplap Sprucing Up Mamahood

How To Plank A Popcorn Ceiling

How To Install Shiplap Ceiling Over Popcorn Making Maanita

How To Plank A Popcorn Ceiling

How To Easily Plank A Textured Ceiling Sincerely Marie Designs

Popcorn Ceilings How We Fake Planked Them Nesting Place

Popcorn Ceilings How We Fake Planked Them Nesting Place

Easily Cover Popcorn Ceilings With Shiplap

Popcorn Ceiling Makeover Wood Planks Nesting With Grace
Related Posts