Can You Paint a Gold Ceiling Fan White?
Painting a gold ceiling fan white offers a simple way to update a room's aesthetic. Many homeowners find themselves with outdated brass or gold fixtures that clash with modern decor. Fortunately, with the right preparation and paint, transforming a gold ceiling fan into a crisp white fixture is achievable.
Key Considerations Before Painting
Several factors should be considered before embarking on this project. Careful planning ensures a smooth process and a professional-looking result.
- Fan Material: Identify the material of the fan. Different materials require different primers and paints. Metal fans are common, but some older models might be wood or plastic.
- Existing Finish: Determine if the gold finish is plated or painted. Plated finishes require specific preparation to ensure proper paint adhesion.
- Fan Location: Consider the fan's location. Bathroom fans are exposed to more moisture and may require moisture-resistant paint. Outdoor fans necessitate weather-resistant options.
Preparing the Ceiling Fan for Painting
Proper preparation is the most critical step in achieving a durable and attractive finish. Skipping or rushing this stage can lead to peeling, chipping, and an uneven final appearance.
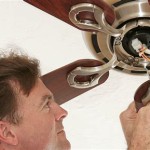
- Disassemble the Fan: Carefully remove the fan blades, light fixtures, and any other removable parts. This allows for easier painting and prevents overspray.
- Clean the Surfaces: Thoroughly clean all surfaces to be painted. Use a degreaser to remove any built-up grime or oil. A clean surface promotes better paint adhesion.
- Sand the Surfaces: Lightly sand all surfaces to be painted. This creates a slightly rough texture, which improves paint adherence. Use fine-grit sandpaper to avoid deep scratches.
- Apply Primer: Apply a metal primer to all metal surfaces. Primer creates a uniform base for the paint and improves its durability. Choose a primer specifically designed for the fan's material.
Painting the Ceiling Fan
Once the fan is prepared, the painting process can begin. Choosing the right paint and applying it correctly are essential for a professional finish.
- Choose the Right Paint: Select a high-quality acrylic enamel paint specifically designed for metal. This type of paint offers durability and resistance to chipping and fading. Consider a spray paint formulated for appliances or metal fixtures for a smoother finish.
- Apply Thin Coats: Apply several thin coats of paint rather than one thick coat. This prevents drips and ensures even coverage. Allow each coat to dry completely before applying the next.
- Use Even Strokes: Use smooth, even strokes when applying the paint. For spray paint, hold the can at a consistent distance and overlap each pass slightly.
- Allow Ample Drying Time: Allow the paint to dry completely before reassembling the fan. This typically takes 24 to 48 hours, depending on the paint and environmental conditions.
Reassembling the Ceiling Fan
After the paint has fully cured, the fan can be reassembled. Careful reassembly is crucial to avoid damaging the newly painted surfaces.
- Handle with Care: Carefully reattach the fan blades, light fixtures, and other components. Avoid excessive force, which could scratch or chip the paint.
- Test Functionality: Once reassembled, test the fan's functionality to ensure everything is working correctly.
Choosing the Right Paint Finish
Selecting the correct paint finish contributes to the overall aesthetic and durability of the finished product. Each finish offers different properties and benefits.
- Satin Finish: A satin finish offers a slight sheen and is relatively easy to clean. It's a popular choice for ceiling fans due to its balance of aesthetics and practicality.
- Semi-Gloss Finish: A semi-gloss finish is more reflective than satin and offers greater durability. It’s a good choice for high-traffic areas or rooms prone to moisture.
- Flat Finish: A flat finish offers minimal sheen and can hide imperfections on the surface. However, it can be more challenging to clean.
Troubleshooting Common Issues
Occasionally, issues may arise during the painting process. Understanding common problems and their solutions can help ensure a successful outcome.
- Dripping Paint: Dripping paint is typically caused by applying too thick a coat. To fix this, lightly sand the affected area after it dries and apply a thinner coat.
- Uneven Coverage: Uneven coverage can be caused by inadequate preparation or applying the paint too thinly. Ensure the surface is properly primed and apply multiple thin coats.
- Peeling Paint: Peeling paint is often a result of inadequate surface preparation or using the wrong type of primer. Ensure the surface is clean, sanded, and primed with a suitable primer for metal.

Update A Ceiling Fan Using Spray Paint

How To Update A Ceiling Fan Without Removing It Savvy Apron

How To Update A Ceiling Fan Without Removing It Savvy Apron

Update A Ceiling Fan Using Spray Paint

Another Ceiling Fan Makeover And How Not To Paint A Bedroom Painting Fans

Can Ceiling Fan Blades Be Stained Or Painted Life Should Cost Less

One Room Challenge Painting Party Week 3 Gold Ceiling Fan Makeover Retro Fans

Update A Ceiling Fan Using Spray Paint

Brass Ceiling Fan Makeover Diy

10 Best Ceiling Fans For Bedrooms Chrissy Marie Blog
Related Posts