1.
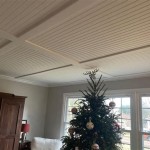
Whether you’re looking to give your home a fresh, new look or you’re remodeling your space, texturing a ceiling can be a great way to make a statement. Textured ceilings are more popular than ever, giving a unique touch and adding an element of dimension to any room. But before you get started, you’ll want to learn more about the best way to texture a ceiling.
Texturing a ceiling isn’t something to be taken lightly. It can be a time-consuming and messy process, and it’s important to do it correctly so you don’t have to start over from scratch. In this article, we’ll take a look at the best methods for texturing a ceiling, what supplies you’ll need, and how to get the job done right.
Preparing To Texture A Ceiling
Before you get started, you’ll want to make sure you have all the necessary supplies and tools. You’ll need a texturing gun, a drywall knife, a drywall trowel, a putty knife, a mud pan, a paint roller, and some sandpaper. You’ll also need some joint compound, a primer, and a sealer. And, of course, you’ll need some texturing material, such as popcorn or orange peel.
Once you’ve gathered your supplies and tools, it’s time to start prepping the ceiling. Start by cleaning the surface and filling any cracks or holes with joint compound. Once this is done and the joint compound has dried, you can move on to the next step.
Applying the Texture
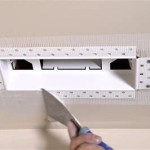
Once the ceiling is prepped, you’re ready to start texturing. Begin by using a primer to seal the surface. Then, using a texturing gun, apply the texturing material to the ceiling in an even coat. Be sure to move the gun in a consistent pattern and to overlap your strokes slightly to ensure a uniform look.
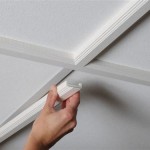
After the texturing material has been applied, use the drywall knife and the mud pan to spread it out evenly. Use the drywall trowel to create a smooth, even surface. Finally, use the putty knife to scrape away any excess material.
Finishing the Job
Once the texturing material has been applied and spread out evenly, it’s time to finish the job. Use a paint roller to apply a sealer to the ceiling. This will help protect the texture from wear and tear. Finally, use some sandpaper to smooth any rough edges.
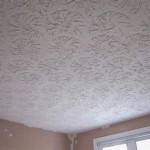
Texturing a ceiling can be a time-consuming and messy job, but it’s worth it. With the right supplies and a bit of patience, you can create a beautiful textured ceiling that will add dimension and character to any room.


![20 Stunning Ceiling Textures With Inspirational Ideas [New 2019]](https://i1.wp.com/www.reverbsf.com/wp-content/uploads/2017/06/Textured-Ceiling-Paint-Ideas.jpg?resize=682.5%2C512)


Related Posts