Adhesive Ceiling Tiles: A Guide to Installation
Adhesive ceiling tiles offer a practical and relatively straightforward solution for improving the aesthetics of a room, covering up imperfections, or enhancing sound absorption. Their primary advantage lies in their ease of installation compared to traditional suspended ceiling systems. This guide provides a comprehensive overview of the installation process, covering essential preparation steps, the application procedure, and crucial considerations to ensure a successful project.
Before embarking on the installation, it is imperative to assess the suitability of the existing ceiling. Adhesive tiles are best applied to smooth, clean, and structurally sound surfaces. Ceilings with significant damage, such as large cracks or loose plaster, should be repaired before proceeding. Likewise, textured ceilings may need to be smoothed or prepared for optimal adhesion. Understanding the characteristics of both the tiles and the existing ceiling is crucial for a lasting and visually appealing result.
Preparing the Ceiling Surface
The success of adhesive ceiling tile installation hinges significantly on proper surface preparation. A clean, smooth, and dry surface provides the optimal foundation for the adhesive to bond effectively. Any existing dirt, dust, grease, or loose paint can compromise the adhesion, leading to tiles detaching over time. Therefore, a thorough cleaning is the first essential step.
Begin by removing any loose debris using a broom or vacuum cleaner. For surfaces with stubborn dirt or grease, wash the ceiling with a mild detergent solution and a sponge or cloth. Ensure the ceiling is thoroughly dried before proceeding to the next step. Allow sufficient drying time, as moisture can hinder adhesion. Using a fan or dehumidifier can expedite the drying process.
If the existing ceiling has a glossy finish, consider scuffing the surface lightly with sandpaper. This creates a slightly rough texture that enhances the adhesive's grip. Be careful not to over-sand, as this can damage the underlying material. Pay particular attention to areas that may have been previously repaired or painted. Remove any sanding dust with a damp cloth and allow the ceiling to dry completely.
For ceilings with minor imperfections, such as small cracks or holes, use a patching compound to fill them in. Apply the compound according to the manufacturer's instructions and allow it to dry completely. Sand the patched areas smooth to create a uniform surface. This ensures that the tiles lie flat and do not reveal any underlying imperfections. Priming the ceiling can further enhance adhesion and provide a more consistent surface for the tiles to adhere to. Use a primer specifically designed for ceilings and follow the manufacturer's recommendations for application.
Selecting the Right Adhesive and Tools
Choosing the appropriate adhesive is paramount for a successful and long-lasting installation. Not all adhesives are created equal, and selecting one specifically formulated for ceiling tiles is essential. Consider the type of ceiling material (e.g., drywall, plaster) and the weight of the tiles when making your selection. Consult the tile manufacturer's recommendations for adhesive compatibility. Using an incompatible adhesive can result in poor adhesion, tile slippage, or even damage to the ceiling surface.
Water-based adhesives are generally preferred for their low odor and ease of cleanup. They are suitable for most standard ceiling tile applications. However, for heavier tiles or areas with high humidity, a stronger adhesive, such as a construction adhesive, may be necessary. Read the adhesive label carefully to understand its properties, drying time, and application instructions. Gather all necessary tools before beginning the installation. Essential tools include a measuring tape, a level, a utility knife or scissors, a chalk line, a caulking gun (if using adhesive tubes), and a clean, lint-free cloth.
A measuring tape is crucial for accurately measuring the ceiling area and determining the tile layout. A level ensures that the tiles are installed straight and even. A utility knife or scissors is used for cutting tiles to fit around edges and corners. A chalk line is helpful for creating straight guidelines on the ceiling to aid in tile alignment. A caulking gun is necessary for applying adhesives that come in tubes. A clean, lint-free cloth is used for wiping away excess adhesive and cleaning the tiles after installation.
In addition to these essential tools, consider using safety glasses and gloves to protect your eyes and hands. A ladder or scaffolding may also be necessary to reach high ceilings safely and comfortably. Having all the right tools on hand will streamline the installation process and minimize potential delays or complications.
Applying the Tiles Strategically
Strategic planning is key to achieving a professional-looking and aesthetically pleasing ceiling tile installation. Before applying any adhesive, carefully plan the layout of the tiles. Start by measuring the dimensions of the ceiling and calculating the number of full tiles required. Determine the best starting point to ensure a balanced and symmetrical appearance. Often, the center of the room is the most logical starting point, allowing for even distribution of cut tiles along the edges.
Use a chalk line to mark straight guidelines on the ceiling. These guidelines will serve as a visual reference for aligning the tiles and ensuring a uniform layout. Start by marking a center line across the length and width of the ceiling. Then, use a level to ensure that the lines are perfectly straight. Adjust the lines as needed until they are accurately aligned. Apply the adhesive to the back of each tile according to the manufacturer's instructions. Typically, this involves applying a bead of adhesive around the perimeter of the tile and a few dots in the center.
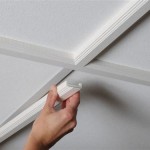
Carefully position the tile onto the ceiling, aligning it with the chalk lines. Press firmly and evenly to ensure good contact with the adhesive. Hold the tile in place for a few seconds to allow the adhesive to grab. Repeat this process for the remaining full tiles, working systematically across the ceiling. For tiles that need to be cut to fit around edges or corners, measure the required dimensions accurately. Use a utility knife or scissors to cut the tiles to the correct size. Ensure the cuts are clean and precise for a professional finish.
Apply adhesive to the back of the cut tiles and position them carefully in place. Pay close attention to the alignment of the cut tiles with the adjacent full tiles to maintain a consistent and uniform appearance. Wipe away any excess adhesive immediately with a clean, damp cloth. Allow the adhesive to dry completely according to the manufacturer's instructions before applying any weight or pressure to the tiles. Inspect the installed tiles for any gaps or imperfections. If necessary, apply additional adhesive to fill any gaps and ensure a secure bond.
Consider working in small sections to prevent the adhesive from drying out before the tiles are applied. This is especially important in warm or dry environments. Additionally, ensure adequate ventilation in the room during the installation process. This will help to dissipate any fumes from the adhesive and promote faster drying. Regularly check the alignment of the tiles as you progress to ensure that the layout remains consistent and uniform. This will help to avoid any unsightly gaps or misalignments.
Proper disposal of waste materials is also important. Dispose of any adhesive containers, tile scraps, and cleaning cloths in accordance with local regulations. By following these guidelines, you can achieve a professional-looking and long-lasting adhesive ceiling tile installation. Remember to prioritize safety and take your time to ensure that each step is completed accurately and carefully.

Ceiling Tile Installation Ceilings Armstrong Residential

How To Install Glue Up Ceiling Tiles Ceilume

Ceiling Tile Installation Ceilings Armstrong Residential

How To Tile A Ceiling Tips And Guidelines Howstuffworks

How To Install Glue Up Ceiling Tiles

How To Install Glue Up Ceiling Tiles Ceilume

Keep Heavy Tile On The Ceiling Fine Homebuilding

How To Install Glue Up Lap Joint Ceiling Tiles Ceilume

How To Install Glue Up Ceiling Tiles Ceilume

Say Goodbye To Messy Popcorn Ceilings Diy Guide Covering With Glue Up Ceiling Tiles
Related Posts


