Installing Vinyl Beadboard Ceiling on a Porch: A Comprehensive Guide
A porch ceiling not only enhances the aesthetic appeal of a home but also provides protection from the elements. Vinyl beadboard offers an attractive and durable option for porch ceilings, resisting moisture, insects, and rot, factors that can plague traditional wood ceilings. This guide provides a detailed exploration of the installation process, ensuring a professional and long-lasting result.
Planning and Preparation: Laying the Groundwork for Success
Prior to commencing the installation, meticulous planning is paramount. This phase involves accurately measuring the porch ceiling area, selecting appropriate materials and tools, and assessing the existing structure for any necessary repairs or reinforcements. Overlooking these preliminary steps can lead to complications and unsatisfactory outcomes later in the project.
The initial step is to obtain precise measurements of the ceiling's length and width. These measurements will dictate the quantity of vinyl beadboard panels, furring strips, and other necessary supplies. It is always prudent to purchase slightly more material than calculated to account for cuts and potential errors. Aim for an extra 10-15% to avoid shortfalls during installation. Consider the direction you want the beadboard to run – lengthwise or widthwise – as this will affect the calculations.
Vinyl beadboard panels are available in various widths, lengths, and thicknesses. Choose a product specifically designed for exterior use, as it will be formulated to withstand weather conditions and UV exposure. Examine the manufacturer's specifications to determine the appropriate panel thickness for your application. Thicker panels generally offer greater durability and resistance to sagging, particularly for larger porch ceilings.
Furring strips, typically made of pressure-treated lumber, serve as the framework to which the vinyl beadboard panels will be attached. The spacing of these strips is crucial for providing adequate support and preventing the panels from bowing or sagging. Consult the manufacturer's recommendations for the appropriate spacing, typically ranging from 16 to 24 inches on center. Ensure that the furring strips are straight and free from defects, as any imperfections will be transferred to the finished ceiling.
The tool list includes: a measuring tape, a pencil, a level, a circular saw or miter saw, a drill, a screw gun, safety glasses, a dust mask, and galvanized or stainless-steel screws. A chalk line can be useful for marking straight lines. A jigsaw may also be needed for cutting around obstructions such as light fixtures or support posts. Verify that all tools are in good working order and that you are familiar with their safe operation.
Before installing the furring strips, evaluate the existing porch ceiling structure. Check for any signs of rot, water damage, or structural weaknesses. Address any issues before proceeding, as neglecting them will compromise the integrity of the new ceiling. Replace any damaged wood, and reinforce sagging areas with additional supports. Ensure that the existing structure is level and plumb, as this will affect the appearance of the finished ceiling.
Finally, consider the placement of electrical wiring for any planned lighting fixtures or ceiling fans. Run the wiring before installing the furring strips, ensuring that it is properly insulated and secured. Leave sufficient slack in the wiring to allow for easy connection to the fixtures later.
Installation Process: Step-by-Step Guide to a Professional Finish
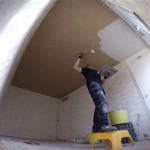
The installation process begins with attaching the furring strips to the existing ceiling structure. Proper alignment and secure fastening are paramount for creating a stable and level base for the vinyl beadboard panels. This step-by-step guide outlines the procedure, ensuring a professional and long-lasting result.
Begin by determining the orientation of the furring strips. Typically, they are installed perpendicular to the direction of the vinyl beadboard panels. Use a chalk line to mark the locations of the furring strips, ensuring that they are evenly spaced according to the manufacturer's recommendations. This spacing affects the stability of the ceiling, so accurate marking is crucial.
Attach the furring strips to the existing ceiling structure using galvanized or stainless-steel screws. These screws provide superior corrosion resistance compared to standard screws, which is essential for exterior applications. The length of the screws should be sufficient to penetrate deeply into the existing structure, providing a secure hold. For added stability, consider using construction adhesive in conjunction with the screws.
Use a level to ensure that the furring strips are perfectly level. Shim any low spots with wood shims to create a uniform surface. This step is critical for preventing the vinyl beadboard panels from appearing uneven or warped. Take the time to make careful adjustments, as even small discrepancies can be noticeable in the finished ceiling.
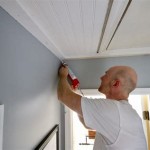
Once the furring strips are securely in place, begin installing the vinyl beadboard panels. Start at one edge of the ceiling and work your way across, ensuring that each panel is properly aligned and secured. Use a screw gun to drive the screws through the panels and into the furring strips. Follow the manufacturer's recommendations for screw spacing, typically ranging from 6 to 12 inches.
When installing the first row of panels, ensure that it is perfectly straight and square. Use a level to check the alignment, and make any necessary adjustments before proceeding. A crooked first row will result in a crooked ceiling. The first row often requires careful planning to ensure the beadboard lines up correctly with the edges of the porch.
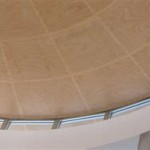
Vinyl beadboard panels typically have interlocking edges that allow them to be easily connected. Gently slide the panels together, ensuring that the edges are properly engaged. Avoid forcing the panels together, as this can damage the interlocking mechanism. If the panels are too tight, you may need to trim them slightly.
When you reach the opposite edge of the ceiling, you will likely need to cut the last row of panels to fit. Use a circular saw or miter saw to make clean, precise cuts. Measure carefully before cutting, and always err on the side of cutting too long rather than too short. You can always trim more off, but you cannot add material back. Beveling the cut edge slightly can help with a snug fit against the wall.
For cutting around obstructions such as light fixtures or support posts, use a jigsaw. Create a template of the obstruction, and trace it onto the panel. Use the jigsaw to carefully cut out the required shape. Smooth the edges of the cut with sandpaper or a file to prevent sharp edges.
After all of the panels are installed, inspect the ceiling for any gaps or imperfections. Fill any gaps with caulk, and touch up any scratches or blemishes with paint. A clean, professional finish will enhance the appearance and durability of the ceiling. Pay particular attention to seams and corners.
Addressing Common Challenges: Troubleshooting Installation Issues
Even with meticulous planning and careful execution, certain challenges may arise during the installation of a vinyl beadboard ceiling. Identifying and addressing these issues promptly is crucial for achieving a satisfactory and long-lasting result. This section outlines common problems and provides practical solutions.
One frequent issue is sagging or bowing of the vinyl beadboard panels. This typically occurs when the furring strips are spaced too far apart, or when the panels are not properly secured. To correct this, add additional furring strips between the existing ones, reducing the spacing and providing more support. Ensure that all panels are securely fastened to the furring strips, using sufficient screws.
Another common problem is uneven or warped panels. This can be caused by uneven furring strips, or by irregularities in the existing ceiling structure. Use shims to level the furring strips, and reinforce any weak or sagging areas in the existing structure. Ensure that the panels are properly aligned and secured, and that the interlocking edges are fully engaged.
Difficulties cutting the vinyl beadboard panels can also arise. Vinyl can be brittle and prone to cracking or chipping if cut improperly. Use a sharp blade and a slow, steady cutting speed. Support the panel firmly while cutting, and use a guide to ensure a straight, accurate cut. Always wear safety glasses to protect your eyes from flying debris.
Moisture accumulation behind vinyl beadboard is a major concern. Though vinyl is waterproof, improper vapor control can lead to mold and mildew growth. Ensure adequate ventilation in the porch area. Consider installing a vapor barrier between the existing ceiling and the furring strips, particularly in humid climates. Proper caulking can similarly prevent water intrusion.
Difficulties in aligning panels, especially over large areas, can occur. This can be addressed by using a chalk line to mark straight lines and frequently checking alignment during installation. Minor adjustments may be needed as you go. Using a helper to assist with alignment is beneficial.
If screws strip out from the furring strips, use longer screws. In extreme cases, use construction adhesive to improve the fastener's hold. Pre-drilling pilot holes helps prevent stripping.
Consistent monitoring and addressing any difficulties as they arise will contribute to achieving a visually appealing, sound, and enduring vinyl beadboard porch ceiling.

Installing Vinyl Soffit Porch Ceilings

Installing Vinyl Soffit Porch Ceilings

Vinyl Beadboard Ceiling Common Problems And A Better Alternative Allura Usa

How To Install A Beadboard Porch Ceiling This Old House

Vinyl Beadboard Ceiling Common Problems And A Better Alternative Allura Usa

Vinyl Beadboard Ceiling On Porch Patio Ideas

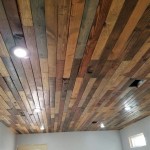
How To Install A Wood Plank Ceiling Young House Love

Vinyl Beadboard Ceiling On Porch

How To Install A Wood Plank Ceiling Young House Love

Replace Vinyl Ceiling W Azek Beadboard Fine Homebuilding
Related Posts