Tongue And Groove Pine Ceiling: A Comprehensive Guide
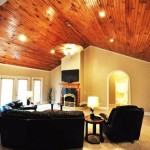
Tongue and groove pine ceilings offer a timeless aesthetic appeal and practical advantages for both residential and commercial spaces. This type of ceiling is constructed using individual pine boards meticulously milled with a tongue on one edge and a corresponding groove on the opposite edge. These interlock seamlessly, creating a smooth, visually appealing surface. The natural beauty of pine, combined with the interlocking design, contributes to a warm, inviting ambiance. Beyond aesthetics, tongue and groove pine ceilings can enhance a room's insulation properties and provide a degree of sound dampening.
The installation process, while requiring precision, is manageable for experienced DIY enthusiasts or professional carpenters. The availability of pine in various grades, finishes, and dimensions allows for customization to suit different design preferences and budgets. This comprehensive guide explores the benefits, considerations, installation techniques, and maintenance aspects of tongue and groove pine ceilings.
Benefits of Tongue and Groove Pine Ceilings
The selection of a ceiling material involves considering various factors, including aesthetics, durability, cost, and ease of installation. Tongue and groove pine ceilings present a compelling option due to their numerous benefits.
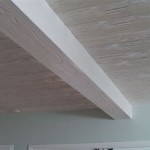
Firstly, the aesthetic appeal of natural wood cannot be overstated. Pine offers a warm, inviting look that complements a variety of architectural styles, from rustic to modern. The grain patterns and natural variations in color within the wood add character and visual interest to the ceiling. The clean, uniform lines created by the interlocking boards contribute to a sense of order and sophistication.
Secondly, pine is a relatively lightweight material compared to alternatives like hardwood or plaster. This reduces the structural load on the ceiling joists and simplifies the installation process. The lighter weight also translates to easier handling and maneuverability during installation, potentially reducing labor costs.
Thirdly, tongue and groove construction provides inherent stability and resistance to warping or cupping. The interlocking design allows the boards to move slightly with changes in humidity without compromising the overall appearance or structural integrity of the ceiling. This is particularly important in climates with significant seasonal variations in temperature and humidity.
Fourthly, pine possesses natural insulation properties. While not a substitute for dedicated insulation materials, a tongue and groove pine ceiling can contribute to improved energy efficiency by reducing heat loss in the winter and heat gain in the summer. This can lead to lower energy bills and a more comfortable living environment.
Finally, pine is a readily available and relatively affordable lumber option. Compared to exotic hardwoods or specialized ceiling tiles, pine offers a cost-effective way to achieve a high-end look without breaking the bank. The availability of different grades and finishes allows for further customization to meet specific budget requirements.
Considerations Before Installation
Prior to embarking on a tongue and groove pine ceiling installation, several crucial considerations must be addressed to ensure a successful outcome.
Firstly, assess the existing ceiling structure. Verify that the ceiling joists are level, structurally sound, and spaced appropriately for the chosen pine boards. Any existing sagging or damage should be addressed before proceeding with the installation. This might involve reinforcing the joists or adding additional support.
Secondly, determine the desired finish and direction of the boards. The finish will significantly impact the overall appearance of the ceiling. Options include staining, painting, varnishing, or leaving the wood natural. The direction of the boards can also influence the visual perception of the space. Running them lengthwise can make a room appear longer, while running them widthwise can make it seem wider.
Thirdly, plan for necessary ventilation. Improper ventilation can lead to moisture buildup behind the ceiling, potentially causing mold growth and wood decay. Ensure adequate ventilation in the attic or ceiling cavity to prevent these problems. This may involve installing vents or improving existing ventilation systems.
Fourthly, consider the integration of lighting and other fixtures. Plan the placement of recessed lighting, ceiling fans, or other fixtures before installing the ceiling. This will allow you to properly wire and support these elements within the ceiling structure. It is generally easier and more efficient to run wiring and install support brackets before the tongue and groove boards are in place.
Fifthly, account for expansion and contraction. Wood naturally expands and contracts with changes in humidity. Leave a small gap (approximately 1/8 inch) around the perimeter of the ceiling to allow for this movement. This will prevent the ceiling from buckling or cracking as the wood acclimates to its environment.
Sixthly, select the appropriate grade and quality of pine. Pine is available in various grades, each with different characteristics in terms of knots, color variation, and overall appearance. Select a grade that meets the aesthetic requirements and budget constraints of the project. Higher grades will generally have fewer knots and a more uniform color.
Installation Techniques for Tongue and Groove Pine Ceilings
The installation of a tongue and groove pine ceiling requires careful planning and precise execution. While professional installation is recommended for complex projects, experienced DIY enthusiasts can successfully complete the task by following these guidelines.
Firstly, gather the necessary tools and materials. These include: tongue and groove pine boards, a measuring tape, a level, a saw (circular saw or miter saw), a nail gun or hammer, finishing nails, construction adhesive, safety glasses, and ear protection.
Secondly, acclimate the pine boards to the environment. Allow the boards to sit in the room where they will be installed for several days prior to installation. This will allow them to adjust to the temperature and humidity levels, minimizing expansion and contraction after installation.
Thirdly, establish a starting point. Choose a straight and square wall as the starting point for the first row of boards. Use a level to ensure that the first board is perfectly aligned. This will serve as the foundation for the entire ceiling.
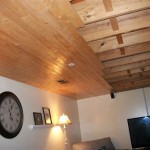
Fourthly, install the first row of boards. Apply a bead of construction adhesive to the ceiling joists and position the first board with the tongue facing outward. Secure the board to the joists using finishing nails driven at an angle through the tongue. Conceal the nail heads beneath the next board.
Fifthly, continue installing subsequent rows of boards. Slide the groove of the next board onto the tongue of the previous board. Ensure a tight and seamless fit. Secure the board to the joists using finishing nails driven at an angle through the tongue. Again, conceal the nail heads beneath the next board.
Sixthly, cut and install the final row of boards. Measure the remaining space and cut the boards to fit. It may be necessary to rip the boards lengthwise to achieve the correct width. Secure the final row of boards using finishing nails driven through the face of the board. These nail holes can be filled with wood filler and sanded smooth.
Seventhly, install trim and molding. Add trim and molding around the perimeter of the ceiling to conceal any gaps and create a finished look. This can include crown molding, baseboard, or other decorative elements.
Eighthly, apply the desired finish. Once the installation is complete, apply the chosen finish to the ceiling. This may involve staining, painting, varnishing, or simply applying a protective coating. Follow the manufacturer's instructions for the chosen finish.
Maintenance and Care for Tongue and Groove Pine Ceilings
Proper maintenance and care are essential to preserving the beauty and longevity of a tongue and groove pine ceiling.
Regular cleaning is crucial. Dust the ceiling regularly with a soft cloth or vacuum cleaner with a brush attachment. This will prevent the buildup of dust and debris, which can dull the finish and attract pests.
Address moisture issues promptly. Any water leaks or condensation problems should be addressed immediately to prevent water damage. Repair any leaks and ensure proper ventilation to minimize moisture buildup.
Protect the ceiling from direct sunlight. Prolonged exposure to direct sunlight can cause the wood to fade or discolor. Install window coverings or apply a UV-resistant finish to protect the ceiling from sun damage.
Repair minor damage as soon as possible. Scratches, dents, or other minor damage should be repaired promptly to prevent them from worsening. Use wood filler to fill cracks and scratches, and apply a matching finish to blend the repair with the surrounding wood.
Periodically re-apply the finish. Depending on the type of finish used, it may be necessary to re-apply it periodically to maintain the ceiling's appearance and protect the wood. Follow the manufacturer's instructions for re-applying the finish.
Inspect for pests. Regularly inspect the ceiling for signs of pests such as termites or carpenter ants. If any pests are detected, take immediate action to eradicate them.
By following these maintenance and care guidelines, a tongue and groove pine ceiling can provide years of beauty and enjoyment.

Tongue And Groove A Comprehensive Guide

Tongue And Groove A Comprehensive Guide

Diy Guide How To Install A Tongue And Groove Ceiling Step By Instructions

Curious About Pickled Pine Tongue And Groove Walls Ceilings Country Home Blooms

How To Install A Tongue And Groove Ceiling

Diy Guide How To Install A Tongue And Groove Ceiling Step By Instructions

Installing A Tongue And Groove Porch Ceiling Homemade By Huseman

How To Install A V Groove Pine Ceiling Think Wood

Tongue And Groove Ceiling Planks Ceilings Armstrong Residential

Installing A Tongue And Groove Porch Ceiling Homemade By Huseman
Related Posts