Ceiling fans are a great way to keep your home cool during hot summer months. Not only do they provide a refreshing breeze, but they can also help reduce your energy bill by circulating the air in your home more efficiently. Installing a ceiling fan is a relatively simple task that can be done in a few hours using some basic tools. Here is a step-by-step guide on how to mount a ceiling fan.
Step 1: Safety First
Before beginning any ceiling fan installation, it is important to ensure that the power to the area is completely off. This can be done by turning off the breaker in your home’s circuit box. Once the power is off, it is a good idea to use a voltage tester to make sure that the area is completely without power. This will help ensure that you stay safe while working.
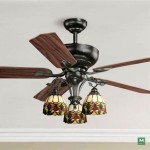
Step 2: Select the Right Fan
Once you have determined that the power is off and it is safe to proceed, you will need to select the right fan for your home. Consider the size of the room that you are installing the fan in, as well as the height of the ceiling. You will also want to think about the type of fan that you would like. There are a variety of options available and you should select one that meets your needs.
Step 3: Prepare the Ceiling
Before mounting the fan, you will need to prepare the ceiling. First, use a stud finder to locate the joists in the ceiling. Then, use a level to ensure that the fan will hang straight. You may also need to drill a hole for the fan’s electrical wiring. Once you have the area prepped, you can mount the fan.
Step 4: Assemble the Fan
Next, you will need to assemble the fan. Carefully read the instructions that come with the fan and follow them closely. Depending on the type of fan that you select, the assembly process may be more or less involved. However, most fans will require some basic assembly.
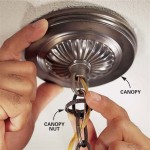
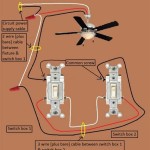
Step 5: Connect the Wiring
Once the fan is assembled, you will need to connect the wiring. Start by connecting the wires in the fan’s canopy to the wires in the ceiling box. Then, connect the fan’s light kit (if applicable) to the wiring. Finally, connect the fan’s switch housing to the wiring. Make sure to follow the manufacturer’s instructions to ensure that the wiring is done correctly.
Step 6: Hang the Fan
Now that the fan is assembled and the wiring is connected, it is time to hang the fan. Start by connecting the fan to the mounting bracket. Then, carefully lower the fan into the ceiling box. Secure the fan to the box with the mounting screws provided. Finally, attach the fan blades to the fan motor. Once the fan is in place, you can turn the power back on.
Step 7: Enjoy the Breeze
After all the hard work, you can now turn on your fan and enjoy the breeze. Make sure to check the fan periodically to ensure that it is working properly and is securely mounted. With proper installation, your fan should provide reliable service for many years to come.


Related Posts