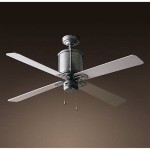
Can You Hang A Ceiling Fan On A Slanted Ceiling? A Comprehensive Guide
The question of whether a ceiling fan can be installed on a slanted ceiling is a common concern for homeowners and builders alike. The answer, generally, is yes. However, it requires understanding specific considerations, appropriate hardware, and a careful approach to ensure safety and optimal performance. Slanted ceilings present unique challenges due to the angle of the mounting surface, which can affect the fan's stability, balance, and airflow. This article provides a comprehensive guide to navigating the complexities of installing ceiling fans on slanted ceilings, outlining the necessary steps and factors to consider for a successful installation.
The primary reason ceiling fans are frequently desired even under slanted ceilings is their ability to improve air circulation and enhance energy efficiency. In warmer months, the downward draft created by the fan provides a cooling effect, reducing the reliance on air conditioning. Conversely, in cooler months, reversing the fan's direction gently pushes warm air, which naturally rises, back down into the living space. This functionality makes ceiling fans an attractive addition to rooms with angled ceilings, despite the installation challenges.
Understanding Ceiling Slope and Required Hardware
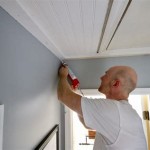
The first and perhaps most critical step in hanging a ceiling fan on a slanted ceiling is determining the degree of the slope. Ceiling slope is typically measured in degrees or as a ratio of rise over run (e.g., 4/12 pitch). This measurement dictates the type of mounting hardware needed. Most standard ceiling fans are designed for flat ceilings, but specialized mounting kits are available to accommodate various degrees of slope. These kits usually include a downrod designed for angled mounting and a canopy that can swivel to achieve a level position against the ceiling.
For slopes less than 15 degrees, a standard downrod may suffice, especially if the fan's canopy has a flexible or adjustable design. However, for steeper slopes exceeding 15 degrees, it is essential to use a longer downrod and a specifically designed angled mounting kit. These kits typically incorporate a ball-and-socket joint that allows the fan to hang vertically despite the angle of the ceiling. Using the wrong hardware can lead to instability, wobbling, and potential damage to the fan or the ceiling structure.
Accurate measurement is crucial. A level and a protractor can be used to determine the angle of the ceiling. Alternatively, a digital level with an angle measurement function can provide precise readings. Once the angle is known, consult the ceiling fan manufacturer's documentation or a qualified electrician to determine the appropriate type of downrod and mounting kit. The goal is to ensure the fan hangs stably and provides optimal airflow without excessive vibration or noise.
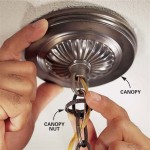
Beyond the downrod and mounting kit, other hardware considerations include the electrical box. The electrical box is a crucial component that supports the weight of the ceiling fan. It must be specifically rated for ceiling fan support. Standard electrical boxes are not sufficient for the dynamic weight and vibrations of a rotating fan. Replacing a standard electrical box with a fan-rated box is essential for safety. These boxes are typically reinforced and securely attached to a structural member of the ceiling, such as a joist.
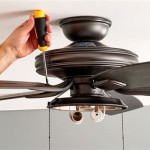
Finally, securing the downrod to the fan motor assembly is a critical step. Follow the manufacturer's instructions carefully, ensuring all screws and fasteners are tightened to the specified torque. Loose connections can lead to wobbling and eventually cause the fan to detach from the ceiling. Regularly inspect the fan for loose screws or other signs of wear and tear, especially after the initial installation.
Preparing the Electrical Wiring and Ensuring Safety
Electrical wiring is a critical aspect of ceiling fan installation, especially when working with slanted ceilings. Before starting any electrical work, it is imperative to turn off the power to the circuit at the breaker box. Confirm the power is off using a non-contact voltage tester before touching any wires. This simple step can prevent electric shock and ensure your safety.
The wiring inside the electrical box typically consists of a black wire (hot), a white wire (neutral), and a green or bare copper wire (ground). These wires must be connected correctly to the corresponding wires on the ceiling fan. Improper wiring can lead to electrical shorts, fire hazards, or damage to the fan motor. If you are unsure about any aspect of the wiring process, consult a qualified electrician.
When working with slanted ceilings, the available space for wiring within the electrical box can be limited. Ensure there is enough slack in the wires to make secure connections without straining them. Use wire connectors approved for the wire gauge being used to create secure and insulated connections. Wrap electrical tape around the wire connectors for added insulation and protection. Neatly tuck the wires back into the electrical box, ensuring they do not interfere with the fan's mounting bracket.
Grounding is a crucial safety measure. The ground wire provides a path for electrical current to flow safely back to the electrical panel in the event of a fault. Always connect the ground wire from the ceiling fan to the ground wire in the electrical box. This helps prevent electrical shock if there is a short circuit in the fan motor or wiring.
Beyond the immediate wiring connections, consider the overall electrical load on the circuit. Adding a ceiling fan to a circuit with existing lighting or appliances can potentially overload the circuit, leading to tripped breakers or even a fire hazard. Consult a qualified electrician to determine if the existing circuit can handle the additional load of the ceiling fan. If necessary, a dedicated circuit may need to be installed.
Finally, after completing the wiring, carefully inspect all connections to ensure they are secure and properly insulated. Turn the power back on at the breaker box and test the fan's operation. Check the fan's speed settings and ensure the light kit, if present, is functioning correctly. If any issues arise, immediately turn off the power and re-examine the wiring.
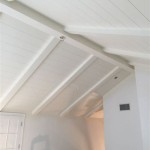
Addressing Airflow and Stability Concerns
Mounting a ceiling fan on a slanted ceiling can influence airflow patterns within the room. The angled position of the fan relative to the floor can create uneven air distribution, potentially leading to drafts in some areas and stagnant air in others. To mitigate this, consider the fan's blade pitch and diameter. A steeper blade pitch can improve air circulation in rooms with high ceilings or complex geometries. The appropriate fan size also directly correlates to the room dimentions. Always consult the manufacturer’s provided guidelines.
The stability of the ceiling fan is another critical consideration. The angled mounting surface can amplify vibrations, leading to wobbling and noise. Ensure the downrod is the correct length and that the mounting bracket is securely attached to the ceiling joist. Using shims to level the mounting bracket can help reduce vibrations and improve stability. Consider using vibration dampening materials, such as rubber washers, between the mounting bracket and the ceiling.
Balancing the fan blades is essential for optimal performance and longevity. Even slight imbalances can cause wobbling and put stress on the fan motor. Most ceiling fans come with a balancing kit that includes small weights that can be attached to the blades to correct imbalances. Follow the instructions provided with the balancing kit to identify the areas where weights need to be added.
The height of the ceiling fan above the floor also impacts airflow. Ideally, the fan blades should be at least 7 feet above the floor to prevent accidents and ensure proper air circulation. In rooms with low ceilings, consider using a hugger-style ceiling fan that mounts close to the ceiling. While these fans may not move as much air as those with longer downrods, they provide a safer and more practical option for low-ceilinged spaces.
Periodically inspect the ceiling fan for any signs of instability or damage. Check for loose screws, wobbling, or unusual noises. Tighten any loose screws and re-balance the fan blades as needed. Regular maintenance can help extend the lifespan of the ceiling fan and ensure safe and efficient operation. It's also recommended that you regularly remove accumulated dust from the fan blades.
Furthermore, consider the placement of the ceiling fan within the room. Ideally, the fan should be centrally located to provide even air distribution throughout the space. However, in rooms with asymmetrical layouts or furniture arrangements, it may be necessary to adjust the fan's position to optimize airflow. Experiment with different fan speeds and directions to find the setting that provides the most comfortable and effective air circulation.

How To Install A Ceiling Fan On Sloped Lemon Thistle

Mounting Ceiling Fan On Sloped Home Improvement Stack Exchange

Electrical Mount Ceiling Fan At The Peak Of A Sloped Home Improvement Stack Exchange

How To Install A Ceiling Fan On Sloped Lemon Thistle

How To Choose A Ceiling Fan For Vaulted Ceilings Lightology

Ensuring Proper Ceiling Fan Installation With Vaulted Ceilings

Install Ceiling Fan On Sloped Simple Modern Handmade Home

Vaulted Sloped Ceiling Adapter For Modern Fan Company Fans Stardust

How To Install A Fan On Steep Ceiling Faro Barcelona

Can Ceiling Fans Be Installed On Vaulted Or Sloped Ceilings
Related Posts