How To Change A Ceiling Fan Light Pull Chain
Ceiling fan light pull chains, while seemingly insignificant, are crucial components for controlling the operation of a ceiling fan's light fixture. Over time, these chains can break, become unsightly, or simply fail to function correctly. Replacing a faulty or worn pull chain is a relatively straightforward task that most homeowners can accomplish with basic tools and a little patience. This article outlines the steps involved in safely and effectively replacing a ceiling fan light pull chain.
Before commencing any electrical work, it is paramount to prioritize safety. Disconnecting the power supply to the ceiling fan is the first and most crucial step. This prevents the risk of electrical shock during the replacement process. Locate the circuit breaker that controls the ceiling fan and switch it to the "off" position. To confirm that the power is indeed off, test the fan's light fixture using a non-contact voltage tester. If the tester indicates the presence of voltage, double-check that the correct circuit breaker is switched off.
Gathering Necessary Tools and Materials
Successfully replacing a ceiling fan light pull chain requires a few essential tools and materials. These include:
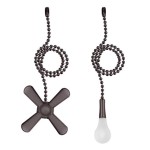
- Replacement Pull Chain: Purchase a new pull chain that matches the existing one in terms of length and connector type. Hardware stores offer a variety of pull chains, including those with decorative ends.
- Pliers: Needle-nose pliers or standard pliers are necessary for manipulating small components and disconnecting the old pull chain.
- Screwdriver (if needed): Depending on the design of the ceiling fan, a screwdriver may be required to access the switch housing.
- Wire Strippers (potentially): In certain cases, wire strippers might be needed if the new pull chain requires wire connections.
- Non-Contact Voltage Tester: As mentioned previously, this is crucial for verifying that the power is disconnected.
- Safety Glasses: Protect eyes from falling debris or accidental contact with electrical components.
- Ladder or Step Stool: Provides safe access to the ceiling fan. Ensure the ladder is stable and placed on a level surface.
Having all these items readily available before starting the replacement process will contribute to a smoother and more efficient experience.
Removing the Old Pull Chain
With the power safely disconnected and the necessary tools at hand, the next step involves removing the old pull chain. This process varies slightly depending on the design of the ceiling fan.
First, carefully inspect the pull chain and its point of attachment to the switch mechanism inside the light fixture housing. Most ceiling fans have a small access hole in the housing through which the pull chain extends. In some cases, this hole is large enough to allow the switch itself to be pulled out slightly for easier access.
If the switch can be accessed through the access hole, use the pliers to gently grasp the connector that secures the old pull chain to the switch mechanism. The connector may be a small metal clip, a ball chain connector, or a similar type of fastener. Carefully disconnect the old pull chain from the switch. Avoid pulling forcefully, as this could damage the switch mechanism.
If the switch cannot be easily accessed through the access hole, it may be necessary to partially disassemble the light fixture housing. This typically involves removing a few screws that hold the housing together. Before removing any screws, carefully note the location of each screw and the order in which they are removed. This will help ensure that the housing can be reassembled correctly later on.
Once the housing is partially disassembled (if required), locate the switch mechanism and disconnect the old pull chain as described above. Remember to handle the switch mechanism with care to avoid damaging it.
After the old pull chain is disconnected, gently pull it down and out of the access hole in the light fixture housing. Discard the old pull chain appropriately.
Installing the New Pull Chain
With the old pull chain removed, the new pull chain can be installed. This process is essentially the reverse of the removal process.
First, carefully thread the new pull chain up through the access hole in the light fixture housing. Ensure that the chain is long enough to extend down to a comfortable length for operating the light fixture.
Next, connect the new pull chain to the switch mechanism. Use the pliers to securely attach the connector on the new pull chain to the corresponding point of attachment on the switch. Ensure that the connection is firm and that the pull chain is properly aligned.
If the light fixture housing was partially disassembled, carefully reassemble it, ensuring that all screws are tightened securely. Refer to the notes taken during disassembly to ensure that the housing is reassembled correctly.
In some cases, the new pull chain might require wire connections. This is more common with smart ceiling fan pull chains or those that integrate with other home automation systems. If wiring is required, carefully follow the manufacturer's instructions to connect the wires correctly. Ensure that all wire connections are secure and properly insulated.
Once the new pull chain is installed and the light fixture housing is reassembled (if necessary), test the operation of the light fixture. Restore power to the ceiling fan by switching the circuit breaker back to the "on" position. Then, gently pull the new pull chain to turn the light fixture on and off. Verify that the light fixture functions correctly and that the pull chain operates smoothly.
If the light fixture does not function correctly, double-check all connections and ensure that the switch mechanism is properly functioning. If the problem persists, it may be necessary to consult with a qualified electrician.
Finally, ensure the chain doesn't bind or snag inside the fan housing. Smooth operation will prolong the life of the switch mechanism and prevent premature failure of the new pull chain.
Troubleshooting Common Issues
While replacing a ceiling fan light pull chain is generally a straightforward task, some common issues may arise. Addressing these issues effectively will ensure a successful replacement.
Pull Chain Breaks Immediately: If the new pull chain breaks soon after installation, it may be due to a faulty switch mechanism or excessive force being applied to the chain. Inspect the switch mechanism for signs of damage or wear. Avoid pulling the chain too hard, as this can strain the switch and the chain itself.
Light Fixture Does Not Respond: If the light fixture does not turn on or off after replacing the pull chain, the switch mechanism may be defective. In this case, the switch mechanism itself may need to be replaced. Additionally, check the light bulb to ensure it is functioning correctly.
Difficulty Accessing the Switch: If the switch mechanism is difficult to access, consult the ceiling fan's instruction manual for guidance on disassembling the light fixture housing. If the manual is not available, search online for documentation specific to the ceiling fan model. When disassembling the housing, proceed carefully and take detailed notes to aid in reassembly.
Chain too short or too long: Ensure the new chain is of adequate length before fully installing it. A chain that is too short will be difficult to reach, while a chain that is too long can become tangled. Adjust the chain length as needed before securing it to the switch mechanism.
By addressing these common issues proactively, homeowners can navigate the pull chain replacement process more effectively and achieve a successful outcome.

How To Fix Replace A Ceiling Fan Pull Chain Switch

Ceiling Fan Pull Chain Switch Replacement How To Replace A On Easy

Ceiling Fan Pull Chain Switch Replacement How To Replace A On Easy

Ceiling Fan Light Repair Home Tutor

How To Repair A Ceiling Fan Light Pull Cord Maintenance

4 Ways To Replace A Ceiling Fan Pull Chain Switch Wikihow

How To Change A Ceiling Fan Pull Chain Switch

How To Replace A Broken Ceiling Fan Light Pull Chain Step By Instructions

4 Ways To Replace A Ceiling Fan Pull Chain Switch Wikihow

Pull Chain Sd Control Casablanca Fan Repair
Related Posts