How to Make a False Ceiling at Home
A false ceiling, also known as a drop ceiling, offers multiple benefits for your home. It can enhance aesthetics, improve acoustics, conceal wiring and pipes, and even provide additional insulation. While professional installation is available, creating a false ceiling at home is a DIY project within the reach of many homeowners with basic carpentry skills. This article will guide you through the process, offering detailed steps and helpful tips to realize this home improvement project.
1. Planning and Preparation
The first step involves careful planning and preparation. This includes determining the desired ceiling height, the materials required, and the overall design.
A. Measuring and Planning
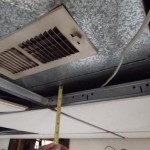
Before you begin, accurately measure the area where you plan to install the false ceiling. This will help you calculate the amount of materials needed. Consider the desired drop height, factoring in the thickness of the chosen materials, and the location of existing fixtures, such as light fittings and smoke detectors.
B. Material Selection
Several materials are available for creating false ceilings, each with its own advantages and drawbacks. Common options include:
- Gypsum Board: This widely used material is affordable, easy to work with, and offers a smooth, paintable surface. It is also fire-resistant.
- Wood: Wood panels can add a rustic or modern aesthetic, depending on the type and finish. They can be more expensive than gypsum board but provide a more robust feel.
- PVC Panels: PVC panels are waterproof, making them ideal for humid environments like bathrooms and kitchens. They are lightweight and relatively easy to install.
- Tiled Ceiling Panels: These panels are available in various styles and designs, adding a decorative touch to your ceiling. They are often made of mineral fiber or polystyrene and are relatively easy to install.
C. Tools and Equipment
To successfully create a false ceiling, you will need the following tools and equipment:
- Level
- Measuring tape
- Pencil
- Circular saw or jigsaw
- Drill and drill bits
- Screwdriver
- Hammer
- Safety glasses and gloves
- Ladder or scaffolding
- Clamps or brackets (for supporting the frame)
- Metal framing channels (for creating the supporting structure)
- C-clamps or spring clamps
- Screws, nails, or other fasteners
- Joint compound or drywall mud (for filling gaps and seams)
- Sandpaper
- Primer and paint (optional)
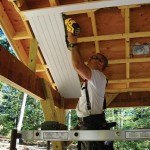
2. Building the Frame
The frame provides the structural support for your false ceiling. It is typically constructed using metal framing channels, which are lightweight and easy to work with.
A. Marking and Installing the Framing
Use the level and marking tools to transfer the desired drop height measurements onto the walls. Then, mark the positions of the framing channels on the walls and ceiling. Carefully cut the channels to size, ensuring they are level and plumb. Secure them to the walls and ceiling using screws or nails.
B. Creating the Grid
Once the perimeter frame is in place, install the cross-members of the grid system. These channels will support the chosen ceiling material. Measure and cut the channels to the desired length, and secure them to the perimeter frame using screws or nails. Ensure the grid is level and plumb, creating a solid foundation for the ceiling.
3. Installing the Ceiling Material
With the frame complete, you can begin installing the chosen ceiling material. This process will vary depending on the chosen material.
A. Gypsum Board Installation
For gypsum board, cut the sheets to size using a circular saw or jigsaw. Once the gypsum board is cut, attach it to the frame using screws or nails. Be sure to countersink the screws to create a flush surface. Apply joint compound to fill any gaps and seams, and sand the surface smooth.
B. Wood Panel Installation
Wood panels are often attached to the frame using screws or nails, depending on the type of wood and desired finish. Pre-drill holes to prevent splitting. Ensure the panels are evenly spaced and securely fastened to the frame.
C. PVC Panel Installation
PVC panels typically snap into place on the frame using a tongue-and-groove system. This makes installation relatively quick and easy. To install, simply slide the panels into the grooves of the frame. Ensure the panels are flush with each other and that any seams are properly sealed.
D. Tiled Ceiling Panel Installation
Tiled ceiling panels are usually attached to the frame using adhesive or clips, depending on the manufacturer's instructions. Ensure the panels are evenly spaced and that any edges are properly trimmed.
4. Finishing Touches
Once the ceiling material is installed, you will need to complete the final finishing touches.
A. Joint Compound and Sanding
For gypsum board ceilings, apply joint compound to fill any gaps, seams, and screw holes. Allow the compound to dry completely before sanding the surface smooth.
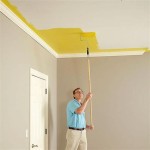
B. Primer and Painting
If you are painting the ceiling, apply a primer to the surface before painting. The primer will help to ensure that the paint adheres properly and provides a smooth, even finish.
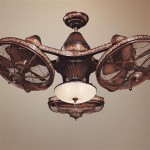
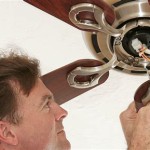
C. Installing Light Fixtures and Other Fixtures
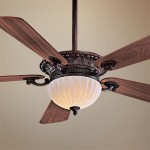
Install any light fixtures or other fixtures that will be mounted on the false ceiling. Ensure that the fixtures are properly wired and secured to the frame. Be careful not to damage the ceiling material while installing these fixtures.
Creating a false ceiling can be a rewarding DIY project that adds value and style to your home. By following the steps outlined in this article, you can achieve a professional-looking finish, transforming the look and feel of any room.

Technique To False Ceiling Installation Contractorbhai

Create Ceiling From Gypsum Board Installation Diy

How To Make False Ceiling At Home Bed Room Diy Gypsum Board

How To Make False Ceiling Designs For Living Room Gypsum Design

How To Make False Ceiling At Home Designs

How To Make False Ceiling At Home Bed Room Diy Gypsum Board Design

How To Do False Ceiling Tips For A Perfect Look Your Home

Gypsum False Ceiling How To Design For A Home And Install It

False Ceiling क Framing स करत ह 16 X 13 Bedroom

A Step By Guide For False Ceiling Installation Homify
Related Posts