Installing a LED Flush Mount Ceiling Light
LED flush mount ceiling lights offer a sleek, modern aesthetic and energy efficiency, making them a popular choice for various rooms. This article provides a comprehensive guide to installing a LED flush mount ceiling light, outlining the necessary tools, safety precautions, and step-by-step instructions.
Tools and Materials: Before beginning the installation, gather the necessary tools and materials. These typically include a voltage tester, wire strippers, wire connectors, a screwdriver, pliers, safety glasses, a ladder, and the new LED flush mount ceiling light fixture. Ensure all tools are in good working condition and the light fixture package contains all necessary mounting hardware.
Safety First: Electrical work always poses potential hazards. The most crucial step is to de-energize the circuit. Locate the circuit breaker corresponding to the light fixture in the electrical panel and switch it off. Confirm power is off by using a voltage tester on the wires connected to the existing fixture. This step is paramount to preventing electrical shock.
Removing the Old Fixture: Once the power is off, the old fixture can be safely removed. Typically, older fixtures are secured to the ceiling junction box with screws. Carefully remove these screws, supporting the fixture as it becomes loose. Lower the fixture and disconnect the wires. Note the wire connections (typically black to black, white to white, and ground to ground) before disconnecting. Take a picture for reference if needed. If the wiring appears damaged or outdated, consult a qualified electrician.
Inspecting the Junction Box: After removing the old fixture, inspect the junction box for any damage or loose wiring. Ensure it's securely mounted to the ceiling joist. If the junction box is damaged or unstable, it must be repaired or replaced before proceeding. This often requires the expertise of a qualified electrician.
Connecting the New LED Flush Mount Ceiling Light: Carefully follow the manufacturer's instructions provided with the new fixture. These instructions will provide specific details related to the fixture's wiring and mounting. Generally, the wiring process involves matching the wires from the new fixture to the wires in the junction box, using wire connectors to secure each connection. Ensure the wire connectors are properly tightened to prevent loose connections.
Grounding the Fixture: Proper grounding is essential for safety. Connect the ground wire from the new fixture to the ground wire in the junction box (usually bare copper or green). If the junction box doesn't have a ground wire, consult a qualified electrician to ensure proper grounding procedures are followed according to local electrical codes.
Mounting the New Fixture: Once the wiring is complete, carefully tuck the wires into the junction box and align the mounting bracket of the new fixture with the junction box. Secure the fixture to the junction box using the provided screws. Ensure the fixture is mounted flush against the ceiling.
Attaching the Fixture Cover/Shade: The final step involves attaching the cover or shade to the fixture base. This process varies depending on the fixture design. Consult the manufacturer's instructions for specific guidance on attaching the cover/shade correctly and securely.
Restoring Power and Testing: After the fixture is fully assembled, return to the electrical panel and turn the circuit breaker back on. Test the new LED flush mount ceiling light by switching the light switch on and off. Verify that the light functions correctly. If the light doesn't work, double-check all connections and consult the troubleshooting section of the manufacturer's instructions. If the problem persists, consult a qualified electrician.
Variations in Installation: While these instructions provide a general guideline, it's important to recognize that there might be variations in installation procedures depending on the specific model of the LED flush mount ceiling light and the existing electrical configuration. Always refer to the manufacturer's instructions for the most accurate and up-to-date installation guidance. For complex installations or when encountering unfamiliar wiring situations, consulting a qualified electrician is always recommended.
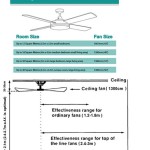
Choosing the Right LED Flush Mount Ceiling Light: Consider factors such as room size, ceiling height, and desired lighting ambiance when selecting a new fixture. Various styles and color temperatures are available to suit different needs and preferences. Understanding the specific lighting requirements for the room will help in choosing the most appropriate LED flush mount ceiling light.
Maintaining Your LED Flush Mount Ceiling Light: Regular cleaning of the fixture will maintain optimal light output and prolong its lifespan. Dust and debris can accumulate on the fixture over time, reducing its brightness. Use a soft cloth to gently wipe the fixture surface. Always ensure the power is off before cleaning the fixture. Avoid using harsh chemicals or abrasive cleaners as these can damage the fixture finish.

16w Led Flush Mount Ceiling Light Dimmable 10 5 Inch Brushed Nickel White Lepro

Install An Led Light Fixture

Commercial Electric 9 In White Oil Rubbed Broe Trims 800 Lumens Led Flush Mount Ceiling Light Fixture With Night Adjustable Cct 56582112 The Home Depot

Led Flush Mount Ceiling Light Fixture 12 Inch 24w 3200lm 4000k Neutr Freeamzs

Commercial Electric 9 In Color Selectable Led Flush Mount Ceiling Light W Night Optional White And Brushed Nickel Trim Rings 56582191 The Home Depot

Drosbey 36w Dimmable Led Flush Mount Ceiling Light Fixture Review How To Install It

15w Led Recessed Mount Ceiling Lights 5000k Daylight White Waterproof 1250lm Le

Square Contemporary Ceiling Lights Kitchen Led Flush Mount Install Bedroom Ideas Art Deco For Light

Next Glow Ultra Slim Luxurious Edge Lit 7 In Square Black 3000k Led Easy Installation Ceiling Light Flush Mount 1 Pack Ng2180 The Home Depot

The Ultimate Flush Ceiling Light Installation And Guide 21 22 Fancy Place
Related Posts