Ways To Cover Old Ceiling Tiles
Old ceiling tiles, a common feature in many older homes and commercial buildings, can often become an eyesore. Stained, cracked, or simply outdated, these tiles can detract from the overall aesthetic of a space. While complete removal and replacement are viable options, they can be costly and time-consuming. Fortunately, several methods exist to cover old ceiling tiles, offering a variety of solutions to improve the appearance of a room without the extensive labor and expense of a full replacement.
The decision of which covering method to use depends on several factors, including the condition of the existing tiles, the desired aesthetic, the budget, and the skill level of the individual undertaking the project. Some methods are relatively simple and can be accomplished by a DIY enthusiast, while others require professional installation. Understanding the advantages and disadvantages of each option is crucial for making an informed decision that aligns with both practical needs and aesthetic preferences.
Painting Ceiling Tiles
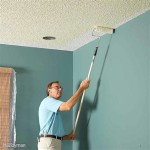
Painting existing ceiling tiles is often the simplest and most economical way to improve their appearance. This method is particularly effective for tackling minor stains and discoloration. However, it's crucial to properly prepare the surface and use the appropriate type of paint to achieve a lasting and aesthetically pleasing result.
Before painting, thoroughly clean the ceiling tiles to remove any dust, dirt, or cobwebs. A vacuum cleaner with a brush attachment is ideal for this purpose. For stubborn stains, gently scrub the affected areas with a mild detergent solution and a soft cloth. Ensure the tiles are completely dry before proceeding to the next step. Addressing excessive sagging before painting is also imperative. Sagging tiles may indicate underlying water damage that should be rectified. If this is not done, they will continue to sag after painting.
The type of paint used is critical. Latex paint is generally recommended for ceiling tiles due to its flexibility and ability to expand and contract with temperature changes, reducing the risk of cracking. Consider using a primer specifically designed for ceilings, particularly if the tiles are stained or have a porous surface. The primer will help to seal the surface, prevent stains from bleeding through the paint, and ensure better adhesion. Apply the paint in thin, even coats, allowing each coat to dry completely before applying the next. Avoid applying too much paint at once, as this can saturate the tiles and cause them to sag or detach from the grid.
While painting is a cost-effective solution, it may not be suitable for heavily damaged or textured tiles. Paint can accentuate imperfections, so it’s best reserved for tiles that are in relatively good condition. Also, painted tiles can be more difficult to clean than unpainted ones, potentially making future maintenance more challenging. Always test the paint on a small, inconspicuous area of the ceiling first to ensure it adheres properly and provides the desired coverage. Consider using specialized ceiling paint that is designed to be drip-resistant and provides a uniform, matte finish.
Installing a Drop Ceiling Beneath Existing Tiles
Installing a new drop ceiling below the existing tiles is a more involved but effective method for completely concealing old and unsightly ceiling tiles. This involves suspending a new grid system below the existing ceiling and installing new tiles within the grid. This method offers a clean, modern look and can also provide benefits such as improved sound insulation and easier access to wiring and plumbing.
The first step is to determine the desired height of the new drop ceiling. This will depend on factors such as the height of the room, the location of light fixtures, and any obstructions that need to be cleared. Use a level to mark a consistent line around the perimeter of the room, which will serve as a guide for installing the wall angle brackets. The wall angle brackets are attached to the walls using screws or nails, providing support for the perimeter of the grid system.
Next, install the main runners, which are the long, horizontal pieces of the grid system that run parallel to each other across the room. The main runners are suspended from the existing ceiling using hanger wires. The hanger wires should be spaced evenly apart to provide adequate support for the grid system. Once the main runners are in place, install the cross tees, which run perpendicular to the main runners and create the grid pattern. The cross tees are typically clipped into the main runners, forming a secure and stable framework.
With the grid system in place, the new ceiling tiles can be installed. Simply lift the tiles into the grid, ensuring they are properly aligned and seated. Consider using acoustic ceiling tiles to improve sound insulation. The space between the old and new ceilings can also be used to run wiring for lighting or other electrical fixtures, providing a convenient and hidden pathway. While a drop ceiling is more expensive than painting, it provides a significant aesthetic upgrade and can offer functional benefits. However, it does reduce the overall height of the room and requires careful planning and installation to ensure a level and professional finish. It is also important to ensure that the new suspended ceiling meets local building codes.
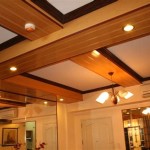
Using Decorative Panels or Planks
Decorative panels or planks offer another option for covering old ceiling tiles, providing a more visually interesting and textured alternative to painting or a traditional drop ceiling. These panels can be made from a variety of materials, including wood, metal, PVC, and composite materials, offering a wide range of styles and finishes to suit different design preferences.
One popular option is to install wood planks directly over the existing ceiling tiles. This can be achieved by attaching furring strips to the existing ceiling, creating a level surface for the planks to be attached. The planks can then be nailed, screwed, or glued to the furring strips. Consider using tongue-and-groove planks, which interlock to create a seamless and professional finish. Wood planks can add warmth and character to a room, creating a rustic or contemporary look depending on the type of wood and finish used.
Another option is to use decorative metal panels. These panels are typically lightweight and easy to install, often using a clip-in system or adhesive. Metal panels can add a modern and industrial touch to a space, and they are also durable and easy to clean. PVC panels are another popular choice, offering a waterproof and low-maintenance solution. They are available in a variety of colors and patterns, mimicking the look of wood, stone, or other materials. Composite panels, made from a combination of materials, offer a balance of durability, aesthetics, and affordability.
Before installing decorative panels, ensure the existing ceiling tiles are structurally sound and free from excessive sagging. If necessary, reinforce the ceiling with additional supports. Also, consider the weight of the panels and choose an attachment method that can adequately support the load. Proper planning and careful installation are essential for achieving a professional and visually appealing result. Decorative panels can be more expensive than painting, but they offer a dramatic aesthetic upgrade and can transform the look of a room.
Applying Beadboard
Beadboard is a classic and versatile option for covering old ceiling tiles, offering a timeless aesthetic that complements a variety of interior design styles. Beadboard consists of narrow, vertical planks with a raised bead or groove running along their length. It is typically made from wood or MDF (Medium-Density Fiberboard) and can be painted or stained to match the existing decor.
The installation process for beadboard is similar to that of wood planks. First, install furring strips to the existing ceiling, creating a level surface for the beadboard to be attached. The furring strips should be spaced evenly apart to provide adequate support. The beadboard panels can then be nailed, screwed, or glued to the furring strips. When installing beadboard, it's important to stagger the seams to create a more visually appealing and durable finish. This involves cutting the first panel in each row to a different length, ensuring that the seams do not line up vertically.
Beadboard can add texture and dimension to a ceiling, creating a more visually interesting and inviting space. It is particularly well-suited for bathrooms, kitchens, and other areas where a classic or cottage-style aesthetic is desired. Beadboard can be painted in a variety of colors, from soft pastels to bold hues, allowing for customization to match the existing decor. It can also be stained to highlight the natural grain of the wood, creating a warm and rustic look.
Before installing beadboard, ensure the existing ceiling tiles are clean, dry, and structurally sound. Address any sagging or damage to the tiles before proceeding. Also, consider the weight of the beadboard and choose an attachment method that can adequately support the load. Beadboard is a relatively affordable and easy-to-install option for covering old ceiling tiles, offering a classic and timeless aesthetic. The use of primed beadboard can save time and effort in preparation.
Using Fabric or Wallpaper
While less conventional, fabric or wallpaper can be used to cover old ceiling tiles, offering a unique and creative way to transform the look of a room. This method is particularly well-suited for smaller spaces or accent areas where a more dramatic and personalized touch is desired. However, it requires careful preparation and application to ensure a lasting and aesthetically pleasing result.
When using fabric, it's essential to choose a lightweight and durable material that will not sag or stretch over time. Natural fibers such as cotton or linen are good options, as they are breathable and relatively easy to work with. Before applying the fabric, thoroughly clean the ceiling tiles and ensure they are smooth and free from any imperfections. A thin layer of fabric adhesive can be applied to the tiles to help the fabric adhere properly.
The fabric can then be carefully applied to the ceiling tiles, smoothing out any wrinkles or bubbles as you go. Start from one corner and work your way across the tile, using a smoothing tool or roller to ensure even adhesion. Once the fabric is in place, trim any excess material around the edges of the tile. Repeating this process for each tile is tedious. Applying the fabric in larger sections is preferable, but still difficult.
Wallpaper can also be used to cover old ceiling tiles, offering a wider range of patterns and designs. Choose a wallpaper that is specifically designed for ceilings or has a non-woven backing for added durability. Prepare the ceiling tiles in the same way as for fabric, ensuring they are clean, smooth, and free from any imperfections. Apply wallpaper paste to the back of the wallpaper and carefully align it with the ceiling tile. Use a smoothing tool to remove any air bubbles and ensure even adhesion. Trim any excess wallpaper around the edges of the tile.
Using fabric or wallpaper to cover old ceiling tiles requires patience and attention to detail. It's important to choose the right materials and follow the proper application techniques to achieve a professional-looking finish. This method is best suited for smaller spaces or accent areas, as it can be time-consuming and labor-intensive. The use of bold patterns or textures can create a dramatic and personalized look, transforming the ceiling into a focal point of the room.

11 Ways To Cover A Hideous Ceiling That Anyone Can Do

Completely Cover A Drop Ceiling Ceilings Armstrong Residential

How To Cover Acoustic Tile Ceilings And Easy Hometalk

How To Easily Update An Ugly Drop Ceiling

Completely Cover A Drop Ceiling Ceilings Armstrong Residential

Ways To Cover Up A Hideous Ceiling

How To Update An Ugly Ceiling Hometalk

Diy How To Update Old Ceiling Tile Pink Little Notebookpink Notebook

How To Cover Ceiling Tiles Gainey Ceramics

11 Ways To Cover A Hideous Ceiling That Anyone Can Do
Related Posts