Removing popcorn ceilings is a tedious job, but with the right tools and supplies, it can be an easy, do-it-yourself project. Popcorn ceilings, also known as acoustic ceilings, were popular in homes during the 1970s and 1980s and can often be found in older homes. While popcorn ceilings can be a nice addition to a home, many people find them outdated and difficult to clean. If you’re looking to remove a popcorn ceiling from your home, here is a step-by-step guide to help you get started.
Step 1: Gather the Necessary Supplies
Before you start the project, make sure you have all the necessary supplies on hand. You’ll need a drop cloth, a ladder, a spray bottle, a putty knife, a paint roller, a paint tray, a fine-grit sandpaper, a vacuum cleaner with a brush attachment, and a water-based sealer. For safety reasons, you should also wear protective goggles and gloves.
Step 2: Prepare the Room
Once you have all the necessary supplies, the next step is to prepare the room. Start by removing all furniture and other items from the room. Next, cover the floor and any other surfaces with a drop cloth. Make sure to seal any air vents in the room to prevent the dust from spreading.
Step 3: Spray the Ceiling
Now it’s time to start removing the popcorn ceiling. Fill a spray bottle with a mixture of warm water and a mild detergent and spray the ceiling. Allow the mixture to sit for about five minutes before continuing. This will help to soften the popcorn texture, making it easier to remove.
Step 4: Scrape the Ceiling
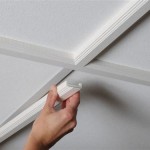
Once the popcorn texture has softened, you can begin to scrape it off. Use a putty knife or a paint roller to gently scrape the texture away. Be sure to scrape in the same direction and be careful not to damage the drywall or the ceiling’s surface.
Step 5: Sand the Ceiling
Once all of the popcorn texture has been removed, use a fine-grit sandpaper to smooth out any rough spots. This will help to ensure a smooth, even surface for painting.
Step 6: Vacuum and Wipe the Ceiling
Once the ceiling is sanded, use a vacuum cleaner with a brush attachment to remove any remaining dust. Then, use a damp cloth to wipe the ceiling and make sure it is completely clean and dry before painting.
Step 7: Seal the Ceiling
Finally, seal the ceiling with a water-based sealer to help protect it from future damage. This will also help make sure your paint job looks great and lasts for years to come.
Conclusion
Removing a popcorn ceiling is a tedious job, but with the right supplies and a little patience, it can be a do-it-yourself project. Follow these steps for successful popcorn ceiling removal and you’ll have a smooth, even surface for painting in no time!


Related Posts