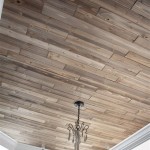
Porch beadboard ceilings are a great way to add a classic, timeless design element to your porch space. By installing beadboard, you can give your porch a polished, finished look that will be the envy of your neighbours. In this article, we’ll discuss the basics of installing a beadboard ceiling, the different types of beadboard, how to choose the best one for your porch, and some tips to make your installation a success.
Types of Porch Beadboard
When it comes to porch beadboard, there are a few different materials to choose from. Traditional beadboard is made of wood, but there are also composite and PVC options available that are designed to look like real wood. Each type of beadboard has its own advantages and disadvantages, and it’s important to choose the right one for your porch.
Wood beadboard is the most classic look, and it’s relatively easy to install. However, it can require more maintenance than other types of beadboard and may not last as long. Composite and PVC beadboard are more expensive, but they are also more durable and require less maintenance. They also come in a variety of colors and finishes, so you can customize the look of your porch.
Choosing the Right Beadboard
When selecting the beadboard for your porch, you should take into account the size of the area, the climate, and the type of material you want. For a larger porch, composite or PVC beadboard is a great choice because it can be cut to size and won’t warp or crack in extreme temperatures. For a smaller area, wood beadboard may be the better option. You should also consider the color and finish of the beadboard you choose. Darker colors will absorb more heat, while lighter colors will reflect it away from your porch.
Installing Porch Beadboard
Once you’ve chosen the right beadboard for your porch, it’s time to install it. Installing beadboard is a fairly simple process, but it’s important to do it correctly to ensure it lasts for years to come. Start by measuring the area where you’ll be installing the beadboard, and cut the boards to size. Use a level to make sure everything is even, and then use screws or nails to secure the boards in place. Make sure to leave a gap between the ends of the boards to ensure proper ventilation.
Tips for Installing Porch Beadboard
Here are a few tips to help you get the best results when installing a beadboard ceiling for your porch:
- Measure twice, cut once – this old adage applies to all DIY projects, and it’s especially important when it comes to installing beadboard.
- Use a drill with a countersink bit – this will make it easier to get the screws in place and also give the boards a professional, finished look.
- Use a waterproof sealant – this will help protect the wood against moisture, which can cause warping and cracking.
- Try a sample first – it’s always a good idea to test out a piece of the beadboard before you install it, to make sure you like the look and feel.
Conclusion
Installing a porch beadboard ceiling is a great way to add character and charm to your outdoor space. With the right materials and a little bit of time and effort, you can transform your porch into an inviting, beautiful area. Keep in mind the tips we shared and you’ll be able to enjoy your new porch beadboard ceiling for years to come!


Related Posts

