Mounting a Ceiling Fan on a Sloped Ceiling: A Comprehensive Guide
Installing a ceiling fan can significantly improve airflow and comfort in any room. However, when the ceiling is sloped, the installation process requires specific considerations and adaptations to ensure proper functionality and safety. This article provides a comprehensive guide to mounting a ceiling fan on a sloped ceiling, covering necessary components, installation steps, and important safety precautions.
Key Considerations Before Installation
Before commencing the installation, several factors must be evaluated. These include the degree of the ceiling slope, the presence of existing wiring, the weight of the ceiling fan, and the structural integrity of the mounting point. Thorough assessment of these factors is crucial for a successful and safe installation.
Ceiling Slope Angle: The angle of the slope determines the type of mounting hardware required. Standard ceiling fans are typically designed for flat ceilings or inclines up to a certain degree, often between 10 and 15 degrees. For steeper slopes, specialized mounting kits are necessary. These kits usually include a downrod and a canopy designed to accommodate the angle, ensuring the fan hangs level and operates correctly.
Existing Wiring: Examine the existing wiring to ensure it meets the electrical requirements of the ceiling fan. Check the wire gauge and voltage to ensure compatibility. If the wiring is inadequate or damaged, consulting a qualified electrician is strongly advised. Proper wiring is essential to prevent electrical hazards and ensure the fan operates safely and efficiently.
Fan Weight: The weight of the ceiling fan is a critical factor in determining the appropriate mounting method. Heavier fans require more robust support than lighter models. Identify the weight of the fan and verify that the mounting location can adequately support it. Reinforcing the ceiling joist may be necessary for heavier fans to prevent sagging or structural damage.
Structural Integrity: Inspect the ceiling joist to confirm it is structurally sound and capable of supporting the weight and motion of the ceiling fan. Look for signs of water damage, rot, or cracks. If the joist is compromised, reinforcing it with additional lumber or installing a fan-rated electrical box attached directly to the joist is necessary. This ensures a secure and stable mounting point.
Essential Components and Tools
The successful installation of a ceiling fan on a sloped ceiling requires specific components and tools. Ensuring all necessary items are available before starting the project will streamline the process and minimize potential delays.
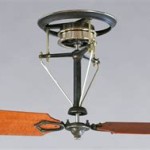
Sloped Ceiling Adapter: For ceilings with a slope exceeding the standard limit of most ceiling fans, a sloped ceiling adapter is essential. This adapter, also known as an angled ceiling kit, allows the fan to hang level while being mounted on a sloped surface. It typically includes a swivel joint and a canopy designed to accommodate the angle of the ceiling.
Extended Downrod: A longer downrod may be needed to ensure adequate clearance between the fan blades and the ceiling. The length of the downrod depends on the height of the ceiling and the angle of the slope. Sufficient clearance is crucial for optimal airflow and to prevent the fan from hitting the ceiling.
Fan-Rated Electrical Box: A standard electrical box is often insufficient for supporting the weight and motion of a ceiling fan. A fan-rated electrical box is specifically designed to handle the additional load and vibrations associated with ceiling fans. Ensure the chosen electrical box is properly rated for the weight of the fan.
Wiring Connectors: Use appropriate wiring connectors, such as wire nuts or push-in connectors, to securely connect the fan's wiring to the existing electrical wiring. These connectors should be rated for the voltage and amperage of the circuit.
Standard Tools: The following tools will be necessary for the installation: a screwdriver (both Phillips and flathead), a wire stripper, a voltage tester, a measuring tape, a level, a drill with appropriate drill bits, and safety glasses. A ladder will also be required to reach the ceiling.
Step-by-Step Installation Process
The installation process can be broken down into several key steps. Following these steps methodically will help ensure a safe and effective installation.
Step 1: Electrical Safety Precautions: Before commencing any electrical work, turn off the power to the circuit at the breaker box. Use a voltage tester to confirm that the power is off before touching any wires. This step is crucial to prevent electrical shock.
Step 2: Remove the Existing Fixture: If there is an existing light fixture or fan, carefully remove it. Disconnect the wiring and lower the fixture. Dispose of the old fixture properly.
Step 3: Install the Fan-Rated Electrical Box: If necessary, replace the existing electrical box with a fan-rated box. Securely attach the new box to the ceiling joist using appropriate screws or mounting hardware. Ensure the box is firmly mounted and can support the weight of the fan.
Step 4: Assemble the Ceiling Fan: Follow the manufacturer's instructions to assemble the ceiling fan. Attach the fan blades to the motor housing. This is typically done using screws and washers. Ensure all screws are tightened securely.
Step 5: Install the Sloped Ceiling Adapter (if needed): If the ceiling has a significant slope, install the sloped ceiling adapter according to the manufacturer's instructions. This adapter will typically attach to the fan-rated electrical box and provide a level mounting surface for the fan.
Step 6: Attach the Downrod: Attach the downrod to the fan motor housing. The length of the downrod should be chosen to provide adequate clearance between the fan blades and the ceiling. Secure the downrod in place using the provided hardware.
Step 7: Wire the Ceiling Fan: Connect the fan's wiring to the existing electrical wiring using wire connectors. Typically, there will be three wires: a black wire (hot), a white wire (neutral), and a green or bare copper wire (ground). Connect the corresponding wires together, ensuring the connections are secure.
Step 8: Mount the Fan to the Electrical Box: Carefully lift the fan and attach the downrod to the mounting bracket on the fan-rated electrical box. Secure the fan to the bracket using the provided hardware. Ensure the fan is hanging level and is securely attached.
Step 9: Install the Canopy: Slide the canopy up the downrod and attach it to the mounting bracket. The canopy covers the wiring and provides a finished look. Secure the canopy in place using screws.
Step 10: Test the Fan: Turn the power back on at the breaker box. Test the fan to ensure it is operating correctly. Verify that the fan blades are spinning smoothly and that the light (if applicable) is working.
Addressing Common Challenges
Several challenges can arise during the installation process. Understanding these challenges and having solutions readily available can help ensure a smooth and successful installation.
Inadequate Ceiling Joist Support: If the ceiling joist is not strong enough to support the weight of the fan, it may be necessary to reinforce it. This can be done by adding additional lumber alongside the existing joist or by installing a support brace between two adjacent joists. Ensure the reinforcement is securely attached and can adequately support the weight of the fan.
Incorrect Wiring: Incorrect wiring can lead to electrical hazards and prevent the fan from functioning correctly. If unsure about the wiring, consult a qualified electrician. Double-check all wiring connections before turning the power back on. Using a voltage tester can help identify and correct wiring issues.
Fan Wobble: Fan wobble can be caused by several factors, including unbalanced blades, loose screws, or an improperly mounted fan. Check the balance of the blades using a balancing kit. Tighten all screws and ensure the fan is securely attached to the electrical box. If the wobble persists, consult the manufacturer's instructions or contact a professional installer.
Insufficient Downrod Length: An insufficient downrod length can result in poor airflow and increase the risk of the fan hitting the ceiling. Measure the distance from the ceiling to the desired fan height and choose a downrod that provides adequate clearance. A longer downrod may be necessary for ceilings with significant slopes.
Canopy Fit Issues: The canopy may not fit properly against the sloped ceiling, leaving gaps or exposing the wiring. Ensure the sloped ceiling adapter is properly installed and that the canopy is designed to accommodate the angle of the ceiling. Adjust the position of the canopy as needed to achieve a flush fit.
Safety Precautions and Best Practices
Prioritizing safety is paramount when installing a ceiling fan, especially on a sloped ceiling. Adhering to safety precautions and best practices can prevent accidents and ensure a safe and reliable installation.
Always Turn Off the Power: As emphasized earlier, always turn off the power to the circuit at the breaker box before commencing any electrical work. This is the most important safety precaution to prevent electrical shock.
Wear Safety Glasses: Wear safety glasses to protect eyes from debris or falling objects during the installation process.
Use a Sturdy Ladder: Use a sturdy ladder that is tall enough to reach the ceiling comfortably and safely. Ensure the ladder is placed on a level surface and is stable before climbing.
Follow Manufacturer's Instructions: Follow the manufacturer's instructions for assembly, wiring, and mounting. These instructions provide specific guidance for the particular model of ceiling fan being installed.
Secure All Connections: Ensure all wiring connections and mounting hardware are securely tightened. Loose connections can lead to electrical hazards or cause the fan to wobble or fall.
Inspect Regularly: After installation, inspect the ceiling fan regularly for any signs of damage, loose screws, or wobble. Address any issues promptly to prevent further damage or safety risks.
Installing a ceiling fan on a sloped ceiling requires careful planning, the right components, and adherence to safety precautions. By following the steps outlined in this guide, homeowners can successfully install a ceiling fan that enhances comfort and improves airflow in their homes. If uncertainties arise at any point during the process, consulting a qualified electrician or professional installer is always recommended.

How To Choose A Ceiling Fan For Vaulted Ceilings Lightology

How To Install A Ceiling Fan On Sloped Lemon Thistle

Vaulted Sloped Ceiling Adapter For Modern Fan Company Fans Stardust

How To Install A Ceiling Fan On Sloped Lemon Thistle

How To Choose A Ceiling Fan For Vaulted Ceilings Lightology

Fans On An Angle Installing Ceiling Angled Or Raked

Vaulted Sloped Ceiling Adapter For Modern Fan Company Fans Stardust

Ceiling Fans For Angled Ceilings

Ensuring Proper Ceiling Fan Installation With Vaulted Ceilings

Vaulted Sloped Ceiling Adapter For Modern Fan Company Fans Stardust
Related Posts