Installing A Remote Control Hunter Ceiling Fan: A Step-by-Step Guide
Installing a remote control Hunter ceiling fan is a relatively straightforward project that can be completed in a few hours. By following these step-by-step instructions, you can ensure a safe and successful installation.
1. Gather Your Tools and Materials
Before you begin, gather the necessary tools and materials. You will need:
- Remote control Hunter ceiling fan
- Screwdriver
- Drill
- Electrical tape
- Wire nuts
- Ceiling fan mounting bracket
- Ceiling fan canopy
- Downrod
- Fan blades
- Remote control receiver
- Batteries for remote control
2. Turn Off the Power
For safety, turn off the power to the ceiling fan circuit at the breaker panel. This will prevent any electrical shocks during installation.
3. Remove the Existing Ceiling Fan (If Applicable)
If you are replacing an existing ceiling fan, remove it by following these steps:
- Remove the fan blades.
- Disconnect the electrical wires.
- Remove the mounting bracket.
- Remove the canopy.
4. Install the Mounting Bracket
The mounting bracket is the base that will support the ceiling fan. Install it according to the manufacturer's instructions, ensuring that it is securely attached to the ceiling joists.
5. Install the Canopy
The canopy covers the mounting bracket and conceals the electrical connections. Install it according to the manufacturer's instructions.
6. Install the Downrod
The downrod connects the ceiling fan to the mounting bracket. Install it according to the manufacturer's instructions, ensuring that it is securely attached.
7. Install the Fan Blades
Attach the fan blades to the motor housing according to the manufacturer's instructions. Ensure that the blades are securely attached.
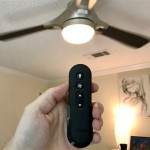
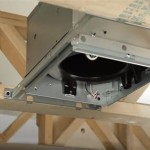
8. Install the Remote Control Receiver
The remote control receiver is the device that receives the signals from the remote control. Install it according to the manufacturer's instructions, ensuring that it is securely attached to the electrical wires.
9. Connect the Electrical Wires
Connect the electrical wires according to the wiring diagram provided in the manufacturer's instructions. Use wire nuts to secure the connections and electrical tape to insulate them.
10. Install the Remote Control Batteries
Insert the batteries into the remote control according to the manufacturer's instructions.
11. Turn On the Power
Turn on the power at the breaker panel. The ceiling fan should now be operational.
12. Test the Remote Control
Test the remote control to ensure that it is working properly. The fan should respond to the commands on the remote control.
Congratulations!
You have now successfully installed a remote control Hunter ceiling fan. Enjoy the convenience and comfort of controlling your fan from the comfort of your couch.

How To Wire A Ceiling Fan With Remote Receiver

How To Install A Ceiling Fan With Remote Control

How To Install A Hunter Control Receiver

How To Install A Ceiling Fan With Remote Control Hunter Model 59188

How To Install A Ceiling Fan With Remote Control Hunter Model 59188

How To Wire A Ceiling Fan Control Using Dimmer Switch

How To Install A Ceiling Fan Remote 5x Series Models

Universal Fan Light Wall Control With Receiver 99771 Hunter

Converting An Existing Ceiling Fan To A Remote Control

How To Wire And Install A Ceiling Fan With Remote Control Light Fixture Removal
Related Posts