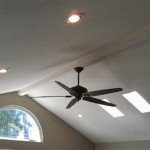
Installing a Ceiling Fan with Remote and Two Light Switches
Installing a ceiling fan with a remote and two light switches offers enhanced control and convenience. This article provides a comprehensive guide to completing this installation, covering necessary tools, safety precautions, and step-by-step instructions.
Safety Precautions
Electrical work always carries potential risks. Before beginning any electrical installation, disconnect power to the circuit at the breaker box. Verify the power is off using a non-contact voltage tester. Use appropriate personal protective equipment (PPE), including safety glasses and gloves. If unsure about any part of the process, consult a qualified electrician.
Gathering the Necessary Tools and Materials
Having the right tools and materials on hand simplifies the installation process. Typically, this includes a ladder, voltage tester, wire strippers/cutters, electrical tape, screwdriver set, pliers, wire connectors, and the ceiling fan kit itself. The kit should contain the fan motor, blades, mounting bracket, remote receiver, and all necessary hardware. Verify that the kit's specifications meet the room's requirements.
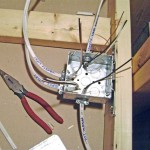
Preparing the Ceiling Electrical Box
The existing electrical box must be capable of supporting the weight of the ceiling fan. Building codes often require a fan-rated box, which is typically marked as such. If an existing light fixture is being replaced, remove it carefully and inspect the box. If the box isn't fan-rated, it must be replaced with one that is. Ensure the box is securely attached to a structural member.
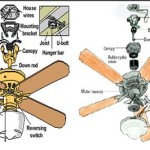
Installing the Mounting Bracket
The ceiling fan's mounting bracket attaches to the electrical box. The specific method of attachment varies depending on the fan and the electrical box, so consult the manufacturer's instructions. Ensure the bracket is securely fastened and properly oriented for the fan's direction.
Wiring the Ceiling Fan
This step involves connecting the fan's wiring to the house wiring. Most ceiling fans have wires coded for the fan motor (black), the fan light (blue), and a ground wire (green or bare copper). The house wiring typically consists of a black (hot) wire for the fan, a black (hot) wire for the light, a red (switched hot) wire from the second switch, a neutral (white) wire, and a ground (bare copper or green) wire. Following the wiring diagram provided with the fan is crucial for proper operation. Connect wires of the same color using approved wire connectors and ensure all connections are secure.
Connecting the Remote Receiver
The remote receiver is usually a small unit that fits inside the ceiling fan's mounting bracket. It connects to the fan's wiring as per the manufacturer's instructions. Typically, the receiver has wires matching the fan's wires. Ensure the receiver's antenna is positioned to optimize signal reception.
Installing the Fan Motor and Blades
Carefully lift the fan motor and attach it to the mounting bracket, following the manufacturer's instructions. Once the motor is secured, attach the fan blades, ensuring they are balanced and securely fastened. Most fan blades are labelled to assist with proper orientation.
Wiring the Two Light Switches
This configuration allows independent control of the fan and the light using two separate switches. In this setup, one switch controls the power to the fan motor, and the other controls power to the light fixture. The red wire from the second switch connects to the blue wire of the fan light kit. Connect the black wires from each switch to the black hot wires coming from the electrical box. The neutral wires are connected together in the switch box, and the ground wires are connected to the switch box and the switches if they have ground terminals.
Testing the Installation
After completing the wiring, restore power to the circuit at the breaker box. Test the fan and light using both wall switches and the remote control. Verify that the fan operates at all speeds and that the light turns on and off correctly. If any issues are encountered, double-check all wiring connections and consult the troubleshooting section of the fan's manual.
Final Steps and Considerations
Once the fan is operating correctly, install any decorative canopy or light kit cover. Ensure all screws and fasteners are tightened securely. Dispose of packaging and leftover materials appropriately. Periodically clean the fan blades to maintain optimal performance and balance.

Wiring How Should I Wire A Ceiling Fan Remote Where Two Switches Are Used To Control The Fixture Home Improvement Stack Exchange

Wiring Old Fan Had 2 Switches One For Light How Can I Utilize The Same Setup On A New Smart With Remote Home Improvement Stack Exchange

Need Feedback On Wiring Fan And Switch With Smartswitches Projects Stories Smartthings Community

How To Wire A Ceiling Fan With Remote Receiver

Electrical How Can I Wire A Ceiling Fan With Two 14 2 Cables Home Improvement Stack Exchange

Ceiling Fan Installation And Circuitry Explained Controller Two Switch Circuits Demonstrated

How To Wire A Ceiling Fan Control Using Dimmer Switch

Converting An Existing Ceiling Fan To A Remote Control

How To Wire A Ceiling Fan Control Using Dimmer Switch

How To Wire A Fan With Two Switches
Related Posts