Installing a Ceiling Fan in a Flat Roof: A Comprehensive Guide
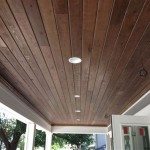
Installing a ceiling fan in a flat roof presents unique challenges compared to installing one in a standard pitched roof. The primary difference lies in the structural support and electrical wiring considerations. This guide provides a detailed, step-by-step approach to ensure a safe and effective ceiling fan installation in a flat roof environment.
Before embarking on the installation process, ensuring compliance with local building codes and electrical regulations is paramount. These codes often dictate specific requirements for electrical wiring, structural support, and permissible alterations to the building's structure. Furthermore, consulting a qualified electrician is highly recommended, especially if the individual lacks extensive electrical experience. An electrician can assess the existing wiring, identify potential hazards, and ensure the installation is compliant with all applicable regulations.
In addition to regulatory compliance, assessing the load-bearing capacity of the flat roof structure is critical. A ceiling fan, especially a larger model, adds weight and exerts dynamic forces during operation. Failure to adequately support the fan can lead to structural damage, including ceiling sagging or, in extreme cases, roof collapse. A structural engineer can evaluate the roof's construction and determine the necessary reinforcements to safely support the fan. This assessment may involve analyzing the joists, rafters, and decking materials to ensure they can withstand the additional load.
Key Point 1: Preparing for the Installation
Preparation is the foundation of a successful ceiling fan installation. This phase involves gathering the necessary tools and materials, carefully planning the electrical wiring route, and ensuring safety precautions are in place. Rushing through this step can lead to errors, delays, and potential safety hazards.
The first step involves acquiring the appropriate tools and materials. Essential tools include a voltage tester, screwdrivers (Phillips and flathead), wire strippers, wire connectors, pliers, a drill with various drill bits, a measuring tape, a level, and a ladder. A stud finder can be helpful for locating ceiling joists. Materials typically include the ceiling fan itself, a fan-rated electrical box, wiring (typically 12 or 14 gauge), mounting hardware (screws, bolts, washers), and wire nuts. Ensure all materials are UL-listed and appropriate for the local building codes.
Next, the electrical wiring route must be planned. This involves determining the location of the power source and the path the wiring will take to the ceiling fan location. If an existing light fixture is being replaced, the wiring may already be in place. However, it is crucial to verify that the wiring is adequately rated for the ceiling fan's amperage draw. If new wiring is required, it must be run through conduit or protected by other approved methods to prevent damage. The wiring should be secured to the ceiling joists using cable staples.
Safety precautions are paramount throughout the installation process. Always turn off the power to the circuit breaker that controls the wiring being worked on. Use a voltage tester to confirm that the power is off before touching any wires. Wear safety glasses to protect eyes from debris, and wear gloves to protect hands from electrical shock and sharp edges. If working at height, use a sturdy ladder and ensure it is properly positioned. Avoid working alone, and have someone nearby in case of an emergency.
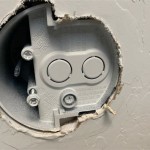
Key Point 2: Installing the Fan-Rated Electrical Box and Support Structure
The electrical box and support structure are critical components of the installation, ensuring both electrical safety and the structural integrity of the fan mounting. A standard electrical box designed for light fixtures is not sufficient; a fan-rated box specifically designed to support the weight and dynamic forces of a ceiling fan is required.
The fan-rated electrical box needs to be securely fastened to the ceiling joists. In a flat roof, this typically involves using heavy-duty screws or bolts to attach the box to the joists. If the joists are not directly above the desired fan location, a bracing system may be necessary. This can involve installing additional lumber between the joists to create a solid mounting platform for the box. The lumber should be sized appropriately to handle the weight of the fan and any additional dynamic forces.
Various types of fan-rated electrical boxes are available, including those that are adjustable to fit different joist spacings. Some boxes feature a built-in suspension system that helps to dampen vibrations and reduce noise. Choose a box that is suitable for the specific ceiling fan and the construction of the flat roof. Ensure the box is properly grounded to prevent electrical shock hazards. Connect the ground wire from the box to the ground wire in the electrical circuit using a wire connector.
If the ceiling joists are not easily accessible, or if the roof structure is unconventional, alternative mounting methods may be required. These can include using a specialized mounting plate that distributes the weight of the fan across a larger area, or installing a custom-built support structure. In these cases, consulting a structural engineer is essential to ensure the chosen method is safe and effective.
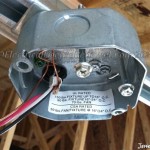
Key Point 3: Wiring and Mounting the Ceiling Fan
With the electrical box and support structure in place, the next step is to wire and mount the ceiling fan itself. This involves connecting the electrical wires according to the manufacturer's instructions and securing the fan to the mounting bracket. Precise wiring and a secure mounting are essential for safe and reliable operation of the fan.
Before connecting the wires, carefully review the wiring diagram provided with the ceiling fan. The diagram will illustrate the correct connections for the power wires, the neutral wire, and the ground wire. Typically, the black wire from the fan connects to the black wire from the power source (hot), the white wire from the fan connects to the white wire from the power source (neutral), and the green or bare copper wire from the fan connects to the ground wire from the power source. Use wire connectors (wire nuts) to securely connect the wires, ensuring that the connections are tight and well-insulated.
After the wiring is complete, carefully tuck the wires into the electrical box. Avoid overcrowding the box, as this can create a potential fire hazard. Secure the ceiling fan's mounting bracket to the electrical box using the provided screws. Ensure the bracket is level before proceeding to the next step.
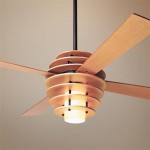
The final step involves attaching the ceiling fan to the mounting bracket. This typically involves lifting the fan into place and aligning it with the bracket. Secure the fan to the bracket using the provided screws or bolts. Ensure all screws are tightened securely to prevent the fan from wobbling or falling. Once the fan is mounted, install the fan blades according to the manufacturer's instructions. Test the fan to ensure it is operating correctly and that the blades are balanced.
Once the fan is completely assembled and electrically connected, inspect all wiring and connections to ensure there are no loose wires or exposed conductors. Carefully push all wiring into the junction box, being mindful not to pinch or damage any of the wires. Attach the canopy to the mounting bracket, concealing the wiring and junction box. This provides a clean and finished appearance.
Finally, with the assembly completed, the breaker can be turned back on. Proceed by testing all the functionality of the fan, including different speed settings and the light fixture if equipped. Verify that the fan operates smoothly and without excessive noise or wobbling. If the fan wobbles, consult the user manual for instructions on balancing the blades, usually involving the use of balancing clips and weights provided with the ceiling fan.
Following these steps carefully and adhering to all applicable safety guidelines will result in a safe and functional ceiling fan installation in a flat roof setting. Remember to consult with qualified professionals when necessary to ensure the safety and integrity of the installation.

Flat Roof Attic Ventilation The Benefits Of

Flat Roof Attic Ventilation The Benefits Of

Flat Roof Attic Ventilation The Benefits Of

How Much Ventilation Does Your Flat Roof Need Jj Roofing

Ceiling Fans For Angled Ceilings

The Roof Mount Whole House Fans Quiet Cool

Flat Roof Vents Roofing Materials Areco Specialists

Ceiling Fan For Apartments Things To Consider Before Choosing

How To Choose A Ceiling Fan For Vaulted Ceilings Lightology

How To Install A Ceiling Fan Diy Family Handyman
Related Posts