Installing A Ceiling Fan On A Sloped Ceiling
Installing a ceiling fan can significantly enhance the comfort and aesthetic appeal of any room. However, when dealing with a sloped ceiling, the installation process requires careful planning and execution to ensure safety and optimal functionality. Standard ceiling fan mounting systems are typically designed for flat surfaces, making them unsuitable for angled ceilings. This article provides a comprehensive guide on how to properly install a ceiling fan on a sloped ceiling, outlining the necessary steps, tools, and considerations for a successful project.
The primary challenge in installing a ceiling fan on a sloped ceiling lies in maintaining the fan's balance and ensuring that the blades have adequate clearance from the ceiling. Without proper installation, a ceiling fan on a slope can wobble excessively, create noise, and potentially detach from the mounting hardware. This article will detail the specialized hardware needed to overcome these challenges and achieve a safe and functional installation.
Choosing the Right Ceiling Fan and Mounting Hardware
Before commencing the installation process, selecting the appropriate ceiling fan and mounting hardware is critical. Not all ceiling fans are designed to accommodate sloped ceilings, and using the wrong type can compromise stability and safety. The two main components to consider are the ceiling fan itself and the mounting kit specifically designed for sloped ceilings.
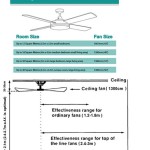
When selecting a ceiling fan, examine the manufacturer's specifications to confirm its suitability for sloped ceilings. Many modern ceiling fans are designed to handle slopes up to a certain degree, typically ranging from 30 to 45 degrees. This information is usually found in the product manual or on the manufacturer's website. If the ceiling's slope exceeds the fan's recommended limit, a different fan design or alternative mounting method will be necessary.
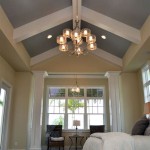
The essential component for sloped ceiling fan installation is a specialized mounting kit. These kits typically include a downrod, a mounting bracket, and a canopy designed to accommodate the angle of the ceiling. The downrod is a pipe that extends the fan away from the ceiling, providing ample clearance for the blades to rotate without hitting the angled surface. The length of the downrod is crucial and depends on the ceiling's slope and the desired height of the fan. A longer downrod is necessary for steeper slopes to maintain adequate blade clearance.
The mounting bracket is designed to be securely attached to the junction box in the ceiling. For sloped ceilings, a swivel mounting bracket is generally preferred. These brackets allow the fan to hang plumb, regardless of the ceiling's angle, ensuring stability and preventing wobbling. The canopy is the decorative cover that conceals the mounting bracket and wiring connections. A sloped ceiling canopy is designed to fit snugly against the angled ceiling surface, providing a clean and aesthetically pleasing finish.
Another critical aspect to consider is the junction box. It must be specifically rated for ceiling fan installation. Standard light fixture junction boxes are typically insufficient to support the weight and vibration of a ceiling fan. A fan-rated junction box is designed to withstand the dynamic loads imposed by the rotating fan, preventing the risk of detachment and potential injury. If an existing light fixture is being replaced, verify that the junction box is fan-rated before proceeding with the installation. If not, it must be replaced with an appropriate fan-rated box.
Step-by-Step Installation Process
Once the appropriate ceiling fan and mounting hardware have been selected, the installation process can begin. The following steps outline the procedure for installing a ceiling fan on a sloped ceiling, emphasizing safety and accuracy.
Step 1: Safety First. Before commencing any electrical work, turn off the power to the circuit at the breaker box. This is a non-negotiable safety precaution to prevent electric shock. Verify that the power is off by using a non-contact voltage tester on the existing wiring.
Step 2: Remove the Existing Fixture. If replacing an existing light fixture, carefully remove it. Disconnect the wiring, taking note of the wire colors and connections. Typically, black is the hot wire, white is the neutral wire, and green or bare copper is the ground wire. Use wire connectors to cap off any exposed wires to prevent accidental contact.
Step 3: Install the Fan-Rated Junction Box (If Necessary). If the existing junction box is not fan-rated, it must be replaced. Carefully remove the old junction box, ensuring that the surrounding ceiling material is not damaged. Install the new fan-rated junction box according to the manufacturer's instructions. These boxes are typically secured to a ceiling joist using screws or nails. Ensure the box is firmly attached and capable of supporting the weight of the ceiling fan.
Step 4: Assemble the Mounting Bracket. Attach the swivel mounting bracket to the junction box. Align the bracket with the pre-drilled holes in the junction box and secure it using the provided screws. Ensure the bracket is firmly attached and properly aligned to allow the fan to hang plumb.
Step 5: Prepare the Ceiling Fan Motor. Assemble the ceiling fan motor according to the manufacturer's instructions. This typically involves attaching the downrod to the motor housing. Ensure the downrod is securely fastened and that the wiring is properly routed through the downrod.
Step 6: Wire the Ceiling Fan. Connect the wiring from the ceiling fan to the house wiring. Match the wire colors carefully, connecting black to black, white to white, and green or bare copper to green or bare copper. Secure the connections using wire connectors, ensuring that the connections are tight and well-insulated.
Step 7: Hang the Ceiling Fan. Carefully lift the ceiling fan and insert the downrod into the mounting bracket. The swivel bracket will allow the fan to hang plumb, regardless of the ceiling's slope. Ensure the downrod is securely seated in the bracket and that any locking mechanisms are engaged.
Step 8: Attach the Fan Blades. Attach the fan blades to the motor housing according to the manufacturer's instructions. Ensure the blades are properly aligned and securely fastened. Imbalances in blade alignment can cause wobbling and noise. Some fans have balancing kits which may be necessary to use after installation if wobbling occurs.
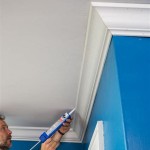
Step 9: Install the Canopy. Slide the canopy up the downrod to conceal the mounting bracket and wiring connections. Secure the canopy to the ceiling using the provided screws. Ensure the canopy fits snugly against the sloped ceiling surface for a clean and aesthetically pleasing finish.
Step 10: Test the Fan. Restore power to the circuit at the breaker box. Test the ceiling fan to ensure it is functioning properly. Check the fan's speed settings and ensure that the fan blades are rotating smoothly and without excessive wobbling. If wobbling occurs, balancing weights can be added to the fan blades to correct the imbalance.
Troubleshooting Common Issues
Even with careful planning and execution, certain issues may arise during or after the installation of a ceiling fan on a sloped ceiling. Addressing these issues promptly is essential to ensure the fan's safe and efficient operation.
Wobbling: One of the most common issues is excessive wobbling. This can be caused by several factors, including unbalanced fan blades, a loose mounting bracket, or an improper downrod length. To address wobbling, first, ensure that all fan blades are securely attached and properly aligned. A balancing kit, typically included with the fan, can be used to add small weights to the blades to correct any imbalances. If the wobbling persists, check the mounting bracket to ensure it is firmly attached to the junction box. If the downrod is too short, it may not provide adequate clearance from the ceiling, causing the fan to wobble. In this case, a longer downrod may be necessary.
Noise: Excessive noise can also be a concern. This can be caused by loose screws, vibrating components, or the fan blades rubbing against the ceiling. To address noise, tighten all screws and check for any loose components. Ensure that the fan blades have adequate clearance from the ceiling and are not rubbing against any surfaces. Lubricating the motor bearings can also help to reduce noise.
Electrical Issues: Electrical issues, such as the fan not turning on or the light not working, can indicate wiring problems. Double-check all wiring connections to ensure they are secure and properly matched. If the fan still does not work, test the circuit breaker to ensure it is functioning correctly. If the issue persists, consult a qualified electrician.
Canopy Fit: A common aesthetic issue can arise if the canopy does not fit flush against the sloped ceiling. This may require adjustment to the mounting bracket or the use of shims to create a more even surface. Ensure that the canopy is securely attached and covers the wiring connections completely.
Installing a ceiling fan on a sloped ceiling requires careful planning, the right equipment, and a thorough understanding of the installation process. By following these guidelines, a homeowner or qualified installer can ensure a safe, functional, and aesthetically pleasing result.

How To Install A Ceiling Fan On Sloped Lemon Thistle

Install Ceiling Fan On Sloped Simple Modern Handmade Home

How To Install A Ceiling Fan On Sloped Lemon Thistle

Electrical Mount Ceiling Fan At The Peak Of A Sloped Home Improvement Stack Exchange

Mounting Ceiling Fan On Sloped Home Improvement Stack Exchange

How To Choose A Ceiling Fan For Vaulted Ceilings Lightology

How To Install A Ceiling Fan On Vaulted Quora

Ensuring Proper Ceiling Fan Installation With Vaulted Ceilings

Kichler Ceiling Fan Fast Facts Sloped

How To Choose A Ceiling Fan For Vaulted Ceilings Lightology
Related Posts