Essential Aspects of Installing a Remote Control Ceiling Fan
Installing a remote control ceiling fan is an efficient way to upgrade your home's comfort and style. Whether you're a seasoned DIYer or seeking professional assistance, these fundamental aspects will guide you through a successful installation.
Electrical Safety First
Prioritize electrical safety by ensuring the power is turned off at the circuit breaker or fuse box. Verify that the circuit is indeed dead using a non-contact voltage tester. Disconnect any existing fan or fixture before proceeding.
Choosing the Right Fan
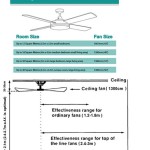
Consider the size and style of your room when selecting a ceiling fan. Measure the width of the room to determine the ideal blade span. Choose a design that complements your existing décor. Remote control fans often come with multiple speed settings and lighting options, so consider your specific needs.
Preparing the Mounting Surface
Before mounting the fan, inspect the ceiling joists to ensure they can support the weight. Locate the electrical box and verify that it is properly secured. Install a ceiling fan-rated electrical box if necessary. Mark the center of the mounting bracket on the ceiling and secure it firmly.
Hanging the Fan
Carefully lift the fan and align it with the mounting bracket. Slide the fan onto the bracket and tighten the mounting screws to secure it. If the fan has a downrod, attach it and adjust the length accordingly.
Connecting the Wiring
Connect the fan's wires to the corresponding wires in the electrical box. Typically, black wires connect to black, white wires to white, and green wires to ground. Consult the manufacturer's instructions for specific wiring details.
Installing the Receiver and Remote Control
Locate a suitable spot for the remote control receiver, typically in the ceiling canopy or on the mounting bracket. Connect the receiver to the fan's wires and secure it in place. Pair the remote control with the receiver by following the manufacturer's instructions.
Balancing the Fan
After installation, it is crucial to balance the fan to ensure smooth and quiet operation. Attach the balancing kit to the fan's blades and adjust the weights until the fan remains stable at all speeds.
Consider Professional Installation
If you are not comfortable with electrical work or lack the necessary tools, consider hiring a qualified electrician to ensure a safe and proper installation.
Safety Tips
Always wear safety glasses and gloves during installation. Use a sturdy ladder or scaffolding to reach the ceiling. Never attempt to operate the fan without the blades properly installed. Regularly clean and maintain the fan to ensure optimal performance.
By following these essential aspects, you can successfully install a remote control ceiling fan, enhancing both the comfort and aesthetics of your home.

How To Install A Ceiling Fan With Remote Control

How To Wire A Ceiling Fan Control Using Dimmer Switch

How To Install A Ceiling Fan Remote Diy Family Handyman

How To Install A Ceiling Fan Remote Control

Pairing Function 12v 23a On Battery Ceiling Fan Remote Control Switch Light Transmitter Made In China Com

Electrical Ceiling Fan Wiring With Remote Control 2 Wall Switches Home Improvement Stack Exchange

How To Install Ceiling Fan Light With Remote

How To Install Ceiling Fan With Light Www Devonbuy Com

Qiachip Flcw Universal Ceiling Fan And Lights Wireless Remote Contro

How To Install A Ceiling Fan With Remote Control Electrical
Related Posts


