Installing Ceiling Heat Registers: A Comprehensive Guide
Heat registers, also known as air vents, are integral components of a forced-air heating and cooling system. They serve as the final distribution point for conditioned air, directing warm or cool air into specific areas of a home or building. While wall and floor registers are common, ceiling registers offer certain advantages, particularly in terms of air circulation and comfort. This article provides a comprehensive guide to installing heat registers in a ceiling, covering necessary tools, preparation steps, and the installation process itself.
Understanding the Benefits of Ceiling Heat Registers
Ceiling heat registers offer several potential benefits compared to their wall-mounted or floor-level counterparts. One significant advantage is improved air circulation. Because warm air naturally rises, positioning registers in the ceiling allows for more efficient distribution of heated air throughout the room. This can lead to a more even temperature gradient, reducing cold spots and promoting overall comfort. Furthermore, ceiling registers can be less obtrusive than floor registers, which can be easily blocked by furniture or foot traffic. They are also less likely to accumulate dust and debris compared to floor registers, leading to improved air quality. Finally, in rooms with limited wall space, ceiling registers provide a viable alternative when wall or floor installations are impractical.
Essential Tools and Materials
Before commencing the installation, it is crucial to gather the necessary tools and materials. The following list outlines the essential items needed for a typical ceiling heat register installation:
*Heat Register: Select a register that is appropriately sized for the ductwork and the room's heating requirements. Consider the register's adjustability and aesthetic appeal.
*Measuring Tape: Accurate measurements are critical for precise cutting and placement.
*Pencil: Used for marking cut lines on the ceiling.
*Drywall Saw or Utility Knife: Needed for cutting the opening in the ceiling drywall.
*Stud Finder: Essential for locating ceiling joists to avoid cutting into them.
*Safety Glasses: Protection for your eyes against falling debris.
*Dust Mask: Prevents inhalation of drywall dust and other particles.
*Gloves: Protects your hands during the installation process.
*Flexible Ductwork (if needed): For connecting the register boot to the main duct line.
*Register Boot: A metal or plastic box that connects the ductwork to the register.
*Screws or Nails: For securing the register boot and the register itself.
*Drill or Screwdriver: For driving screws.
*Aluminum Foil Tape (HVAC-grade): Used to seal connections between ductwork and the register boot.
*Ladder: To safely reach the ceiling.
Preparation for Installation
Thorough preparation is essential for a successful and safe heat register installation. First, turn off the power to the circuit that supplies electricity to the area where you will be working. This is a crucial safety precaution to prevent electrical shock. Next, conduct a visual inspection of the ceiling to identify any potential obstructions, such as wiring, plumbing, or existing ductwork. Use the stud finder to locate ceiling joists. It is imperative to avoid cutting into joists, as they provide structural support for the ceiling. Plan the register's location, ensuring it is centrally located in the room or positioned to optimize air distribution based on the room's layout and heating needs. Once you've determined the precise location, carefully measure and mark the outline of the register boot on the ceiling. Ensure the opening is slightly larger than the boot to allow for easy insertion. Double-check your measurements before proceeding to the cutting stage. Cover the floor with a drop cloth to protect it from falling drywall dust and debris.
Step-by-Step Installation Process
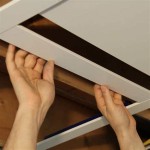
The installation process should be executed with precision and attention to detail. Begin by carefully cutting along the marked outline on the ceiling using the drywall saw or utility knife. Apply gentle pressure to avoid damaging the surrounding drywall. Once the opening is cut, carefully remove the drywall piece and dispose of it properly. Inspect the opening for any obstructions, such as wires or pipes. If any obstructions are present, carefully relocate them or adjust the opening as needed. Next, insert the register boot into the opening. Secure the boot to the ceiling joists using screws or nails. Ensure the boot is flush with the ceiling surface and securely fastened. Connect the flexible ductwork to the register boot and the main duct line. Use aluminum foil tape to seal all connections, ensuring an airtight seal. This prevents air leakage and maximizes the efficiency of the heating system. Finally, attach the heat register to the register boot using screws or clips. Ensure the register is securely fastened and properly aligned. Adjust the register's louvers to direct the airflow as desired.
Addressing Potential Challenges
Several challenges may arise during the installation process. One common issue is encountering hidden wiring or plumbing within the ceiling cavity. If this occurs, carefully assess the situation and determine the best course of action. It may be necessary to relocate the wiring or plumbing or to adjust the register's location. Another challenge is dealing with uneven ceiling surfaces. If the ceiling is not perfectly flat, use shims to level the register boot before securing it to the ceiling. This ensures a flush and aesthetically pleasing installation. Working with flexible ductwork can also be challenging, particularly in tight spaces. Take your time and carefully manipulate the ductwork to ensure a smooth and unrestricted airflow. Finally, ensure all connections are properly sealed with aluminum foil tape to prevent air leakage. Air leakage can significantly reduce the efficiency of the heating system and increase energy costs.
Ensuring Proper Airflow and System Performance
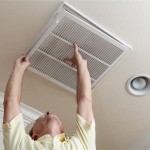
After installation, it is essential to verify that the heat register is functioning correctly and that the heating system is performing optimally. Turn on the heating system and check for airflow from the register. Adjust the register's louvers to direct the airflow as desired. Use a thermometer to measure the temperature of the air coming from the register. Compare this temperature to the temperature of the air coming from other registers in the house. If the temperature is significantly different, there may be an issue with the ductwork or the register itself. Listen for any unusual noises coming from the register or the ductwork. These noises could indicate a problem with the airflow or the system's components. Ensure that the register is not blocked by furniture or other obstructions. Blocked registers can restrict airflow and reduce the efficiency of the heating system. Periodically inspect the register for dust and debris and clean it as needed. A clean register ensures optimal airflow and air quality. If you notice any problems with the heating system's performance, consult with a qualified HVAC technician.
Safety Considerations
Safety should be the primary concern throughout the entire installation process. Always turn off the power to the circuit before commencing any electrical work. Wear safety glasses and a dust mask to protect your eyes and lungs from debris and dust. Use a sturdy ladder that is properly positioned and secured. Avoid overreaching or straining while working on the ceiling. If you are not comfortable working with electrical wiring or ductwork, consult with a qualified electrician or HVAC technician. Follow all manufacturer's instructions for the register, the register boot, and the ductwork. Use appropriate tools and equipment for the task at hand. Do not attempt to cut through ceiling joists, as this can compromise the structural integrity of the ceiling. Be aware of your surroundings and avoid distractions while working. Keep children and pets away from the work area. Dispose of all waste materials properly. If you are unsure about any aspect of the installation process, seek professional assistance.
Long-Term Maintenance and Care
To ensure the continued performance and longevity of the ceiling heat register, regular maintenance and care are essential. Periodically inspect the register for dust, debris, and damage. Clean the register with a vacuum cleaner or a damp cloth. Avoid using harsh chemicals or abrasive cleaners, as these can damage the register's finish. Check the register's louvers and adjust them as needed to maintain optimal airflow. Inspect the ductwork for leaks or damage and repair them promptly. Ensure that the register is securely fastened to the ceiling and that the connections are airtight. If you notice any signs of rust or corrosion, address them promptly to prevent further damage. Consider having your heating system professionally inspected and maintained annually. A professional inspection can identify potential problems before they become major issues. By following these maintenance tips, you can ensure that your ceiling heat register continues to provide efficient and reliable heating for years to come.

Replacing A Heat Vent Register

How Do I Extend A Register From Overhead Duct To Drop Ceiling Doityourself Com Community Forums

Quick Ceiling Vent Fix

How To Secure A Heat Register In Ceiling Without S

How To Install A Sheet Metal Register Can Or Box For Heating Air Conditioning Hvac

How Can I Secure A Vent Register To Drywall On Ceiling Home Improvement Stack Exchange

How To Secure A Heat Register In Ceiling Without S

How Do I Extend A Register From Overhead Duct To Drop Ceiling Doityourself Com Community Forums

How Do I Extend A Register From Overhead Duct To Drop Ceiling Doityourself Com Community Forums

Hvac Register Installation Where To Put It Modernize
Related Posts