Installing a Ceiling Fan on a Vaulted Ceiling: A Comprehensive Guide
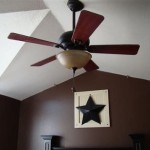
Installing a ceiling fan can significantly improve the comfort and energy efficiency of a room. However, installing a ceiling fan on a vaulted, or sloped, ceiling presents unique challenges compared to a standard flat ceiling installation. These challenges primarily arise from the angle of the ceiling, which necessitates specialized hardware and careful planning to ensure the fan is securely mounted and operates correctly. This article provides a detailed guide to installing a ceiling fan on a vaulted ceiling, covering necessary preparations, component selection, step-by-step installation procedures, and essential safety considerations.
Before beginning the installation process, it is crucial to understand the specific requirements of installing a fan on a vaulted ceiling. A standard ceiling fan mount is designed for a horizontal surface. Attempting to use a standard mount on a sloped ceiling will result in an unstable and potentially dangerous installation. Moreover, the angle of the ceiling can affect the fan's performance and aesthetics if not properly addressed.
Key Point 1: Preparing for Installation
Proper preparation is paramount to a successful and safe ceiling fan installation on a vaulted ceiling. This includes gathering the necessary tools and materials, understanding the ceiling's structure, and turning off the power to the circuit.
Gathering Tools and Materials: The following tools and materials are typically required for this project:
- Ceiling fan specifically designed for vaulted ceilings (or adaptable with a slope adapter kit)
- Slope adapter kit (if required by the fan model)
- Downrod (appropriate length for the ceiling height and slope)
- Wire stripper
- Wire connectors (wire nuts)
- Electrical tape
- Screwdrivers (Phillips and flathead)
- Pliers
- Voltage tester
- Stud finder
- Level
- Drill with various drill bits (including a pilot hole bit)
- Safety glasses
- Gloves
- Ladder or scaffolding (ensuring stable footing)
Identifying the Ceiling Joist: Locating the ceiling joist is critical for securing the ceiling fan mounting bracket. A stud finder can be used to identify the joist. If the existing electrical box is not directly attached to a joist, it will need to be replaced with a fan-rated electrical box that can be securely mounted to the joist. This is essential for supporting the weight and vibration of the ceiling fan.
Electrical Safety: Before commencing any electrical work, the power to the circuit must be turned off at the circuit breaker. Using a voltage tester, confirm that the power is indeed off at the existing electrical box. This is a crucial safety step to prevent electrical shock.
Selecting the Appropriate Downrod Length: The length of the downrod is crucial for proper airflow and aesthetics. On a vaulted ceiling, a longer downrod is often necessary to lower the fan blades to an optimal height for effective air circulation. The general rule of thumb is to have the fan blades at least 7 feet from the floor. Consider the ceiling's slope and the desired height when selecting the downrod length.
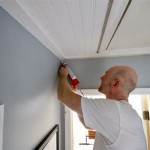
Key Point 2: Installing the Mounting Bracket and Wiring
The installation of the mounting bracket and electrical wiring are crucial steps that require precision and adherence to safety guidelines. Ensuring a secure and properly wired connection is essential for the safe operation of the ceiling fan.
Removing the Existing Fixture: Carefully remove the existing light fixture, disconnecting the wires one at a time. Note the color of each wire and its corresponding connection on the fixture. This will help ensure correct wiring of the ceiling fan. Cap the exposed wires with wire nuts for safety until the new fan is ready to be connected.
Installing the Fan-Rated Electrical Box: If the existing electrical box is not fan-rated, it needs to be replaced. Remove the existing box and install a fan-rated electrical box that is securely attached to the ceiling joist. This usually involves screwing the box directly into the joist using heavy-duty screws. Ensure the box is flush with the ceiling surface.
Attaching the Mounting Bracket: Attach the appropriate mounting bracket that is compatible with the ceiling fan and vaulted ceiling. This might involve using a slope adapter kit, which allows the fan to hang level despite the ceiling's angle. Secure the mounting bracket to the fan-rated electrical box using the screws provided. Ensure the bracket is securely fastened and level.
Wiring the Ceiling Fan: Connect the ceiling fan wires to the corresponding wires from the electrical box. Typically, this involves connecting the black wire (hot) to the black wire, the white wire (neutral) to the white wire, and the green or bare copper wire (ground) to the green or bare copper wire. Use wire connectors (wire nuts) to securely join the wires, and wrap the connections with electrical tape for added insulation. Ensure that all connections are tight and secure.
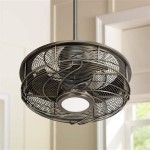
Key Point 3: Assembling and Hanging the Ceiling Fan
The final steps involve assembling the fan motor and blades, attaching them to the downrod, and hanging the fan assembly from the mounting bracket. These steps require careful attention to detail and adherence to the manufacturer's instructions.
Assembling the Fan Motor and Blades: Assemble the fan motor according to the manufacturer's instructions. This typically involves attaching the fan blades to the motor housing using screws. Ensure that all screws are tightened securely to prevent vibration and noise during operation.
Connecting the Downrod: Attach the downrod to the fan motor housing. This usually involves inserting the downrod through the motor housing and securing it with a pin or screws. Ensure that the downrod is properly aligned and securely attached.
Hanging the Fan Assembly: Carefully lift the fan assembly and hang it from the mounting bracket on the ceiling. This typically involves aligning the downrod with the opening in the mounting bracket and securing it with a pin or screws. Ensure that the fan assembly is securely attached and hangs level.
Wiring the Fan Components: Connect the wires from the fan motor to the wires in the canopy (the cover that conceals the mounting bracket). This typically involves connecting the wires for the fan motor, light kit (if applicable), and remote control receiver (if applicable) according to the manufacturer's instructions. Use wire connectors (wire nuts) to securely join the wires, and wrap the connections with electrical tape for added insulation.
Securing the Canopy: Once all the wiring is complete, carefully tuck the wires into the electrical box and secure the canopy to the mounting bracket. This typically involves aligning the canopy with the mounting bracket and tightening the screws. Ensure that the canopy is flush with the ceiling and securely attached.
Installing the Light Kit and Other Accessories: If the ceiling fan includes a light kit or other accessories, install them according to the manufacturer's instructions. This typically involves attaching the light kit to the fan motor housing and connecting the wires.
Testing the Fan: After the installation is complete, turn the power back on at the circuit breaker. Test the fan to ensure that it operates correctly. Check that the fan blades rotate smoothly and that the light kit (if applicable) is functioning properly. Also, check for any unusual noises or vibrations. If any issues are detected, turn off the power and re-examine the wiring and connections.
Installing a ceiling fan on a vaulted ceiling requires careful planning, attention to detail, and adherence to safety guidelines. By following these steps and consulting the manufacturer's instructions, it is possible to achieve a safe and effective installation that enhances the comfort and efficiency of the room.

How To Install A Ceiling Fan On Sloped Lemon Thistle

How To Choose A Ceiling Fan For Vaulted Ceilings Lightology

Ensuring Proper Ceiling Fan Installation With Vaulted Ceilings

How To Install A Ceiling Fan On Sloped Lemon Thistle

Fans On An Angle Installing Ceiling Angled Or Raked

How To Choose A Ceiling Fan For Vaulted Ceilings Lightology

How To Install Vaulted Ceiling Fan

Smart Choice For A Ceiling Fan

Vaulted Ceiling Fans Sloped Lightology

Ceiling Fans For Angled Ceilings
Related Posts