Installing Ceiling Fans on Sloped Walls: A Comprehensive Guide
Ceiling fans offer an efficient and cost-effective solution for climate control in residential spaces. They circulate air, providing cooling during warmer months and assisting with heat distribution during cooler periods. While standard ceiling fan installations are relatively straightforward, installing a ceiling fan on a sloped ceiling presents unique challenges. Addressing these challenges correctly ensures safe operation, optimal performance, and aesthetic integration with the room's design.
This article provides a detailed guide on installing ceiling fans on sloped walls. It covers various aspects, from assessing the slope and selecting the appropriate hardware to the step-by-step installation process. It also explores potential problems and their solutions to ensure a successful and safe installation.
Understanding the Challenges of Sloped Ceiling Fan Installation
Installing a ceiling fan on a sloped ceiling differs significantly from a standard flat ceiling installation. The primary challenge lies in ensuring the fan hangs plumb and level to operate correctly. Several factors contribute to this difficulty:
1. Angle of the Slope: The angle of the ceiling slope directly affects the type of mounting hardware required. Steeper slopes necessitate specialized mounting brackets and longer downrods than shallower slopes.
2. Electrical Wiring: The electrical box must be properly rated and securely mounted to handle the weight and vibration of the ceiling fan. Existing wiring may need modification or replacement to meet current safety standards and accommodate the fan's electrical requirements.
3. Fan Blade Clearance: Adequate clearance between the fan blades and the ceiling is crucial for efficient airflow and to prevent the blades from striking the ceiling. This becomes more complex with sloped ceilings, as the distance between the blade tips and the ceiling varies depending on the angle of the slope.
4. Aesthetic Considerations: A ceiling fan installed on a sloped ceiling should visually integrate with the room. Selecting a fan design and finish that complements the existing décor is an important consideration.
Preparing for the Installation
Proper preparation is essential for a safe and successful ceiling fan installation on a sloped ceiling. This involves assessing the site, gathering the necessary tools and materials, and understanding the relevant electrical codes.
1. Assessing the Ceiling Slope: The first step is to determine the angle of the ceiling slope. This can be accomplished using a level and a protractor, or more conveniently, with a digital angle finder. Knowing the exact slope angle is crucial for selecting the appropriate mounting hardware.
2. Inspecting the Electrical Box: Verify that an electrical box specifically rated for ceiling fans is installed. Standard light fixture boxes are typically not strong enough to support the weight and vibration of a ceiling fan and can lead to a hazardous situation. The box should be securely attached to a ceiling joist.
3. Selecting the Appropriate Mounting Hardware: For sloped ceilings, a specialized mounting bracket or adapter is required. These brackets allow the fan to hang plumb even when attached to an angled surface. Choose a bracket designed for the specific angle of your ceiling slope. Additionally, a longer downrod may be necessary to ensure adequate fan blade clearance.
4. Gathering Tools and Materials: The following tools and materials are typically required for installing a ceiling fan on a sloped ceiling:
- Ceiling fan (with all included hardware)
- Sloped ceiling adapter or mounting bracket
- Appropriately sized downrod (if needed)
- Wire stripper
- Wire connectors
- Screwdrivers (Phillips and flathead)
- Pliers
- Electrical tape
- Voltage tester
- Level
- Ladder
- Safety glasses
- Work gloves
5. Reviewing Electrical Codes: Familiarize yourself with local electrical codes and regulations. These codes dictate the proper wiring methods, grounding requirements, and safety standards for ceiling fan installations.
6. Disconnecting Power: Before commencing any electrical work, turn off the power to the circuit at the breaker box. Use a voltage tester to confirm that the power is off at the electrical box before proceeding.
Step-by-Step Installation Process
The following steps outline the process of installing a ceiling fan on a sloped ceiling. These steps assume that a correctly rated electrical box and appropriate mounting hardware are already in place. If not, these elements must be addressed prior to proceeding with the steps below.
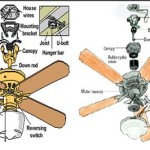
1. Installing the Mounting Bracket: Attach the sloped ceiling adapter or mounting bracket to the electrical box, following the manufacturer's instructions. Ensure the bracket is securely fastened and properly aligned to allow the downrod to hang vertically.
2. Assembling the Fan Motor and Downrod: Assemble the fan motor to the downrod, following the manufacturer's instructions. The length of the downrod should be sufficient to provide adequate clearance between the fan blades and the ceiling. Generally, a longer downrod is required for steeper slopes.
3. Wiring the Fan: Carefully connect the wires from the fan motor to the corresponding wires in the electrical box. Typically, this involves connecting the black (hot) wire, white (neutral) wire, and green (ground) wire. Use wire connectors to secure the connections and wrap them with electrical tape. Refer to the fan's wiring diagram for specific instructions.
4. Hanging the Fan Motor Assembly: Carefully lift the fan motor assembly and insert the downrod into the mounting bracket. Secure the assembly according to the bracket manufacturer's instructions. This may involve using pins, screws, or other locking mechanisms.
5. Installing the Fan Blades: Attach the fan blades to the motor housing, following the manufacturer's instructions. Ensure that all blades are securely fastened and balanced to prevent wobbling.
6. Installing the Light Kit (if applicable): If the fan includes a light kit, install it according to the manufacturer's instructions. This typically involves connecting the light kit's wires to the appropriate terminals on the fan motor.
7. Installing the Canopy: Attach the canopy to the mounting bracket to conceal the wiring and provide a finished appearance. Secure the canopy according to the manufacturer's instructions.
8. Testing the Fan: Restore power to the circuit at the breaker box. Test the fan to ensure that it operates correctly at all speeds. Verify that the light kit (if applicable) functions properly. Check for any unusual noises or vibrations.
Addressing Potential Problems
Despite careful planning and execution, some problems may arise during or after the installation of a ceiling fan on a sloped ceiling. Addressing these issues promptly and effectively is crucial for ensuring safe and reliable operation.
1. Fan Wobbling: Fan wobbling can be caused by several factors, including unbalanced blades, loose screws, or an improperly installed mounting bracket. First, check that all screws are tightened securely. If the wobbling persists, try balancing the blades using a fan balancing kit. In some cases, the mounting bracket may need to be adjusted or replaced.
2. Insufficient Fan Blade Clearance: If the fan blades are too close to the ceiling, they may strike the ceiling or not circulate air effectively. This can be resolved by using a longer downrod to lower the fan. Ensure that the downrod is compatible with the fan motor and mounting bracket.
3. Electrical Problems: Electrical problems can manifest as a failure to operate, flickering lights, or tripped circuit breakers. Check the wiring connections to ensure they are secure and properly insulated. If the problem persists, consult a qualified electrician to diagnose and repair the electrical issue.
4. Noise: Ceiling fans can sometimes produce noise due to loose parts, motor vibration, or airflow turbulence. Tighten all screws and secure any loose components. If the noise persists, try lubricating the motor bearings or adjusting the blade pitch.
5. Incompatibility of Sloped Ceiling Adapter: Verify that the mounting bracket is suitable for the ceiling angle. Incorrect sloped angle will not allow the fan to hang plumb, causing wobbling or even unsafe load distribution and potential falling hazards.
6. Downrod Diameter Mismatch: Match the downrod to the existing mounting hardware and fan motor hole. A downrod that doesn't properly fit will leave gaps and may contribute to wobbling or even potential mechanical failure.

How To Install A Ceiling Fan On Sloped Lemon Thistle

Ensuring Proper Ceiling Fan Installation With Vaulted Ceilings

How To Install A Ceiling Fan On Sloped Lemon Thistle

Electrical Mount Ceiling Fan At The Peak Of A Sloped Home Improvement Stack Exchange

Mounting Ceiling Fan On Sloped Home Improvement Stack Exchange

How To Choose A Ceiling Fan For Vaulted Ceilings Lightology

Vaulted Sloped Ceiling Adapter For Modern Fan Company Fans

How To Choose A Ceiling Fan For Vaulted Ceilings Lightology

How To Install A Ceiling Fan On Sloped Lemon Thistle

How To Choose A Ceiling Fan For Vaulted Ceilings Lightology
Related Posts