Installing a Ceiling Fan on a Sloped Wall: A Comprehensive Guide
Installing a ceiling fan can significantly improve air circulation and reduce energy costs in a room. However, installing a ceiling fan on a sloped ceiling presents unique challenges compared to installing one on a flat ceiling. Careful planning and the use of specialized hardware are essential for a safe and effective installation. This article provides a comprehensive guide to installing a ceiling fan on a sloped wall, outlining the necessary considerations, tools, and steps involved.
Understanding Sloped Ceiling Considerations
Before commencing the installation, it is crucial to understand the specific challenges posed by sloped ceilings. The primary concern is ensuring the ceiling fan hangs vertically and has sufficient clearance from the ceiling. A standard ceiling fan mount is designed for a flat surface and will not properly support a fan on a sloped ceiling. This can lead to instability, wobbling, and potential damage to the fan, the ceiling, or even injury.
The angle of the slope is also a critical factor. Less steep slopes might be accommodated with a standard downrod and a special mounting bracket, while steeper slopes necessitate the use of an extended downrod. The longer the downrod, the lower the fan hangs and the greater the clearance between the fan blades and the ceiling. Building codes in many jurisdictions also specify minimum distances between fan blades and the ceiling or floor.
Another important consideration is the structural integrity of the ceiling. Ensure the electrical box is securely mounted to a ceiling joist capable of supporting the weight of the fan. Standard electrical boxes are often not designed to hold the weight of a ceiling fan and should be replaced with a fan-rated electrical box.
Essential Tools and Materials
Successful installation requires the right tools and materials. Gathering these items before starting will streamline the process and ensure a professional-looking result.
The necessary tools include:
- Screwdriver set (Phillips head and flathead)
- Wire strippers/crimpers
- Pliers
- Adjustable wrench
- Electrical tape
- Voltage tester
- Ladder
- Drill with various drill bits (including a pilot bit)
- Stud finder
- Level
- Tape measure
- Pencil
- Safety glasses
- Gloves
The required materials include:
- Ceiling fan (with instructions)
- Sloped ceiling adapter/mounting bracket
- Downrod (appropriate length for the ceiling slope)
- Fan-rated electrical box
- Wire connectors (wire nuts)
- Electrical wiring (if needed)
- Screws and bolts (appropriate for the mounting bracket and fan)
- Optional: Decorative ceiling medallion
The length of the downrod is determined by the ceiling's slope and the desired height of the fan. Measure the distance from the ceiling to the desired fan height. Consider the blade span of the fan and ensure adequate clearance from walls and furniture. Consult the fan manufacturer's instructions for specific downrod length recommendations.
Step-by-Step Installation Process
Following a systematic approach is essential for a safe and effective ceiling fan installation on a sloped wall.
Step 1: Safety First - Disconnect Power
Before working with any electrical wiring, it is paramount to disconnect the power supply to the circuit at the breaker box. Verify the power is off using a voltage tester at the existing electrical box. This step is crucial for preventing electrical shock and ensuring personal safety.
Step 2: Remove the Existing Fixture
Carefully remove the existing light fixture from the ceiling. Disconnect the wires, taking note of their connections (e.g., black to black, white to white, ground to ground). Use wire connectors to cap off the exposed wires for safety while you prepare for the new installation.
Step 3: Install a Fan-Rated Electrical Box
If the existing electrical box is not fan-rated, it must be replaced with one that is specifically designed to support the weight and vibration of a ceiling fan. Locate a ceiling joist using a stud finder. If necessary, reinforce the joist with additional bracing. Securely mount the fan-rated electrical box to the joist using appropriate screws and bolts. Ensure the box is flush with the ceiling surface.
Step 4: Install the Sloped Ceiling Adapter
The sloped ceiling adapter, also known as a mounting bracket, is a crucial component for a successful installation. This bracket is designed to provide a level surface for the fan motor, compensating for the slope of the ceiling. Attach the bracket to the fan-rated electrical box according to the manufacturer's instructions. Ensure the bracket is securely fastened and aligned properly. Some brackets allow for adjusting the angle to perfectly match the slope of the ceiling.
Step 5: Assemble the Ceiling Fan
Assemble the ceiling fan motor and blades according to the manufacturer's instructions. This usually involves attaching the blades to the motor housing and connecting the wiring harness. Pay close attention to the instructions to ensure proper assembly and balance.
Step 6: Attach the Downrod
Connect the downrod to the fan motor housing. Thread the fan's wiring through the downrod. Secure the downrod with the provided pins or screws. The length of the downrod will depend on the slope of the ceiling and the desired height of the fan.
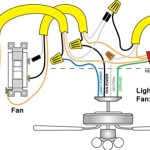
Step 7: Wire the Ceiling Fan
Carefully lift the assembled fan and insert the downrod through the opening in the sloped ceiling adapter. Connect the wires from the fan to the wires in the electrical box using wire connectors. Match the colors carefully: black to black (power), white to white (neutral), and green or bare copper to green or bare copper (ground). Secure the connections with electrical tape. Ensure no bare wire is exposed.
Step 8: Secure the Fan to the Mounting Bracket
Carefully lift the fan and secure the downrod to the mounting bracket. This usually involves aligning the holes in the downrod with the corresponding holes in the bracket and inserting screws or bolts. Tighten the screws securely. Double-check that the fan is hanging vertically and is properly supported by the bracket.
Step 9: Install the Fan Blades
Attach the fan blades to the motor housing. This usually involves screwing the blades into the blade holders. Ensure the blades are securely fastened and properly aligned. Use a level to check that the blades are balanced. If necessary, use balancing weights to correct any imbalances.
Step 10: Install the Light Kit (if applicable)
If the ceiling fan includes a light kit, follow the manufacturer's instructions to install the light fixture. Connect the wires from the light kit to the wires in the fan motor housing. Secure the light fixture to the fan.
Step 11: Test the Fan
Restore power to the circuit at the breaker box. Test the fan to ensure it is operating correctly. Check the fan speed settings, the light kit (if applicable), and the direction of rotation. Ensure the fan is not wobbling excessively. If necessary, adjust the balancing weights to correct any wobbling.
Step 12: Final Inspection and Cleanup
Inspect the installation to ensure all components are securely fastened and properly aligned. Clean up any debris from the installation process. Ensure all tools and materials are stored safely.
Addressing Common Challenges
Despite careful planning, some challenges may arise during the installation process. Understanding these potential problems and knowing how to address them can save time and frustration.
Challenge 1: Insufficient Ceiling Joist Support
If the existing ceiling joist is not strong enough to support the weight of the fan, it may be necessary to reinforce it. This can be done by adding additional bracing to the joist or by installing a support beam between two joists. Consult with a qualified contractor if you are unsure about the structural integrity of your ceiling.
Challenge 2: Excessive Wobbling
Excessive wobbling can be caused by several factors, including unbalanced blades, loose screws, or a misaligned mounting bracket. First, check that all screws are securely tightened. Then, use the included balancing weights to adjust the balance of the blades. If the wobbling persists, inspect the mounting bracket to ensure it is properly aligned and securely fastened.
Challenge 3: Incorrect Wiring
Incorrect wiring can cause the fan to malfunction or even pose a safety hazard. If you are unsure about the wiring connections, consult with a qualified electrician. Double-check that all wires are properly connected and that no bare wire is exposed.
Challenge 4: Downrod Length Issues
Choosing the correct downrod length is crucial for optimal airflow and aesthetics. If the downrod is too short, the fan blades may be too close to the ceiling, restricting airflow. If the downrod is too long, the fan may hang too low, creating a safety hazard. Measure carefully and consult the fan manufacturer's instructions to determine the appropriate downrod length.
By carefully following these steps, taking safety precautions, and addressing potential challenges, homeowners can successfully install a ceiling fan on a sloped wall and enjoy the benefits of improved air circulation and energy efficiency. If any uncertainty or difficulty arises, consulting a licensed electrician or experienced handyman is always recommended.

How To Install A Ceiling Fan On Sloped Lemon Thistle

How To Choose A Ceiling Fan For Vaulted Ceilings Lightology

Ensuring Proper Ceiling Fan Installation With Vaulted Ceilings

How To Find Ceiling Fans Slope Adapters And Downrods For Angled Ceilings Delmarfans Com

How To Choose A Ceiling Fan For Vaulted Ceilings Lightology

Vaulted Sloped Ceiling Adapter For Modern Fan Company Fans Stardust

Install Ceiling Fan On Sloped Simple Modern Handmade Home

How To Choose A Ceiling Fan For Vaulted Ceilings Lightology

Hunter Fans How To Install Your Ceiling Fan Cpo

Install Ceiling Fan On Sloped Simple Modern Handmade Home
Related Posts