How To Wire A Light On Ceiling Fan
Ceiling fans are a great way to circulate air and keep your home cool. They can also be a great way to add style to a room. If you're looking to install a ceiling fan with a light, it's important to know how to wire it properly. Here are the steps you need to follow:
1. Gather your materials. You will need the following materials:
- Ceiling fan
- Wire nuts
- Electrical tape
- Screwdriver
- Pliers
2. Turn off the power. This is the most important step, as it will prevent you from getting shocked. Go to your home's electrical panel and turn off the circuit breaker that powers the room where you will be installing the ceiling fan.
3. Remove the old ceiling fan (if there is one). If there is an old ceiling fan installed, you will need to remove it before you can install the new one. To do this, disconnect the wires from the fan and then unscrew the mounting bracket from the ceiling. Remove the old fan from the ceiling and set it aside.
4. Mount the new ceiling fan. Take the new ceiling fan and mount it to the ceiling according to the manufacturer's instructions. Make sure that the fan is securely mounted and that the wires are not pinched or damaged.
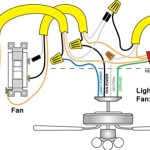
5. Connect the wires. Now it's time to connect the wires. The wires from the ceiling will be color-coded. The black wire is the hot wire, the white wire is the neutral wire, and the green or bare copper wire is the ground wire. Connect the black wire from the ceiling to the black wire from the fan. Connect the white wire from the ceiling to the white wire from the fan. Connect the green or bare copper wire from the ceiling to the green or bare copper wire from the fan.
6. Secure the wire nuts. Once the wires are connected, secure them with wire nuts. Twist the wire nuts onto the wires until they are tight. Then, wrap electrical tape around the wire nuts to insulate them.
7. Turn on the power. Once the wires are connected and secured, turn on the power at the electrical panel. The ceiling fan should now be working properly.
8. Enjoy your new ceiling fan! Your new ceiling fan is now installed and ready to use. Enjoy the cool breeze and the added style that it brings to your room.
Here are some additional tips for wiring a ceiling fan with a light:
- If you are not comfortable working with electricity, it is best to hire a qualified electrician to install your ceiling fan.
- Make sure that the ceiling fan is properly grounded. This will help to prevent electrical shocks.
- Use the correct size wire nuts. Wire nuts that are too small can come loose and cause a fire.
- Wrap electrical tape around the wire nuts to insulate them. This will help to prevent electrical shocks.
- Test the ceiling fan to make sure that it is working properly before you use it.

Replacing A Ceiling Fan Light With Regular Fixture Jlc
Replacing A Ceiling Fan Light With Regular Fixture Jlc

Wiring A Ceiling Fan And Light With Diagrams Ptr

How To Wire A Ceiling Fan Temecula Handyman

How To Wire A Ceiling Fan Temecula Handyman
How To Wire A Ceiling Fan Light Switch Quora

Installing A Ceiling Fan Fine Homebuilding

Wiring A Ceiling Fan And Light With Diagrams Installation

How To Replace A Ceiling Fan With Pendant Light

Ceiling Fan Wiring Diagram With Light Dimmer
Related Posts

