How to Wire a Ceiling Fan with Light Fixture: A Comprehensive Guide
Installing a ceiling fan with a light fixture can enhance the aesthetics and functionality of any room. While it may seem like a daunting task, it can be accomplished with the right tools, materials, and a step-by-step approach.
Materials You'll Need:
- Ceiling fan with light fixture
- Phillips and flathead screwdrivers
- Wire strippers
- Electrical tape
- Ceiling fan mounting bracket
- Screws and electrical connectors
Step 1: Safety First
Before starting any electrical work, turn off the power to the ceiling fan circuit at the breaker panel. Ensure the power is off by using a non-contact voltage tester.
Step 2: Prepare the Mounting Bracket
Locate the ceiling joist and install the mounting bracket securely using the provided screws. The bracket should be level and centered.
Step 3: Feed the Wires
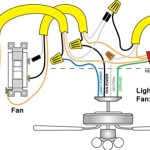
Feed the electrical wires from the ceiling through the center hole of the mounting bracket. Separate the wires into three groups: ground (bare copper), neutral (white), and hot (black or red).
Step 4: Connect the Ground Wires
Twist the bare copper ground wires from the fan, light fixture, and ceiling together. Secure them with a wire connector and electrical tape.
Step 5: Connect the Neutral Wires
Twist all the white neutral wires together. Secure them with a wire connector and electrical tape.
Step 6: Connect the Hot Wires
Identify the hot wire from the ceiling (black or red) and connect it to the black or red wire from the fan. Secure the connection with a wire connector and electrical tape.
Step 7: Connect the Light Fixture
Connect the white and black wires from the light fixture to the corresponding wires on the fan. Secure the connections with wire connectors and electrical tape.
Step 8: Test the Fan and Light
Turn on the power at the breaker panel and operate the fan and light. Ensure they are functioning properly.
Step 9: Install the Fan Blades
Attach the fan blades to the motor hub according to the manufacturer's instructions.
Step 10: Install the Light Kit
Assemble the light kit and install it on the fan.
Step 11: Balance the Fan
If the fan wobbles, use the included balancing kit to adjust the blades until the wobbling is eliminated.
Important Tips:
- Follow the manufacturer's instructions carefully.
- Ensure all electrical connections are secure and well-insulated.
- If you are not comfortable working with electricity, hire a qualified electrician.
- Always turn off the power before performing any maintenance or repairs.
By following these steps and taking necessary safety precautions, you can successfully wire a ceiling fan with a light fixture and enjoy its benefits.

Replacing A Ceiling Fan Light With Regular Fixture Jlc

Replacing A Ceiling Fan Light With Regular Fixture Jlc

How To Replace A Ceiling Fan With Pendant Light

Wiring A Ceiling Fan And Light With Diagrams Ptr

How To Replace A Ceiling Fan With Pendant Light

How To Wire A Ceiling Fan Light Switch Quora

Ceiling Fan Light Fixture Replacement Ifixit Repair Guide

Graphic Ceiling Fan With Light Wiring Switch

Wiring A Ceiling Fan Light Part 2

Ceiling Fan Wiring Diagram Power Into Light
Related Posts