How To Replace a Light Switch in a Hunter Ceiling Fan
The light switch in a Hunter ceiling fan, like any mechanical or electrical component, can fail over time. Frequent use, power surges, or simply the degradation of materials can render the switch inoperable. Replacing a faulty light switch can restore the functionality of the Hunter ceiling fan's lighting system without the expense of replacing the entire fixture. This article provides a comprehensive guide to replacing a light switch in a Hunter ceiling fan, covering safety precautions, necessary tools, and step-by-step instructions.
Before commencing any electrical work, it is crucial to prioritize safety. Electricity poses a significant risk of shock and injury if handled improperly. Disconnecting the power supply at the circuit breaker is the most important safety measure. This ensures that there is no live current flowing through the fan's wiring during the replacement process. Double-checking that the power is off with a non-contact voltage tester is recommended for added safety. If there is any doubt about one's ability to safely perform the task, consulting a qualified electrician is strongly advised.
Essential Tools and Materials
Replacing a light switch in a Hunter ceiling fan requires specific tools and materials to ensure a safe and effective repair. Gathering all the necessary items before starting the project saves time and minimizes potential frustrations. The following list outlines the essential tools and materials needed:
*Screwdriver Set:
A set of screwdrivers, including both Phillips head and flathead screwdrivers, is essential for removing screws and accessing the fan's internal components. Different sizes of screwdrivers may be required depending on the specific model of the Hunter ceiling fan. *Wire Strippers:
Wire strippers are used to remove the insulation from the ends of wires, exposing the conductive metal for making connections. A good quality wire stripper will provide clean cuts without damaging the wire itself. *Wire Connectors (Wire Nuts):
Wire connectors, commonly referred to as wire nuts, are used to securely connect wires together. They provide insulation and prevent accidental short circuits. Different sizes of wire connectors are available for different wire gauges. *Needle-Nose Pliers:
Needle-nose pliers are useful for manipulating wires in tight spaces and for gripping small components. They can also be used to bend wires into the desired shape. *Electrical Tape:
Electrical tape is used to insulate and protect exposed wire connections. It can also be used to secure wires in place and prevent them from coming loose. *Non-Contact Voltage Tester:
A non-contact voltage tester is a safety tool that detects the presence of electricity without making direct contact with wires. It provides an extra layer of safety by confirming that the power is off before working on the fan. *New Light Switch:
The replacement light switch should be the correct type and rating for the Hunter ceiling fan. It is important to consult the fan's manual or the manufacturer's website to determine the appropriate replacement switch. A switch from Hunter is usually the easiest to install. *Ladder or Step Stool:
A sturdy ladder or step stool is necessary to safely reach the ceiling fan. *Safety Glasses:
Safety glasses protect the eyes from debris that may fall from the fan during disassembly.Having all these tools and materials readily available streamlines the replacement process and reduces the risk of complications.
Step-by-Step Instructions for Replacing the Light Switch
Once the necessary tools and materials are gathered and safety precautions are observed, the light switch replacement can begin. The following steps outline the procedure:
Step 1: Disconnect the Power:
Locate the circuit breaker that controls the ceiling fan and switch it to the "off" position. Verify that the power is off by using a non-contact voltage tester on the fan's wiring. This is the most important step to prevent electrical shock.Step 2: Remove the Light Kit:
Carefully remove the light kit from the ceiling fan. This typically involves unscrewing a few screws or releasing a retaining clip. Once the light kit is detached, gently lower it, supporting its weight to prevent it from falling. Disconnect the wires connecting the light kit to the fan's internal wiring. These connections are usually made with wire connectors.Step 3: Access the Switch Housing:
Identify the switch housing, which is typically located within the fan's motor housing. Depending on the specific model, the switch housing may be accessible by removing a decorative cap or panel. Consult the fan's manual for specific instructions on accessing the switch housing.Step 4: Remove the Old Light Switch:
Once the switch housing is accessible, locate the faulty light switch. Examine the switch wiring to understand how it is connected. The wires are usually connected to the switch terminals using screws or push-in connectors. Use a screwdriver to loosen the screws or depress the release tabs on the push-in connectors to disconnect the wires. Carefully remove the old light switch from the switch housing.Step 5: Connect the New Light Switch:
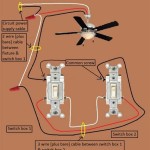
Connect the wires to the new light switch in the same configuration as the old switch. Ensure that each wire is securely connected to the correct terminal. Use wire connectors to connect the wires. Make sure all connections are tight and secure. If the new light switch uses push-in connectors, insert the bare end of the wire into the appropriate connector until it locks in place. For screw terminals, wrap the bare end of the wire around the screw in a clockwise direction before tightening the screw.Step 6: Reassemble the Switch Housing:
Carefully place the new light switch back into the switch housing. Ensure that the switch is properly positioned and secured. Reattach any decorative caps or panels that were removed to access the switch housing.Step 7: Reconnect the Light Kit:
Reconnect the wires connecting the light kit to the fan's internal wiring. Use wire connectors to make secure and insulated connections. Carefully lift the light kit back into place and secure it with screws or retaining clips.Step 8: Restore Power and Test:
Return to the circuit breaker and switch it to the "on" position. Test the new light switch by turning it on and off. Verify that the light kit functions properly. If the light does not turn on, double-check all wiring connections to ensure they are secure.Troubleshooting Tips
Even with careful attention to detail, issues may arise during the light switch replacement process. Here are some troubleshooting tips to address common problems:
*Light Not Working After Replacement:
Verify that the circuit breaker is in the "on" position. Double-check all wiring connections to ensure they are secure. Ensure that the replacement light switch is compatible with the Hunter ceiling fan model. Test the light bulb to ensure it is not burned out. *Loose Wire Connections:
Loose wire connections can cause intermittent lighting or a complete failure of the light. Use wire connectors to create secure and insulated connections. Ensure that the wire connectors are properly sized for the gauge of the wires being connected. *Difficulty Accessing the Switch Housing:
Consult the fan's manual for specific instructions on accessing the switch housing. The switch housing may be hidden behind a decorative panel or cap. If necessary, use a small screwdriver to carefully pry open the panel or cap. *Incorrect Wiring:
Incorrect wiring can cause the light to malfunction or damage the fan's internal components. Carefully examine the wiring of the old light switch before disconnecting it. Take pictures or make notes to ensure that the new switch is wired in the same configuration.Addressing these potential issues can help ensure a successful light switch replacement in a Hunter ceiling fan.
Replacing a light switch in a Hunter ceiling fan is a manageable task for individuals with basic electrical knowledge and a willingness to follow safety guidelines. By adhering to the steps outlined in this article, one can restore the functionality of their ceiling fan's lighting system and avoid the expense of replacing the entire fixture. Safety, preparation, and attention to detail are paramount to a successful outcome.
It is important to reiterate the importance of safety. Always disconnect the power at the circuit breaker and verify that the power is off before working on the fan's wiring. If you are not comfortable working with electricity, consult a qualified electrician.
With the proper tools, materials, and instructions, replacing a light switch in a Hunter ceiling fan can be a straightforward and rewarding DIY project. This article provides the necessary information to confidently undertake this task.

Replace A Hunter Ceiling Fan Pull Chain Switch Broken Fix

Hunter Fan Switch Repair

Hunter Fan Lights Don T Work Quick Fix And No Parts Needed

Hunter Ceiling Fan Control Wire Harness Repairs Start Sd Capacitors Reverse Switches 240 V Genuine Parts

Ceiling Light Switch Ze 110 3 Way Wire Fan Replacement Pull Chain Compatible With Hunter Brass

Ceiling Fan Light Repair Home Tutor

4 Ways To Replace A Ceiling Fan Pull Chain Switch Wikihow

Hunter Universal 3 Sd Fan Light Wall Switch With Receiver White 99771 The Home Depot

How To Install A Ceiling Fan Hunter

4a 125v Ceiling Fan Light Switch Pull Chain On Off For Hunter Lamp China Zipper Made In Com
Related Posts

